


Google Analytics event tracking opens up a whole new world of granular insights for your web analytics strategy. Using events, you can see exactly how users are interacting with your site, and slice and dice your data in novel ways to learn tons about your visitors.
Google Analytics event tracking is one of the most powerful features in Google Analytics, but it’s also one of the least utilized, at least on a broad scale and at a strategic level.
This article will outline events at a high level, how to set them up (in a few different ways), and some common mistakes to avoid when implementing Google Analytics event tracking.
Get brand new analytics strategies straight to your inbox every week. 23,739 people already are!
What Is GA Event Tracking and Why Is It Valuable?
You may use Google Analytics to view how many visitors read your blog each week, how many people come from organic vs. paid (and from specific campaigns), and what your conversion rate looks like--but did you know you can also use Google Analytics to see how many people played a video, downloaded a PDF, or even interacted with a promotional slider?
Google Analytics event tracking is an endlessly customizable feature of the platform that allows you to track specific user interactions with Labels, Categories, and Actions.
Taking a step back, from a high level that means you can track micro-interactions outside of your goal tracking. So, for example, if you have a goal set up for an ecommerce purchase (set when a visitor reaches your Thank You page), you can set up events for micro-interactions that occurred before they got there. These actions could include things like scroll depth, link clicks, video interaction, slider interaction, and many, many more interactions.
Really, you can track virtually any website element with event tracking, including:
- Video plays
- Link clicks
- PDF downloads
- Popup viewed
- Image clicked to enlarge
- Form field abandons
- Scrolling down a page
- Printing a page
...and on and on. Basically, any interaction a user can perform on a web page or experience can be tracked with an event (not everything, obviously, but an imaginative analyst can track most interactions).
Diving Deeper: How Google Analytics Event Tracking Works
I mentioned it briefly above but passed over it -- events are made up of a few different components:
- Category
- Action
- Label (optional, but recommended)
- Value (optional)
For example, if you set up an event for a video interaction on your product page, you might set up the following values for your event:
- Category: "Videos"
- Action: "Play"
- Label: "Product Demo Video"
Generally speaking, these levels get more specific and granular from Category (highest level) to Action and Label (most specific and granular).
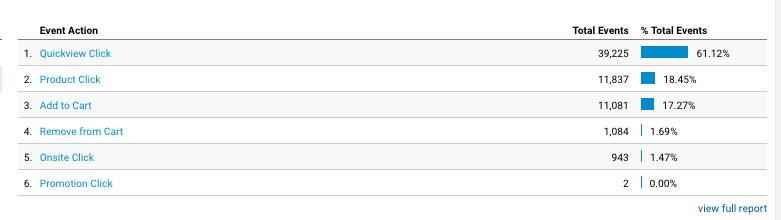
Event categories are broader labels for your events, usually something high level that would be like a folder for the Actions and Labels inside it:

Event actions are the specific actions or behaviors that users exhibit, like “click,” play,” and “50%,” (for scroll depth):
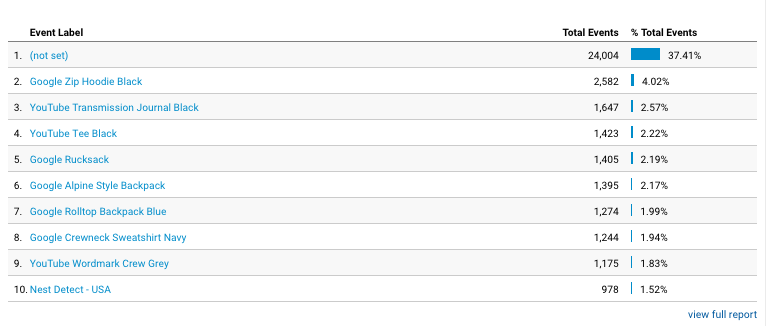
Event labels further clarify where the event occured, so they can be things like the title of the video that was played or on which page a link was clicked:
Event values are basically numeric values you can place on a specific event. This can help you quantitatively track the business value of given events, but it can also mislead you if you just set arbitrary values with no context or historic data to back it up.
Google Analytics event tracking is pretty easy to set up, though, even for the technical novice. You set up an event simply by adding a bit of JavaScript to your page.
The format for this goes something like this:
ga('send', 'event', [eventCategory], [eventAction], [eventLabel], [eventValue], [fieldsObject]);
Only the eventCategory and eventAction are required, but most set up an eventLabel for every event tracked as well. So, to walk you through an example, if we take the above hypothetical video interaction, this is what your event tracking code would look like:
ga('send', 'event', 'Videos', 'Play', 'Product Demo Video');
Another important factor to consider with Google Analytics event tracking is whether or not your event affects your bounce rate. You can have two types of events: Interaction and nonInteraction. If you set up an Interaction event, it will affect your bounce rate. If you set up a nonInteraction event, it won’t affect your bounce rate.
So, for the above example, if you wanted your event to be nonInteraction, it would look like this:
ga('send', 'event', 'Videos', 'Play', 'Product Demo Video', {
nonInteraction: true
});
Now you have a solid understanding of the way a piece of event tracking code fires and store information. Let’s go ahead and walk through how to set up an event, using Google Tag Manager as well as just writing the code.
If you’re just hard coding it, you just need to add a bit of JavaScript to your site to push an event to Google Analytics. Depending on if you’re using ga.js or analytics.js, it could be slightly different. The former, ga,js, is a legacy set up so we won’t cover it, but you can read a guide here if that’s how you need to set it up.
Okay, so let’s set up an event with a bit of code. Let’s say you have a contact page with a form and an email address. Your form is being tracked with goals, because it brings you to a thank you page--but you also want to see how many people click to email you.

The way you’d track that is basically by plugging in the values you’d like for Category, Action, and Label (and optionally Value as well), and wrapping that code on your link. It would look something like this:
onClick=”ga('send', 'event', 'Email', 'Click to Email', 'example@mail.com');”
If you’re looking to track events fired from third-party applications, you may have a bit more trouble with the basic event handlers, so you’ll probably need to look into the documentation of the specific tool.
For example, if you want to track events from your Sumo popup, here’s a guide that explains how to do so.
Realistically, being able to Google well is the real skill here.
To be clear, I almost exclusively use Google Tag Manager to set up event tracking--so if you’re not using GTM, you may want to read more extensive guides on setting it up the old school way:
Setting Up Google Analytics Event Tracking in Tag Manager
In my opinion, you should set up all event tracking through Google Tag Manager. It’s so much easier than hard coding it, and it’s a better control center to manage your tracking and tags.
One of the differences with Google Analytics event tracking is that it requires a lot more implementation knowledge than other things you can set up in Google Analytics. Essentially, you’re better off studying the nuances of Google Tag Manager and web development in general to get really good at event tracking.
While there are many built-in features that help you with Google Tag Manager, it still helps to get a good grasp on the fundamentals.
The best ways to do that are 1) diving in and experimenting (start a personal site and just try things out, and 2) learning from the experts (in this case, that’s basically Simo Ahava. He has a great course at CXL Institute you can take).
In any case, let’s walk through what it would practically take to set up an event in Google Tag Manager. We’re going to use my site as an example, and we’re going to set up an event to capture when people click submit on my lead capture form.
The process is likely going to be different if you use a different form tool, but this walkthrough will at least be practical and you can tweak how you set yours up based on your specific context.
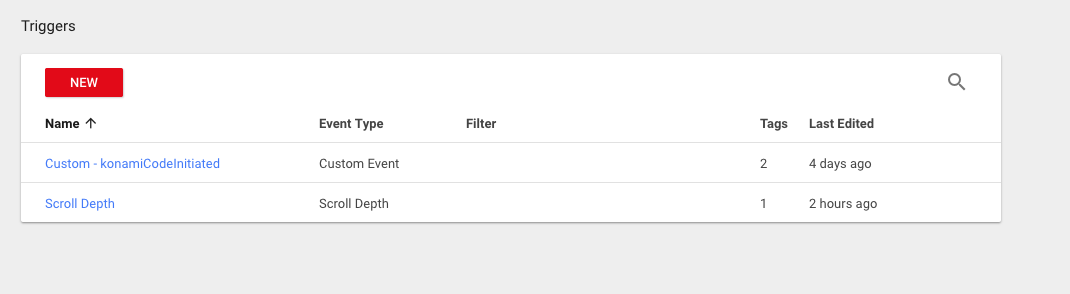
Triggers
First, we’re going to lay the groundwork and set up some generic click listeners. We’ll set up triggers to fire when users click links and when they click anything on the page.
Navigate to your Google Tag Manager account and click on Triggers.
Click the red “New” button to create a new trigger.
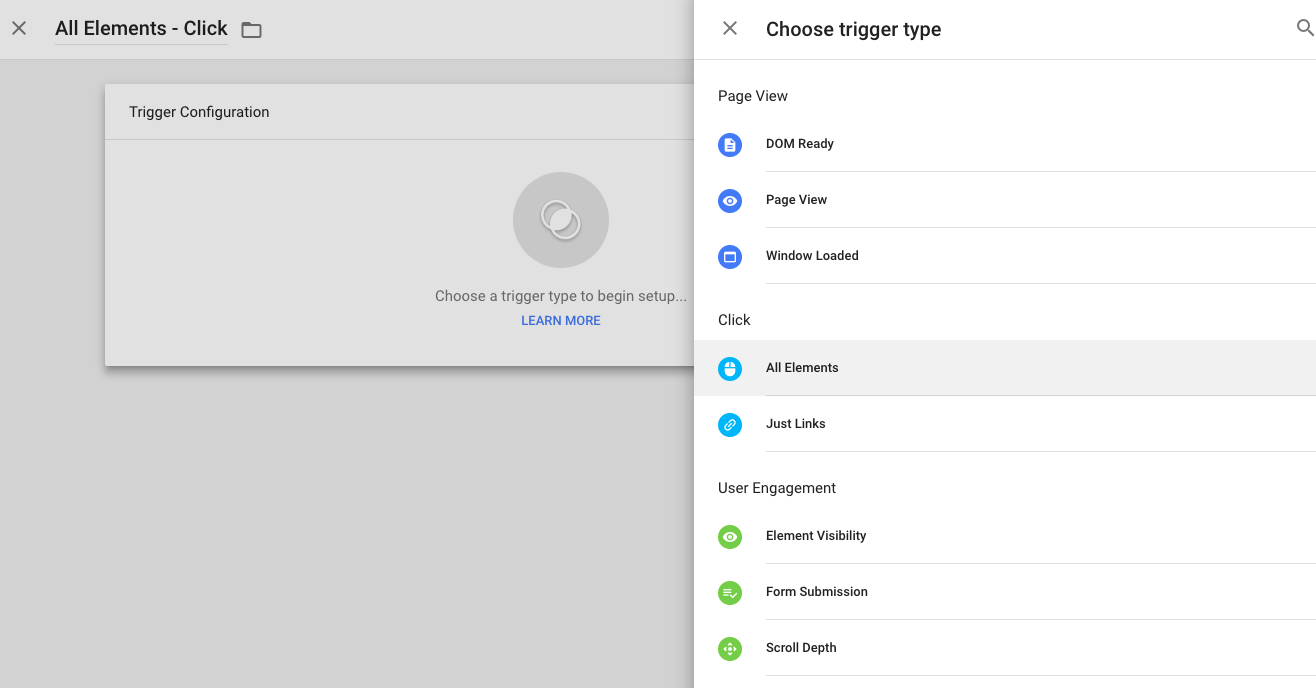
Google Tag Manager has a ton of built-in features that make things easier for the semi-technical or non-technical user. So, configure your trigger and choose which type you want. We’ll set up two triggers, one of which tracks all clicks:
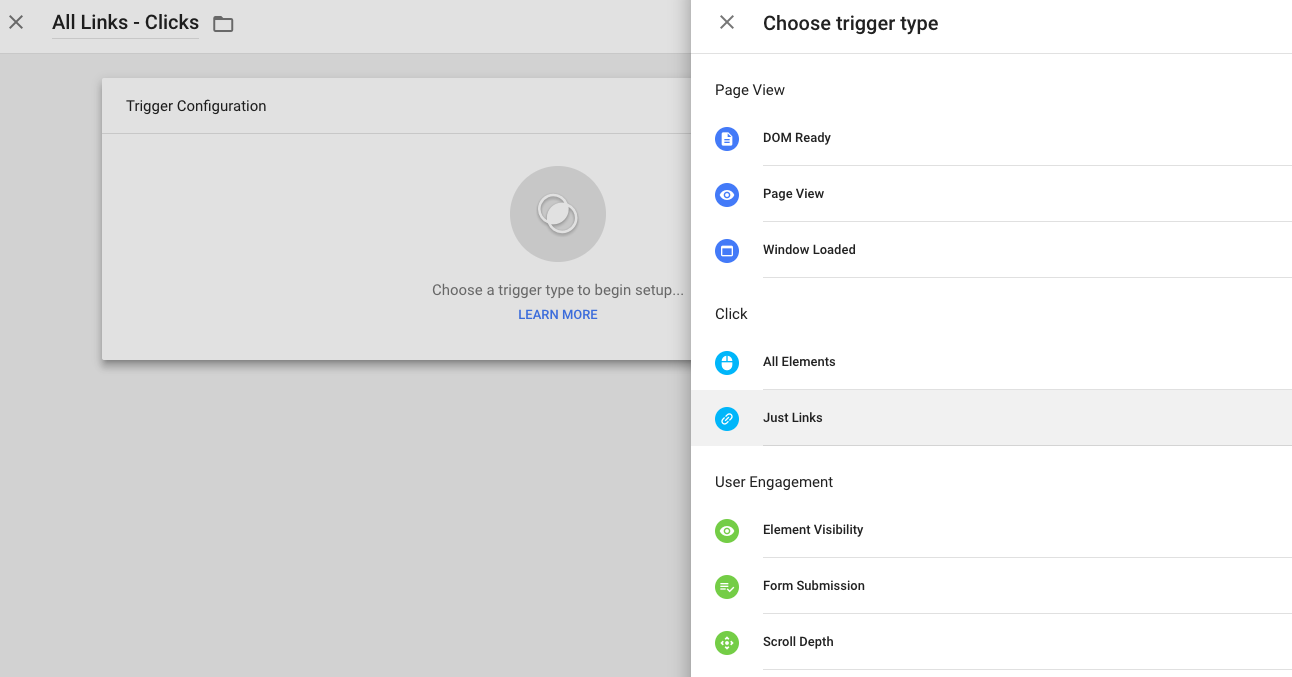
The next one we’ll set up is just on all link clicks:
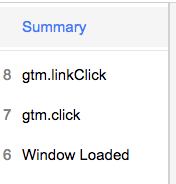
After you set these up, you can enter Preview Mode to see that your clicks are being recorded.
Preview your own site, and click on a random spot and also on a link. Your summary should show that both are being tracked.
Preview
Now, we’re going to use Preview Mode to see what kind of identifiers we can use to target clicks on our form. The form I use is two steps, so I want to track clicks on the first “Subscribe” button as well as clicks on the next step where a user actually submits the form. Also, in an ideal context, we want to know how many times the form is fired in the first place--but for the sake of the length of this article, we’ll skip over that for now.
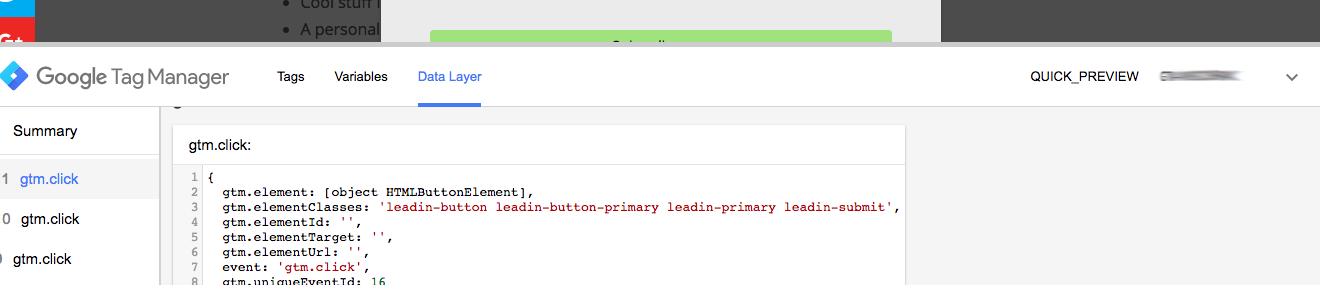
So, enter Preview Mode, go to your site, and click on the link that you’d like to target for an event. You can now click into the specific event that fired (here gtm.click) and view its details.

Go ahead and navigate over to the Data Layer tab, and we can see what kind of information is being captured when we click the subscribe button. An important piece of information we can grab onto here is the “gtm.elementClasses.” Copy that down somewhere.

Do the exact same thing with the second step of the form. Click the button and see what kind of information is being captured. The “gtm.elementClasses” is again important here. We’re going to use that information to set up a trigger in Google Tag Manager.
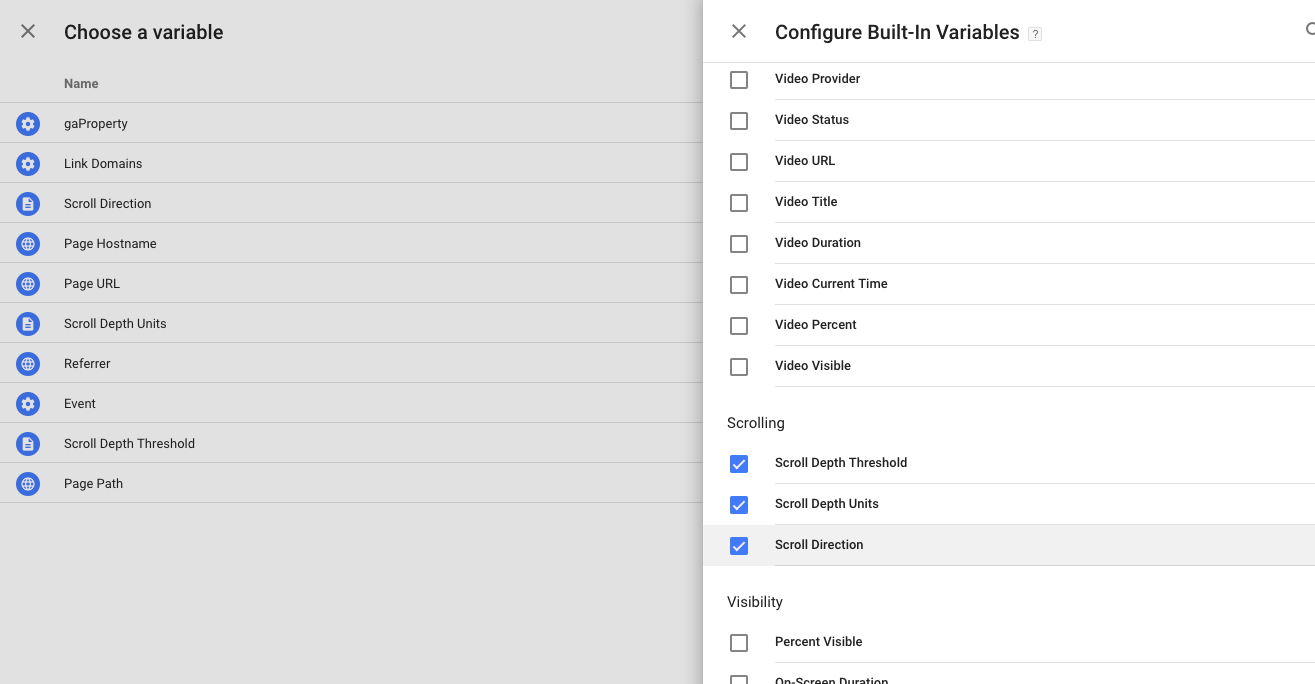
Actually, to take a step back, you’ll want to make sure that all of the necessary built-in variables are set up. Set up all the click based ones if you haven’t already (in GTM, navigate to “Variables,” click “Configure,” and check all those that apply):
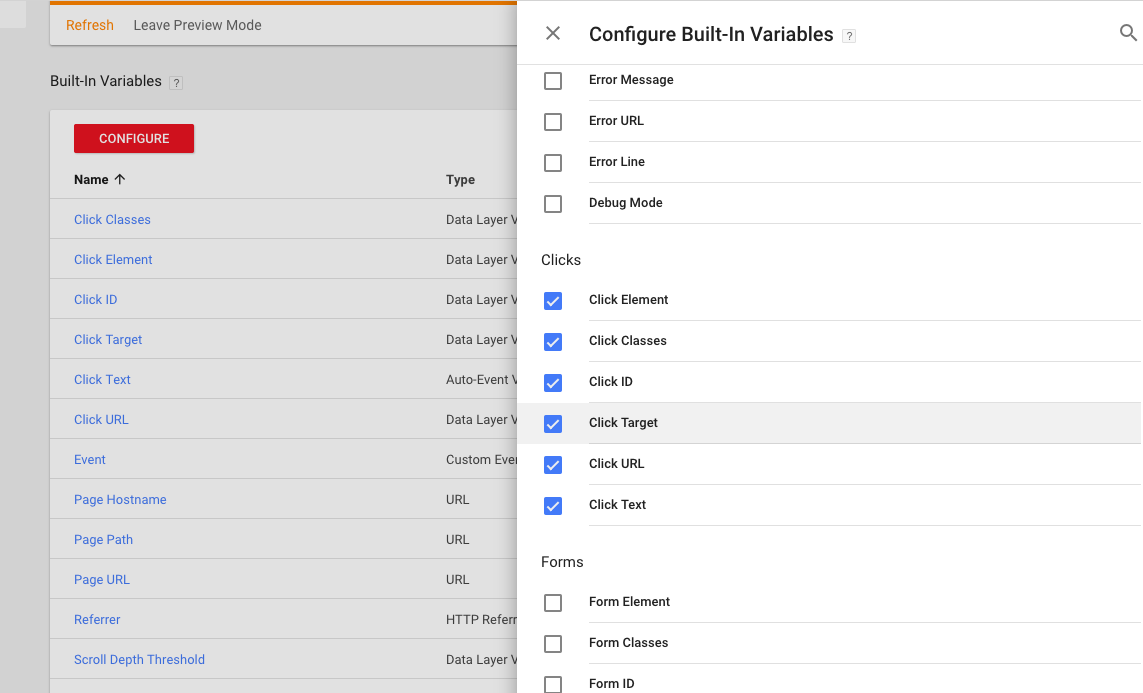
This will allow you to use these variables in your triggers.
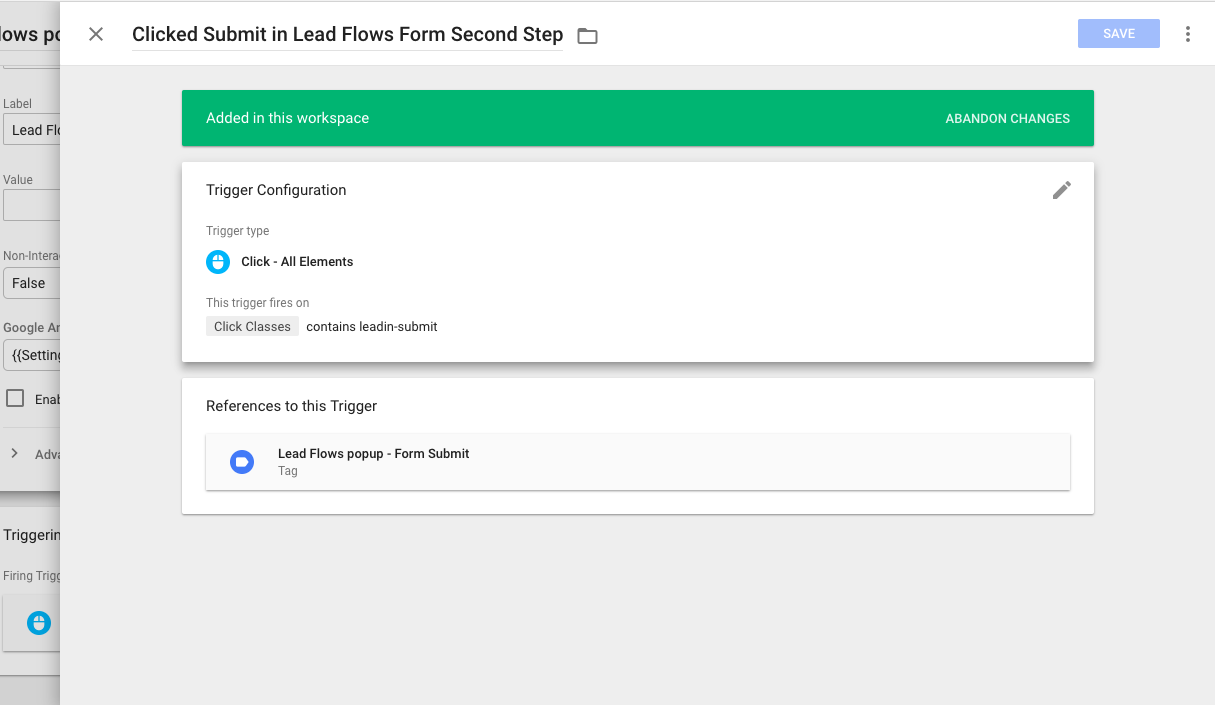
Now, that we have the Click Class information we need, and we have enabled the right built-in variables, we can set up a trigger for step one of our form (when someone clicks “subscribe” to move to step two).
Name your trigger something clear, and configure it in the following way:
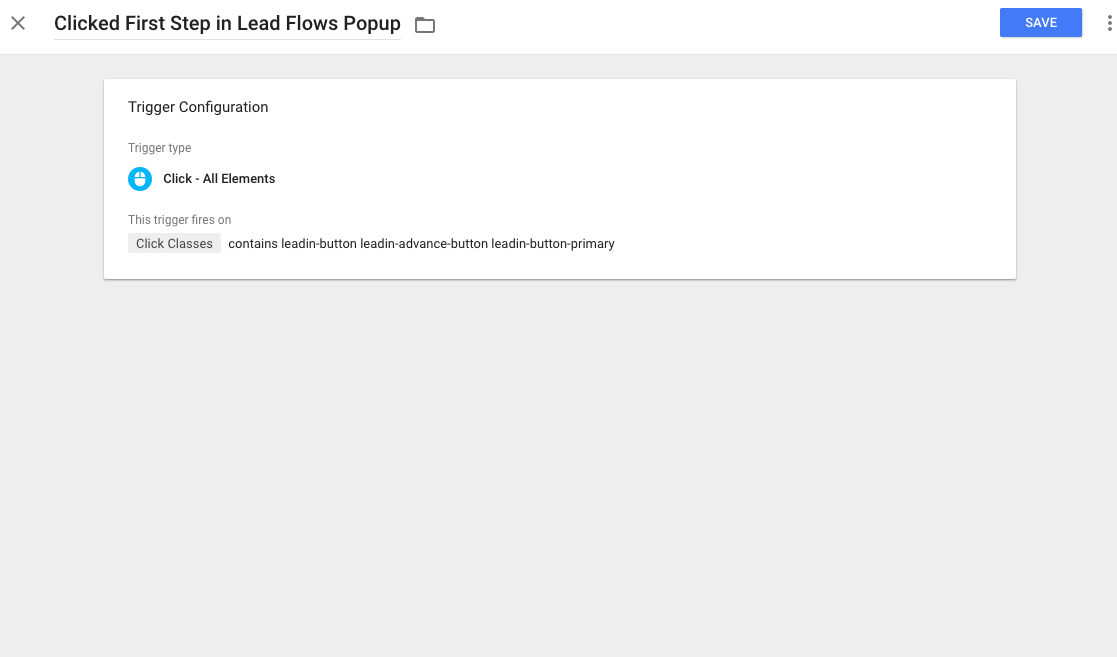
The trigger type is “Click - All Element,” because it’s not exactly a link and we’re putting a filter on it. It will only fire when Click Classes contains the above info (“leadin-button leadin-advance-button leadin-button-primary”).
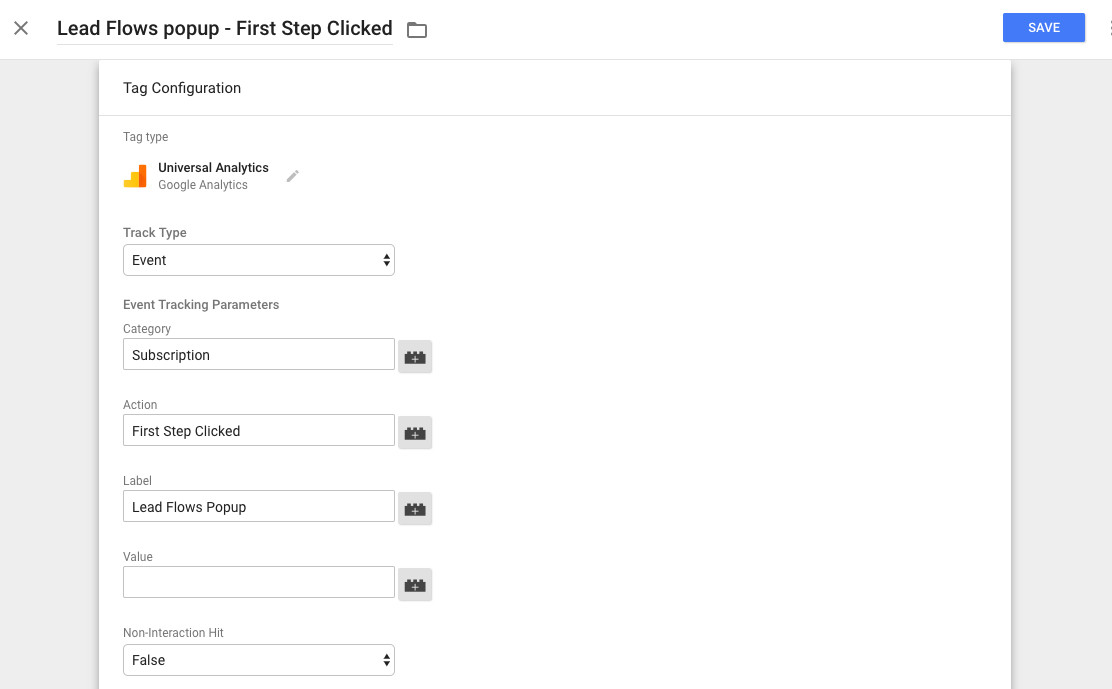
Tag configuration
Now, we can set up a new “Tag” for our event. Choose that as a trigger, and then enter information for the Tag as well (using whatever Category, Action, and Label you’ve chosen ahead of time):
Then, do the same thing for the second event (swapping the trigger criteria, of course, for the information that is collected when a user hits the “submit” button).
Again, set up a Tag that sends an event to Google Analytics with the Category, Action, and Label you’ve chosen.
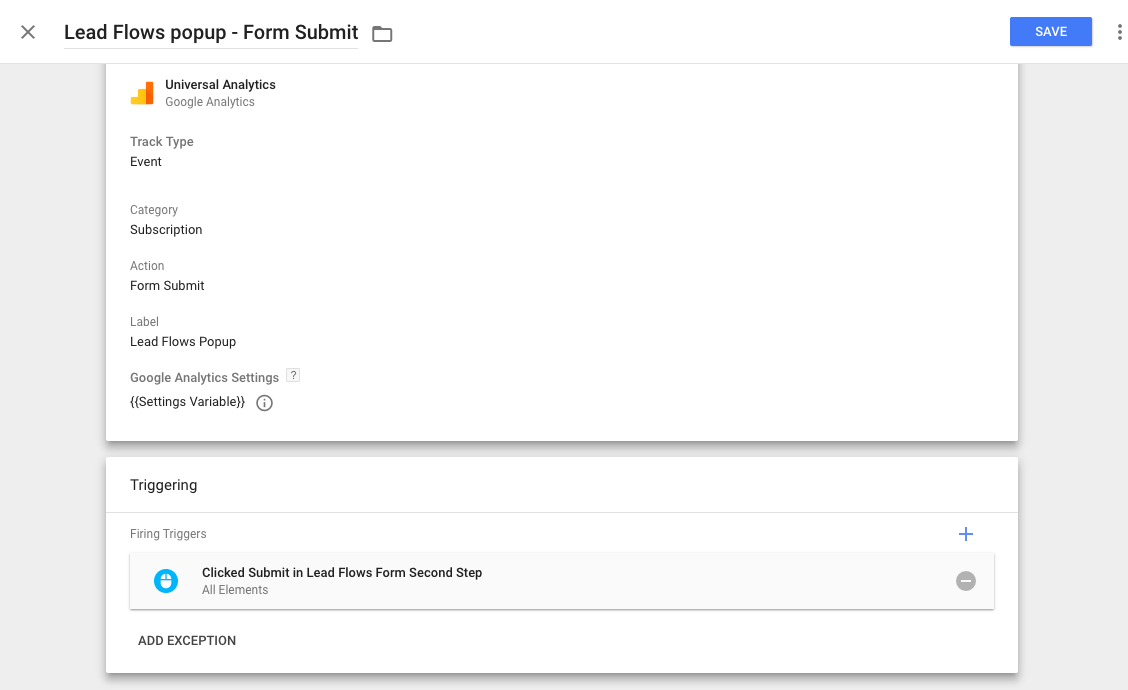
And voila! We’ve got events set up.
These two should trigger, respectively, when a user clicks the first “Subscribe now” button to open up the second part of the form (it’s a two-step form), and then when a user clicks the “Subscribe now” event to submit the form.
Of course, we always want to “measure twice and cut once,” or “trust but verify,” as Chris Mercer says. So, let’s enter Preview Mode on Google Tag Manager to check that our events are actually firing. Go through the process that you want your user to and see what fires in GTM:
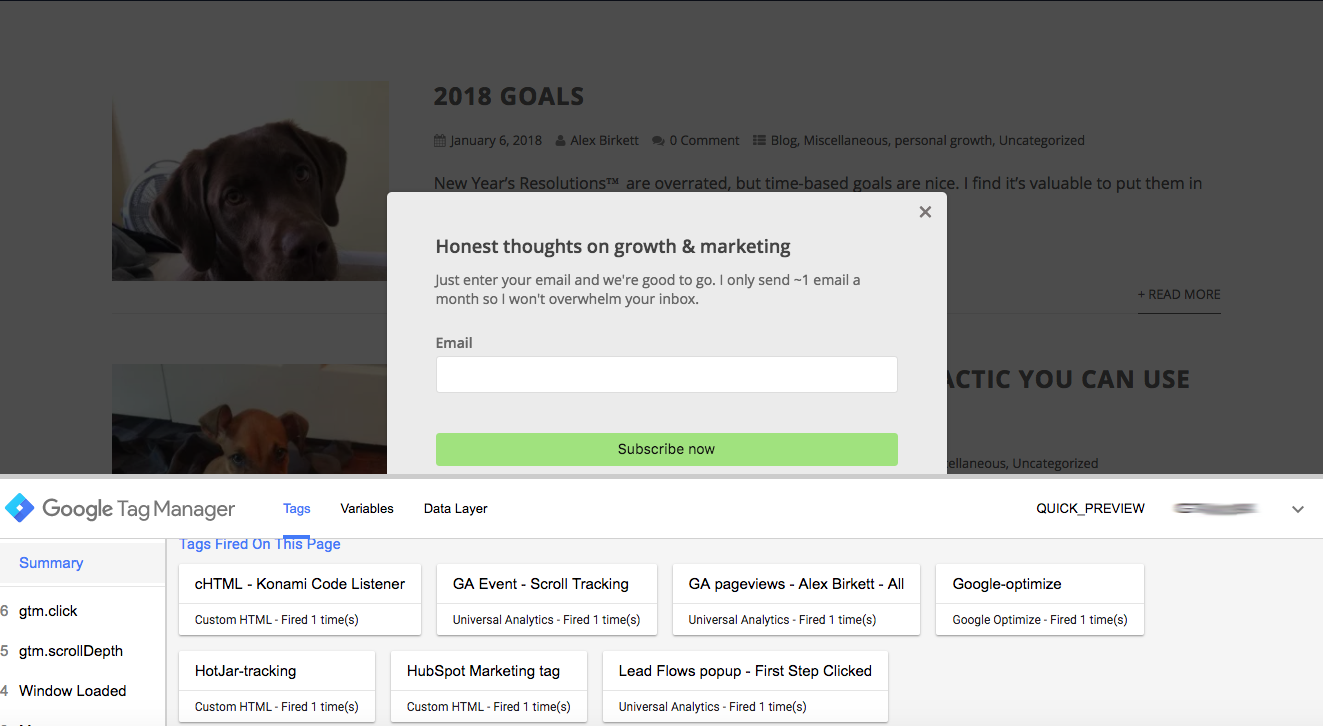
The first step worked, as we can see that after I clicked the button the first time, our event titled “Lead Flows popup - First Step Clicked” fired.

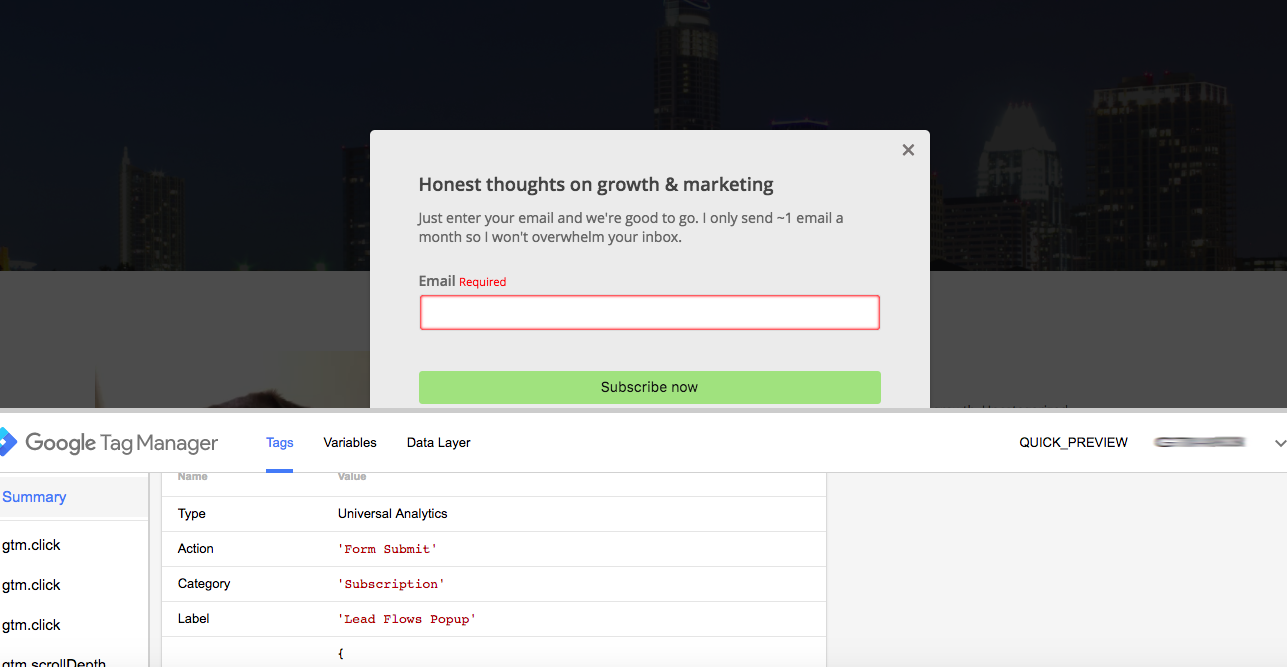
The second one worked as well, as we can see “Lead Flows popup - Form Submit” has been fired too. We can further investigate by clicking into the tag that fired. In this case, here’s the second step “Lead Flows popup - Form Submit” information. You can see that the Action, Category, and Label are all accurately being passed to Google Analytics:
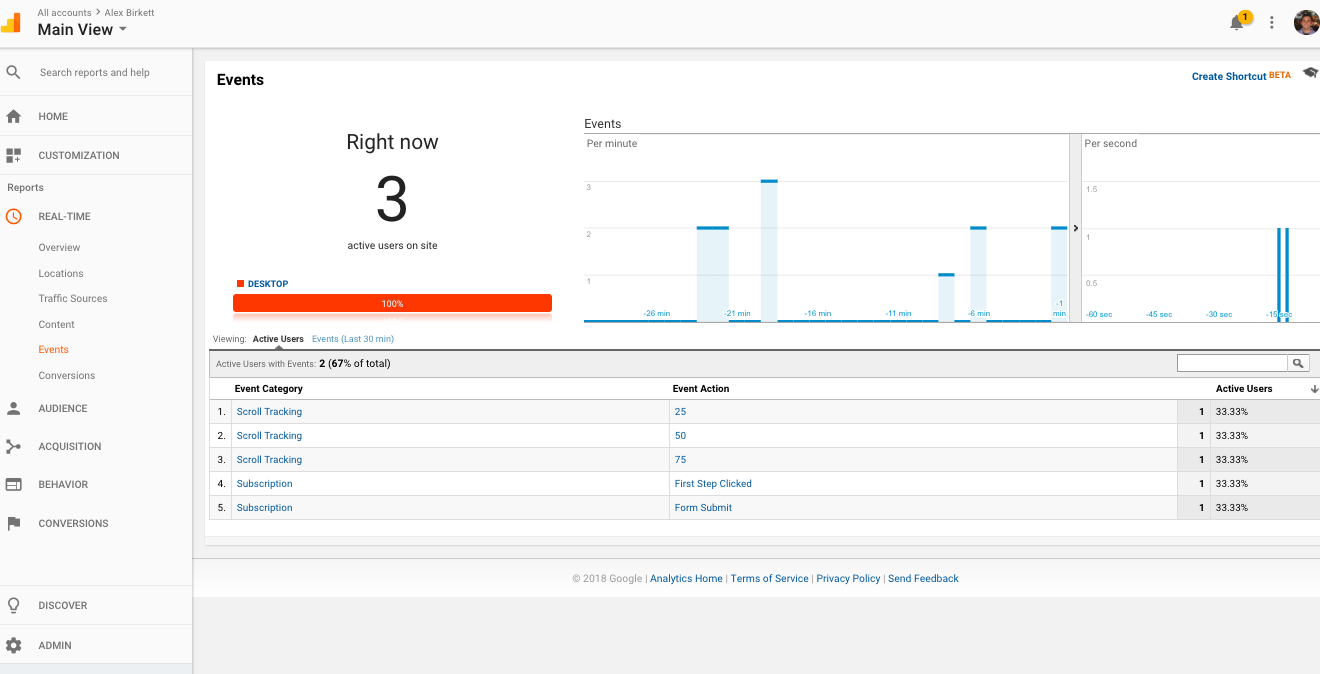
One final quality assurance check you should do before setting the implementation live is to click through the events as you look at your Google Analytics real-time reports. Here you can see that our events are indeed showing up in Google Analytics, so we’re good to go.
This is the basic process you’ll use to set up just about any event in Google Analytics. There are always going to be nuances and specific things that change, but that’s the broad outline.
To be clear, this set up isn’t perfect. For one, it tracks only clicks on the button, not whether or not a valid lead was passed through the form. Ideally, we’d set it up--so we’re tracking actual form submissions, not just clicks, and we’d also set up events to fire when a form error registers. However, it would take a book to cover all the different nuances and they’d likely only apply to a subset of people.
So, this outline covers the broad steps required to set up events, but when it comes to the specifics, look into documentation on your own to get it 100% right. Google has tons of great documentation you can read on Google Tag Manager (like this guide on triggers).
A quick note: something to keep in mind with Google Tag Manager setups is the potential volatility of what variable you use for your trigger. Some change more than others. For instance, Johannes Mehlem, Senior Web Analyst at HubSpot, uses the example of choosing Click Text. Something like Click Text can change depending on your website optimization process, more so than others can--so it helps to be aware of those things.
Here’s how he put it:
“In general, be aware that variables such as Click Text can potentially be more volatile than other variables as the website copy may be changed as part of ongoing website optimization.”
Walkthrough: Setting up Scroll-Depth Tracking
As I mentioned, Google is constantly trying to make things easier and easier for users of Google Tag Manager.
So, some things, such as setting up scroll-depth tracking, can be accomplished in a few clicks (and scroll-depth tracking is arguably a better engagement metric to track than something like bounce rate). Stuff like this has always been doable but difficult, and now it’s more out-of-the-box.
This is the case with more than just Scroll Depth tracking, but let’s walk through how we’d set this up--so you can see how easy some of the new implementations are to do, even for the non-technical user.
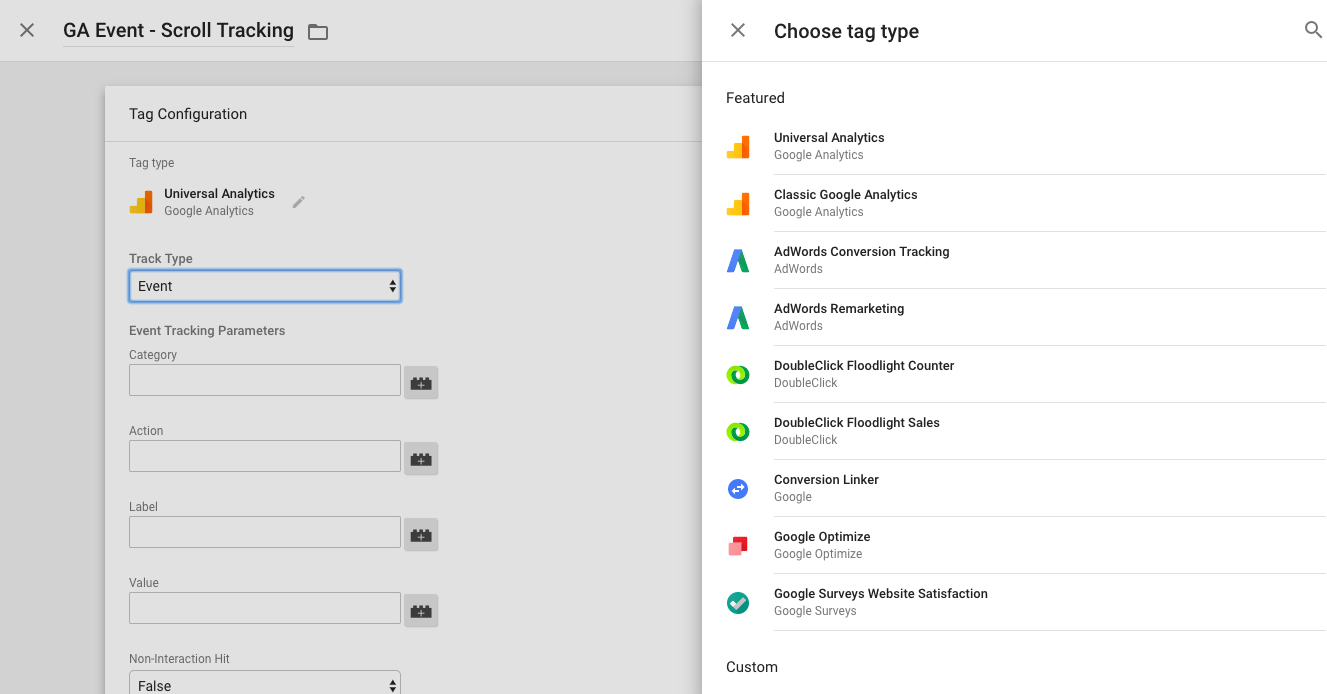
UA Event Tag
First, make a new Universal Analytics Event Tag (click Tag Configuration, Choose “Universal Analytics” under “Featured” tags, and then click the edit icon to choose the “Track Type”) and name it.
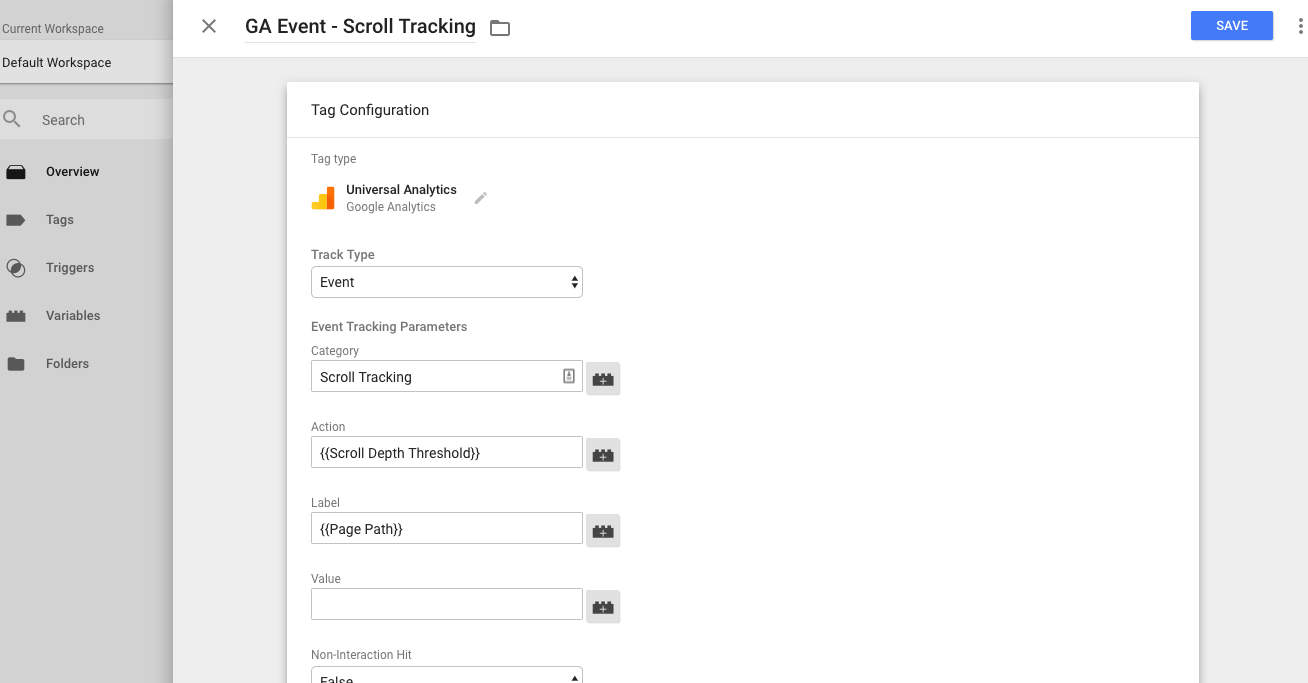
Category, Action, and Label
Next, set up your Category, Action, and Label. Your Category should be something like “Scroll Tracking,” but you can use built-in variables for your Action and Label. For your Action, use {{Scroll Depth Threshold}} and for your Label use {{Page Path}}.
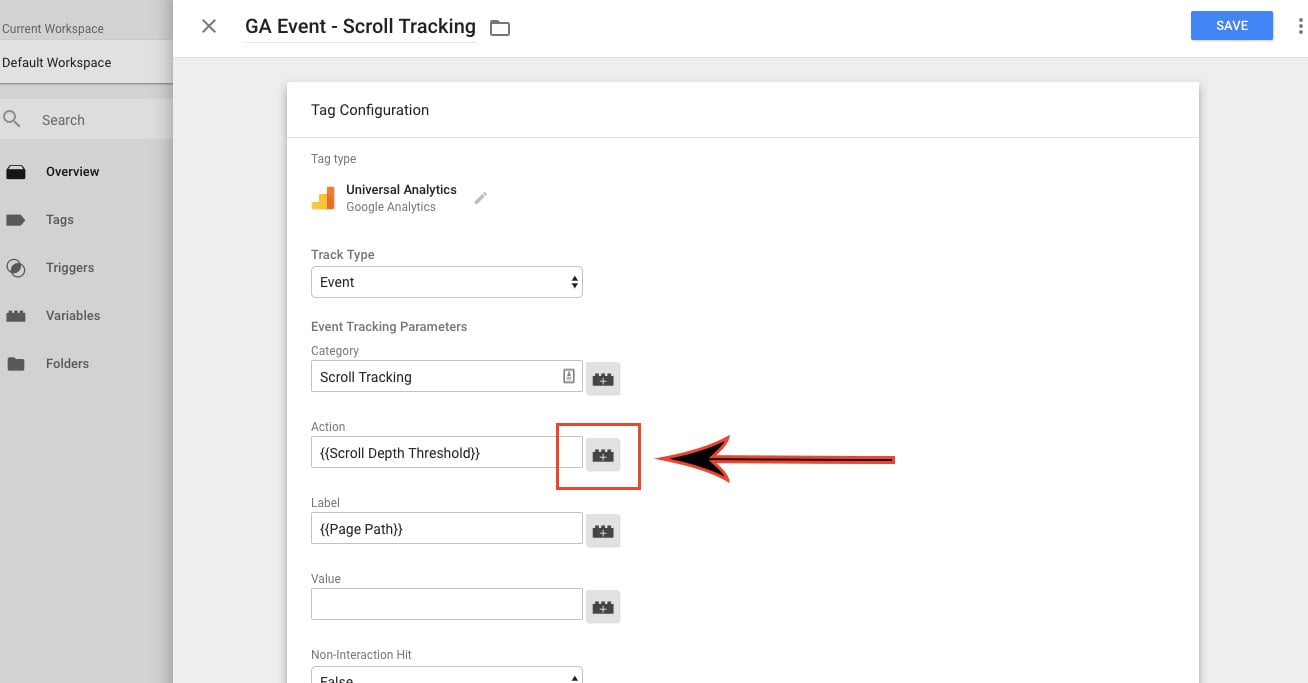
To find these built-in variables, you first need to click the icon to the side of the form field.
From there, click on “built-ins” in the upper right hand corner.
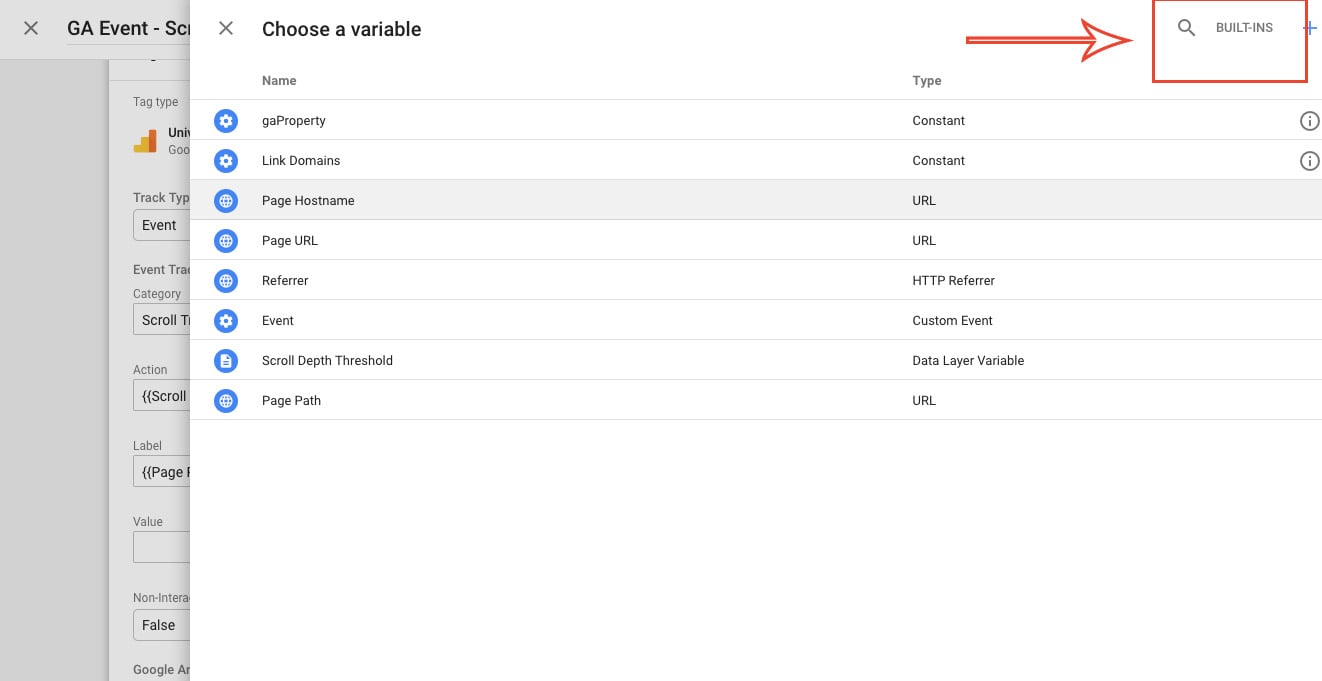
And that’s where you’ll finally find your “Scroll Depth Threshold” variable. While you’re there, also check the other Scrolling triggers, such as “Scroll Depth Units” and “Scroll Direction.” For now, though, just choose “Scroll Depth Threshold” (for your Action), and then “Page Path” (for your Label), and you’re well on your way.
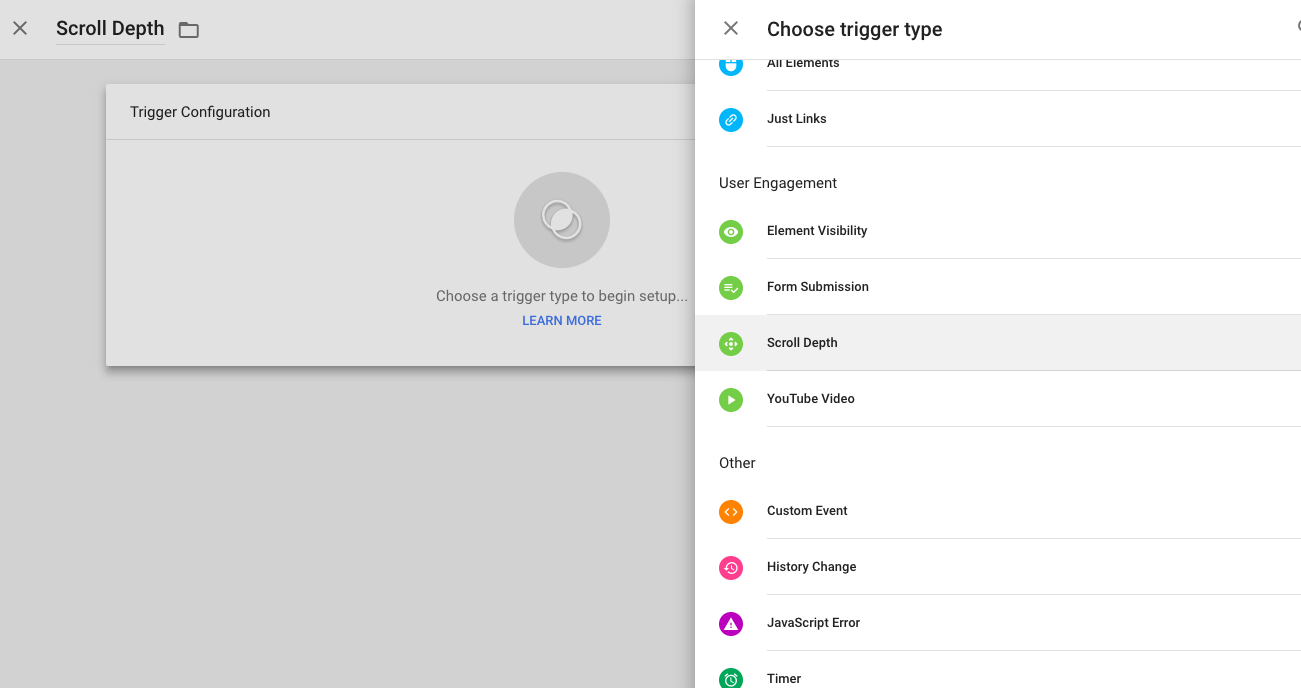
Next, you’ve gotta set up your trigger. Name it “Scroll Depth,” and choose “Scroll Depth” from the list of trigger types (easy, right?)
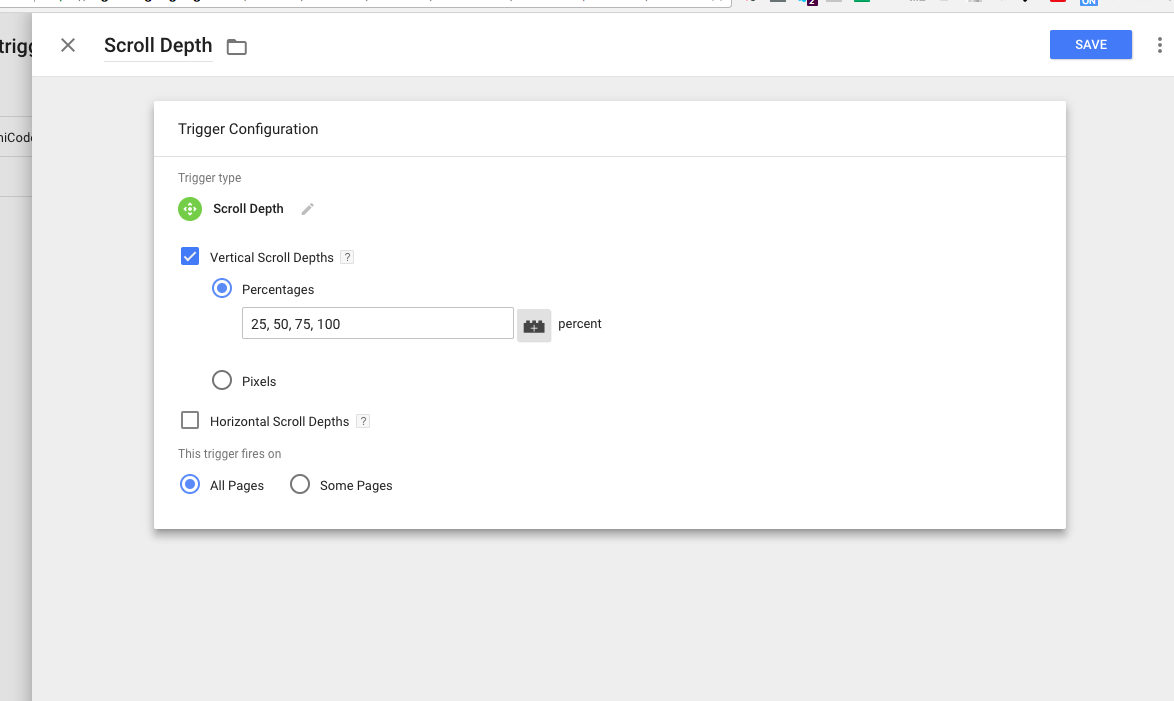
Next, configure your trigger. You’re going to want vertical scroll depth tracking--so choose that, and then pick whatever percentage you want to track (I like quarters - 25, 50, 75, 100).
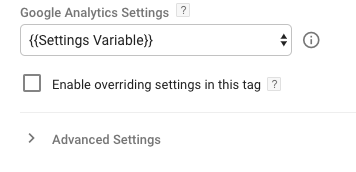
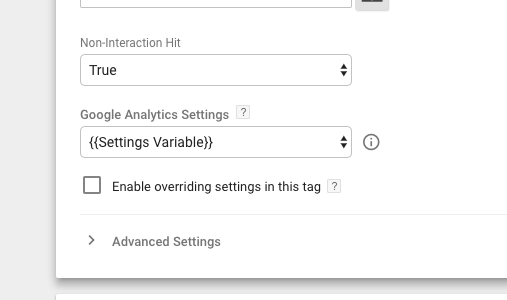
Note, there’s one last part you may need to set up, which is your Google Analytics Settings variable. I won’t cover that in detail here, but here are some instructions for doing so. It’s basically a template that can save you time and errors.
Otherwise, you can just click “Enable overriding settings” and set up your GA Settings variable later.
Now, you just need to preview and debug. One last quality assurance measure before setting things live.
Measure twice, cut once. Or as Chris Mercer says, always “trust but verify.”
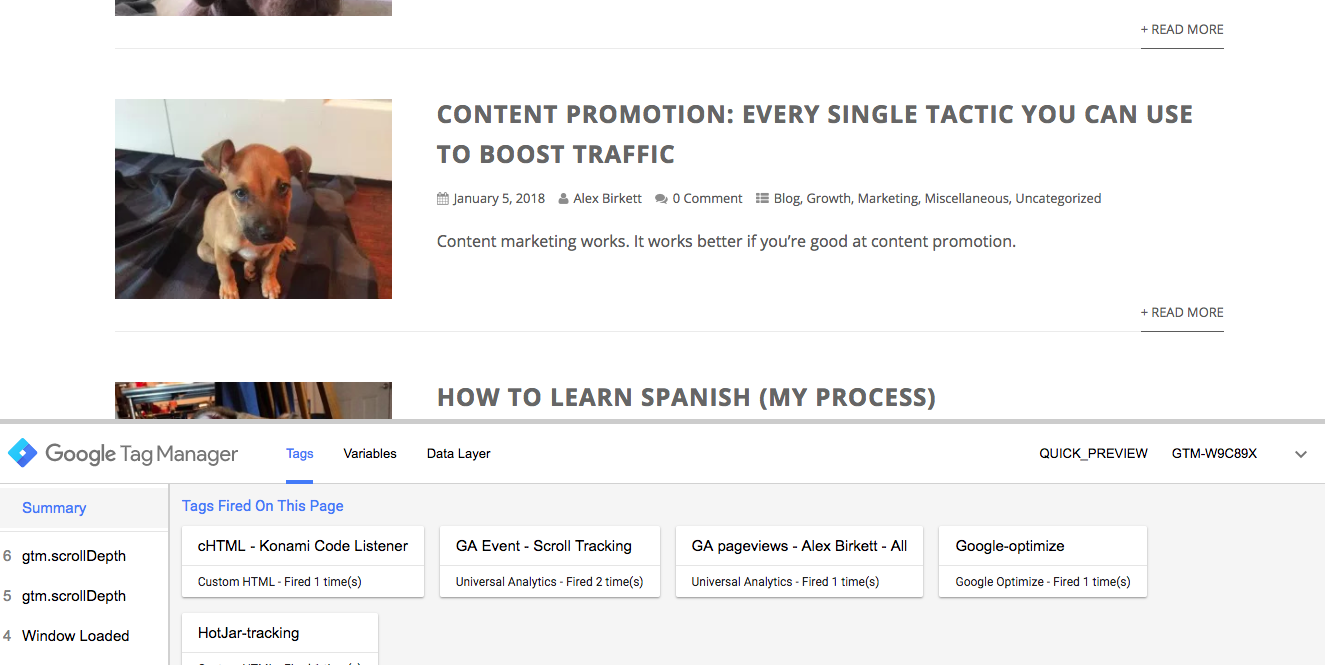
We’re in good shape, it seems. To be extra certain, scroll all the way down the page and check that your events are showing up in your real-time view in Google Analytics.
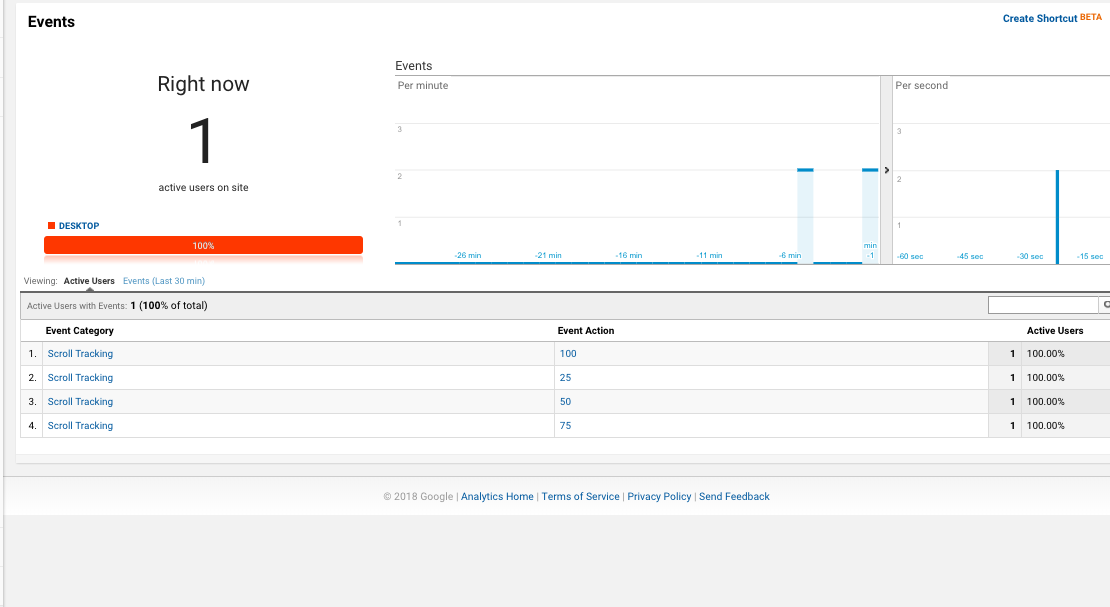
If everything looks good to go, you can hit publish and start analyze your user engagement with scroll tracking.
That’s just one example of Google Analytics event tracking that’s pretty easy to set up and can provide a lot of value (especially if you care about content analytics and data-driven marketing).
Additionally, there are tons of “recipes” available to cut down on the time you need to actually spend implementing tracking. For instance, here’s a great list of 60+ ready-to-use custom code snippets for Google Tag Manager. This list isn’t exclusively event tracking, but does contain a lot of useful recipes--and some not so useful ones. For example, go to alexbirkett.com and type in “Up, Up, Down, Down, Left, Right, Left, Right, B, A” on your keyboard for a fun surprise.
Best Practices for Google Analytics Event Tracking
Google Analytics event tracking can get pretty nuanced, as every site is different and you’re usually after different goals depending on the context. So, it’s somewhat difficult to give advice on best practices or mistakes to avoid.
However, one major point to keep in mind is whether or not your event is an Interaction event.
Essentially, if you consider your event to be indicative of user engagement and you want it to affect your bounce rate, then you want an interaction event (nonInteraction = false).
If the event is something that loads as the page does and you think it doesn’t indicate any additional user engagement, then you want to set your event to nonInteraction = true. This makes it so your bounce rate won’t be affected.
The Google support blog explains it like this:
“Suppose you have a page with a video player where the bounce rate is historically high, and you have not implemented Event Tracking for the page. If you subsequently set up Event Tracking for the player, you might notice a decrease in the bounce rate for that page, because Analytics will record user interaction with the player and send that interaction to the server as an additional GIF request.
Thus, even though the same percentage of visitors to the page might still exist without viewing any other page on your site, their interaction with the video player triggers Event Tracking calls, which disqualifies their session as a bounce.”
Again, if you want to prevent your events from messing with your bounce rate, you can set nonInteraction to true.
You can do a quick audit of your current event tracking setup either with the preview mode on Google Tag Manager or with the GA Debugger plugin. For the first, it’s as simple as clicking into whichever event you’d like to audit and finding how it’s registering the event:

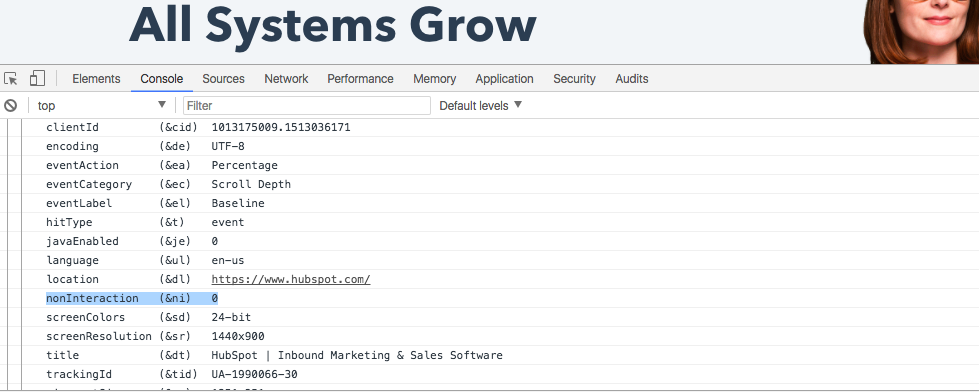
The other way you can do this is with GA Debugger (download the plugin here). After you enable the plugin, right click and hit “inspect” and go to your developer tools console. You can see how the event is being fired here. In this example, nonInteraction is set to 0, which means false (which means the bounce rate is affected):
This is largely a strategic decision, but don’t skimp on the discussion--because it really affects how your bounce rate reports are displayed. To learn more about bounce rate in Google Analytics, read this previous KlientBoost article.
Generally speaking, put a lot of foresight into how you name your events as well, because at scale you can introduce a lot of uncertainty and complexity by not defining your naming conventions. You also need to open up the opportunity that you may want to track things under the same category in the future, so it needs to be broad enough to encompass all use cases.
Johannes Mehlem, Senior Web Analyst at HubSpot, put it really well in a blog post on his website:
“Spending thoughts in advance in understanding the Google Analytics events hierarchy and a suitable naming convention for your business situation pays dividends later. If in doubt where to start when figuring out the event naming convention, I recommend thinking about what is the most granular action that you like to track with an event. Then start working backward and think about what is the next higher name that groups based on commonalities between several events, for which you like to see aggregate volumes in Google Analytics.”
Google themselves have some advice regarding naming conventions, basically along the same lines: plan out in advance how you’ll name things--so they’ll actually be useful in your report. Their example is with Actions, and how you should distinguish among meaningful and different interactions like link clicks and video plays to make reporting easier:
“If you use the action "click" indiscriminately across your Event Tracking implementation, the usefulness of that segment will be diminished in the reports. Consider choosing action names that relate to your data categories if you plan to use Event Tracking extensively on your website. For example, you might choose to reserve the term "click" for gadget interactions, while keeping the action terms, "Play," "Pause," and "Stop" reserved for video player interactions.”
The most important caveat in Google Analytics event tracking, really anything analytics related, is to really plan out your events you’d like to track and what they mean to your business. This means taking things strategically instead of just tracking everything because you can (there’s a real cost to that).
Also, as always, make sure you’re actually using the data you’re collecting to inform your decision making. It’s all too common that you’ll spend a ton of time scoping out and implementing events only to let them sit their dormant, collecting dust. Use the info. to your competitive advantage.
Wrap Up on Google Analytics Event Tracking
Google Analytics event tracking opens up a whole new world of possibilities when it comes to understanding user behavior. How you implement event tracking can range from the simple, quick, and out-of-the-box, to the complex and hyper-customized. But with the right implementation specialist, the possibilities are pretty much endless.
With that in mind, as I touched on, you’re going to want to approach event tracking strategically. Yes, you can track almost everything, but there’s a cost to doing so, both in terms of resources and in terms of complexity (without guidance, you can end up with a lot more cherries to pick in your data).
So, start slowly, think about what matters to your users and to your business goals, and set things up accurately and well. But with how easy it is to track certain events, there’s no reason not to get started with it today.