


You wrote the perfect ad. It’s everything you want it to be and more—the culmination of all your digital marketing chops. You’re certain it’ll succeed.
But after it’s been running a while, you do a test search. Suddenly, you see that your ad’s sitting in the shadow of another ad the size of Godzilla. Um…what?
It’s not just any ad, either–it’s got 4 mini hyperlinks below it that look like legs…standing on top of your ad (how rude). It’s got a clickable discount. It’s got a store location. It’s got a phone number. What the heck is this monstrosity?
If you want your ad to stand a chance in the auction now, you’re going to have to fight Godzilla with King Kong–which means you’re going to need ad extensions.
In this article, we’ll give you a complete rundown on the Google ad extensions available–the benefits, the basics, and the full list of extensions you can use to bump up your business.
We’ll also share some nifty tips for using these extensions to blow that Godzilla ad right out of the water.
Get brand new Google ad strategies straight to your inbox every week. 23,739 people already are!
What are Google Ads ad extensions?
While the name almost gives it away, Google Ads (formerly Google Adwords) ad extensions are “additional bonuses” you can add to your PPC ad to have it take up more real estate space on the Google search engine results page (SERP).
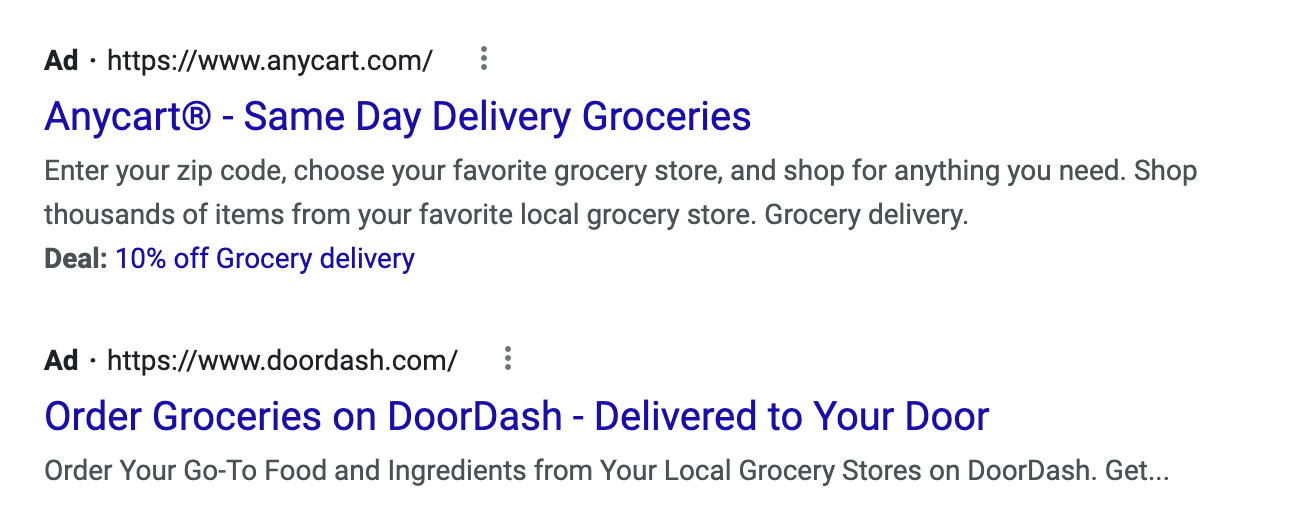
Here’s an example of an ad with plenty of ad extensions (although not all of them).

See how much real estate that takes up on the search results page? Isn’t that nice? It’s especially nice when you see how much your competitors’ ads get compressed down underneath it.
Why are Google ad extensions important?
Google Ads extensions give your potential visitors more channels and paths to get closer to their goal.
Whether that’s calling you directly from the ad, going to a certain URL on your site, checking your reviews, downloading your app, finding your address, or more, ad extensions not only help your visitors by providing more info, but they also help you:
- Increase your click-through-rate (CTR)
- Increase your quality score (indirectly)
- Increase your ad rank
- Potentially reduce your average cost-per-click (CPC)
The biggest reason for this is that, like we saw earlier with Instacart’s ad, the more ad extensions you use, the bigger and more relevant your ad can get, and therefore, the higher the chances of a click.
It’s also important to note that ad extensions are only indirectly a part of the quality score calculation, not a direct component. What we mean is extensions can help improve your Expected CTR, which is one of the three determiners of Quality Score.
Google ad extension basics you need to know
Ad extensions have been through a lot over the past decade.
New options have been added over time to expand our opportunities for more clicks, but many others have been removed from the list. Review extensions, for example, were sunsetted in 2018 due to significant difficulty getting them approved to run.
Today, there are currently 12 different ad extensions available to use on Google Ads, if we’re counting everything under the automated extensions category as one. We can certainly expect that more will be added over time as Google’s technology develops.
Before we get right into the list of ad extensions, let’s go through some basics to get you started.
Finding and reviewing your ad extensions
To find ad extensions in your Google Ads account, you’ll want to navigate to the “Ads & Extensions” tab within your Google Ads interface. This will open up two sub-tabs: Ads and Extensions. Click on “Extensions.”
You can look at your extensions on the account level, campaign level, or adgroup level. For now, we’ll look at them on the account level, but if you want to look at data more granularly, simply select a campaign or adgroup and then navigate to “Extensions.”
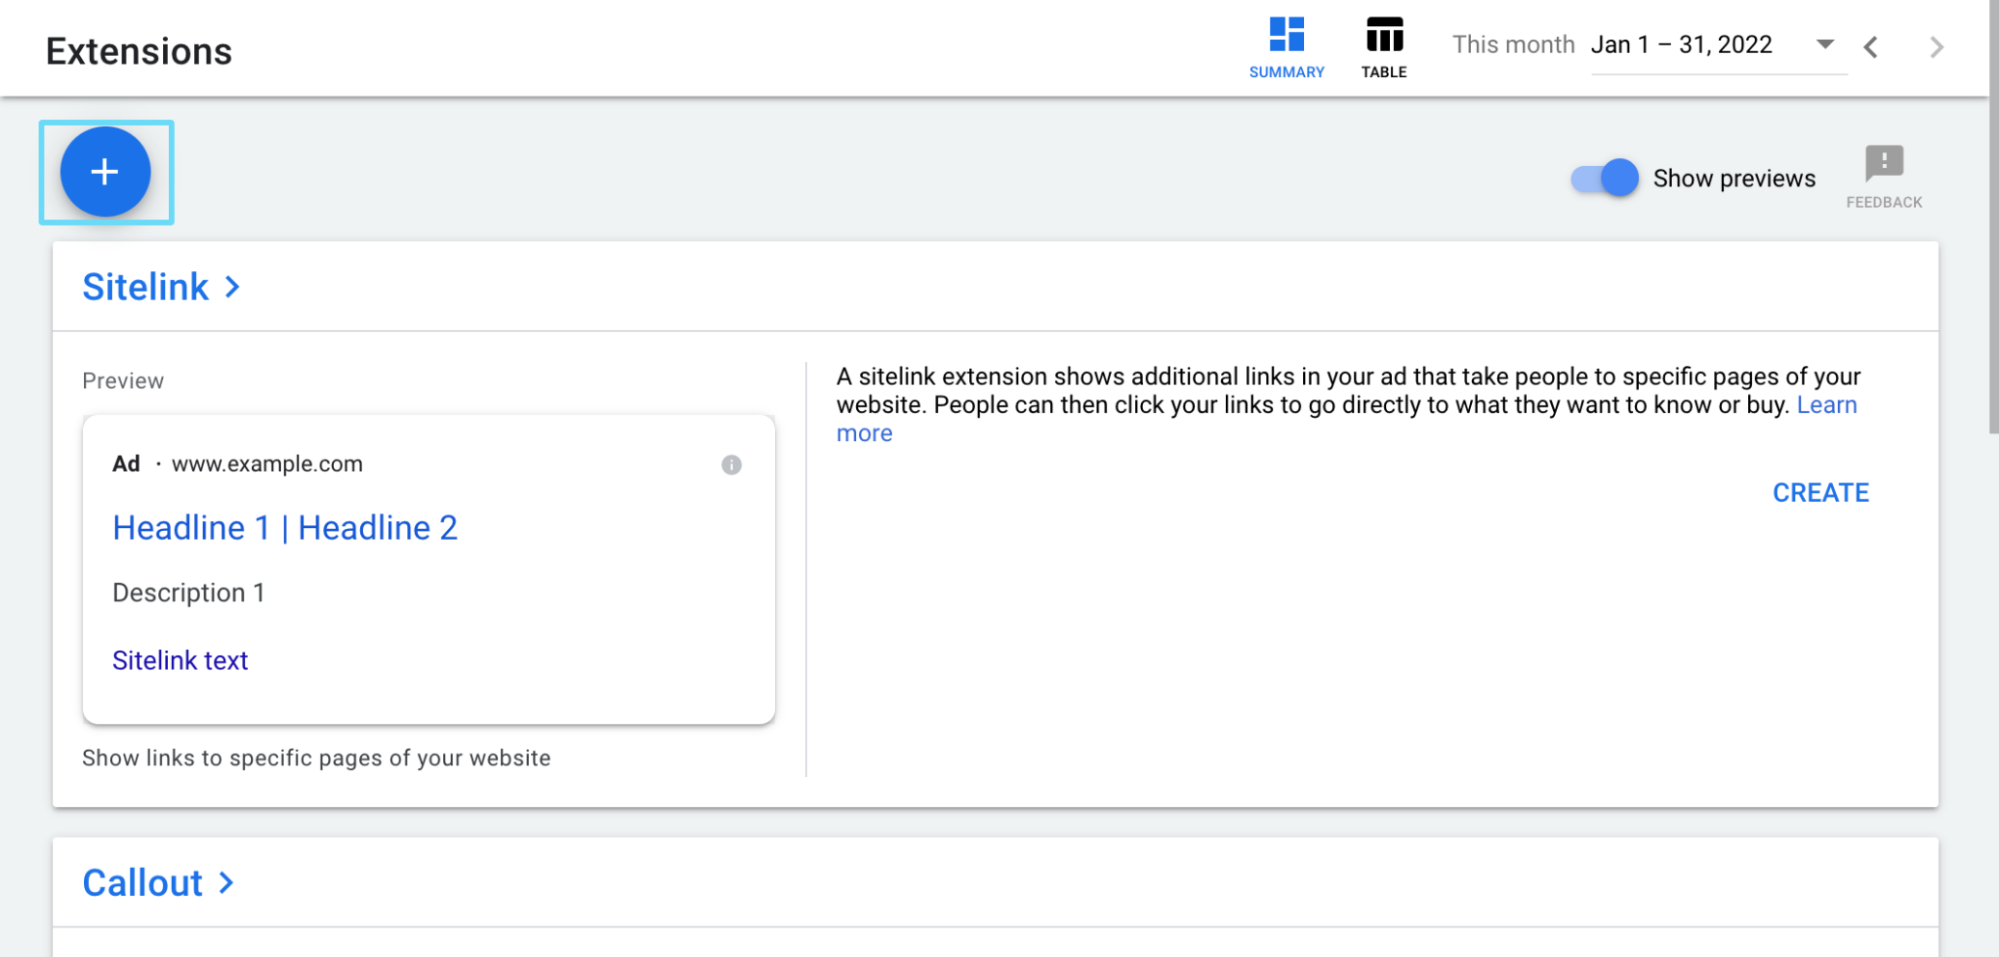
You’ll start off on a summary screen with your extension options listed out as tiles. If you already have some extensions, you’ll be able to see a data summary on each of their tiles here. If not, these tiles will be blank, with placeholder text examples.

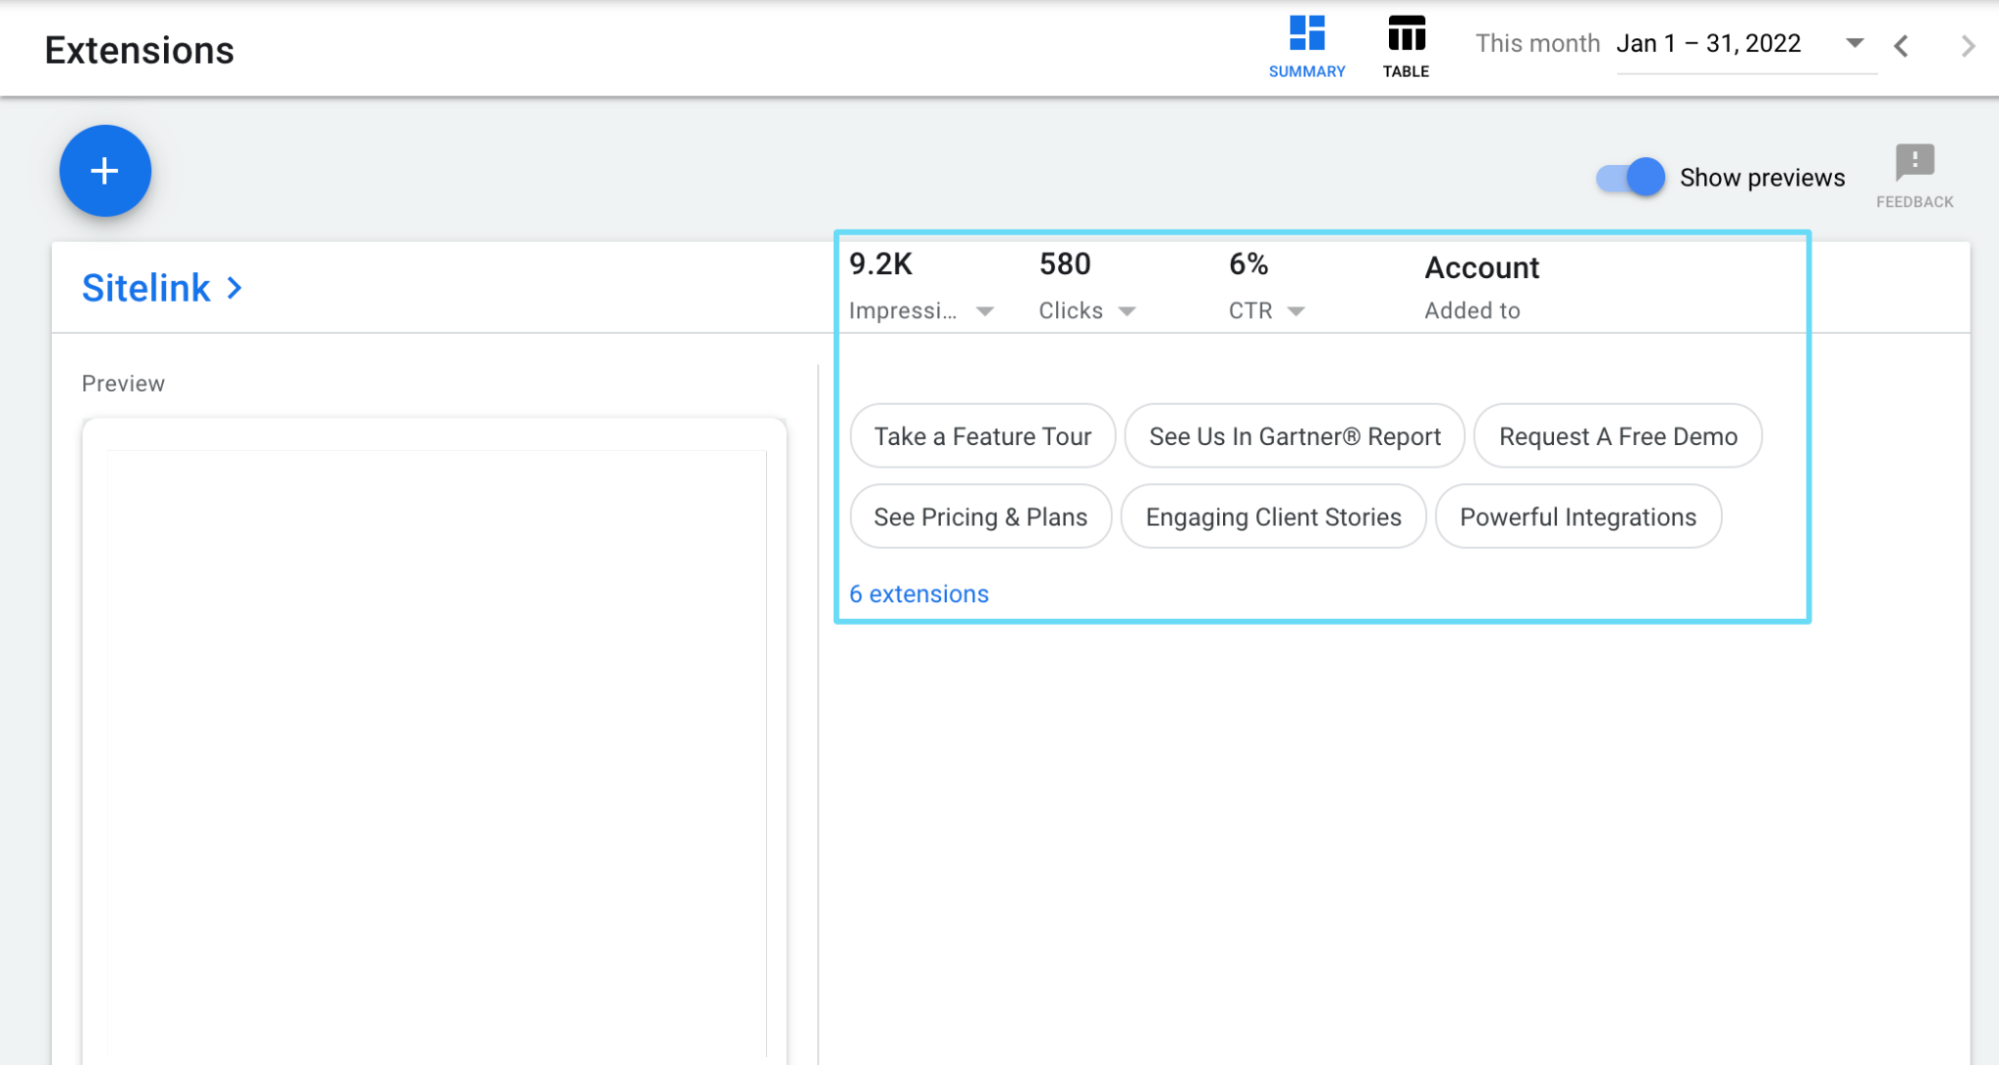
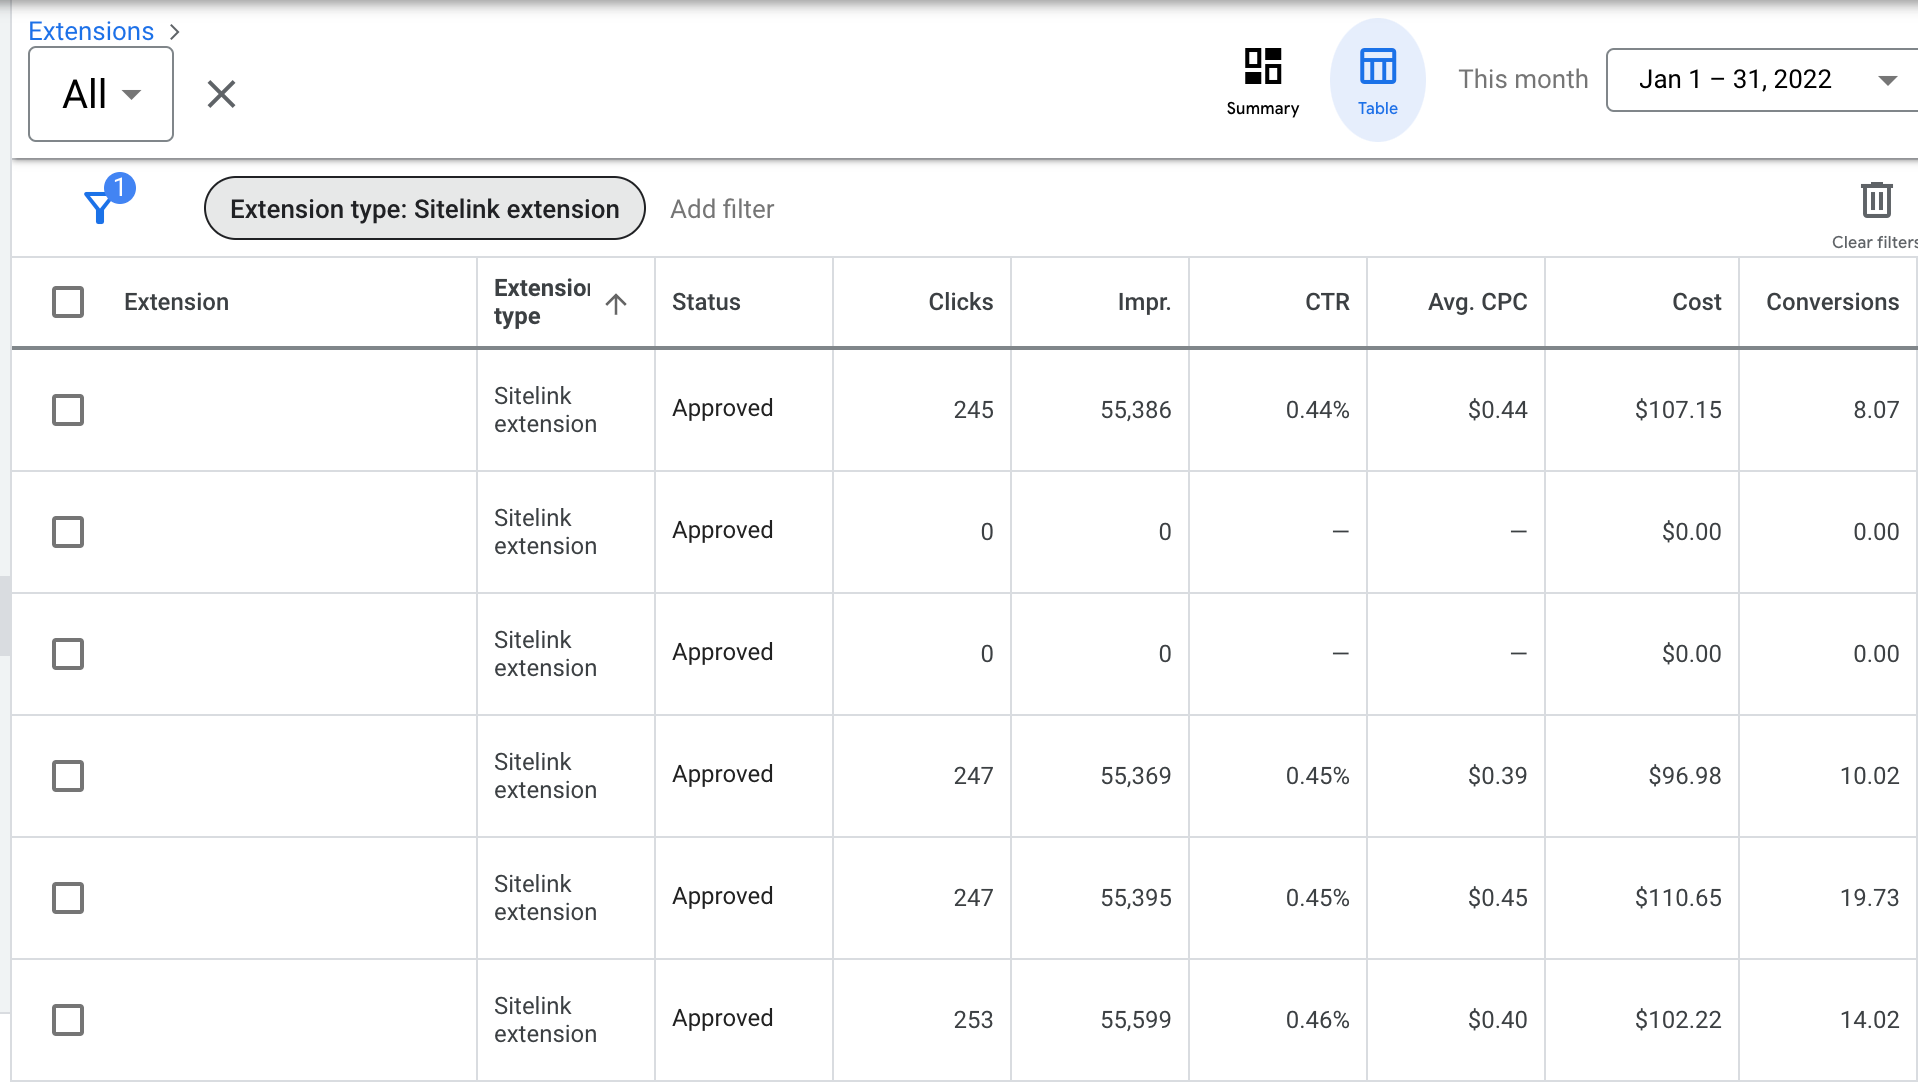
Alternatively, you can view your extensions and data in a table by clicking the “Table” button in the top right. This view is closer to the older versions of the Google Ads interface.
If you’re viewing your extensions this way, you’ll need to use the “Extension Type” filter to designate which extensions you want to look at in the table (be it sitelinks, callouts, etc.). You can look at all extension types at once, but it’s a bit jumbled and messy this way.
You can also toggle between “Associations View” or “Extensions View.”
Associations View means you’re looking at data for extensions split up by what they’re attached to. For example, if your extensions are applied at the campaign level, you’ll see your extension data campaign-by-campaign (even if some of the extensions you use across multiple campaigns are the same).
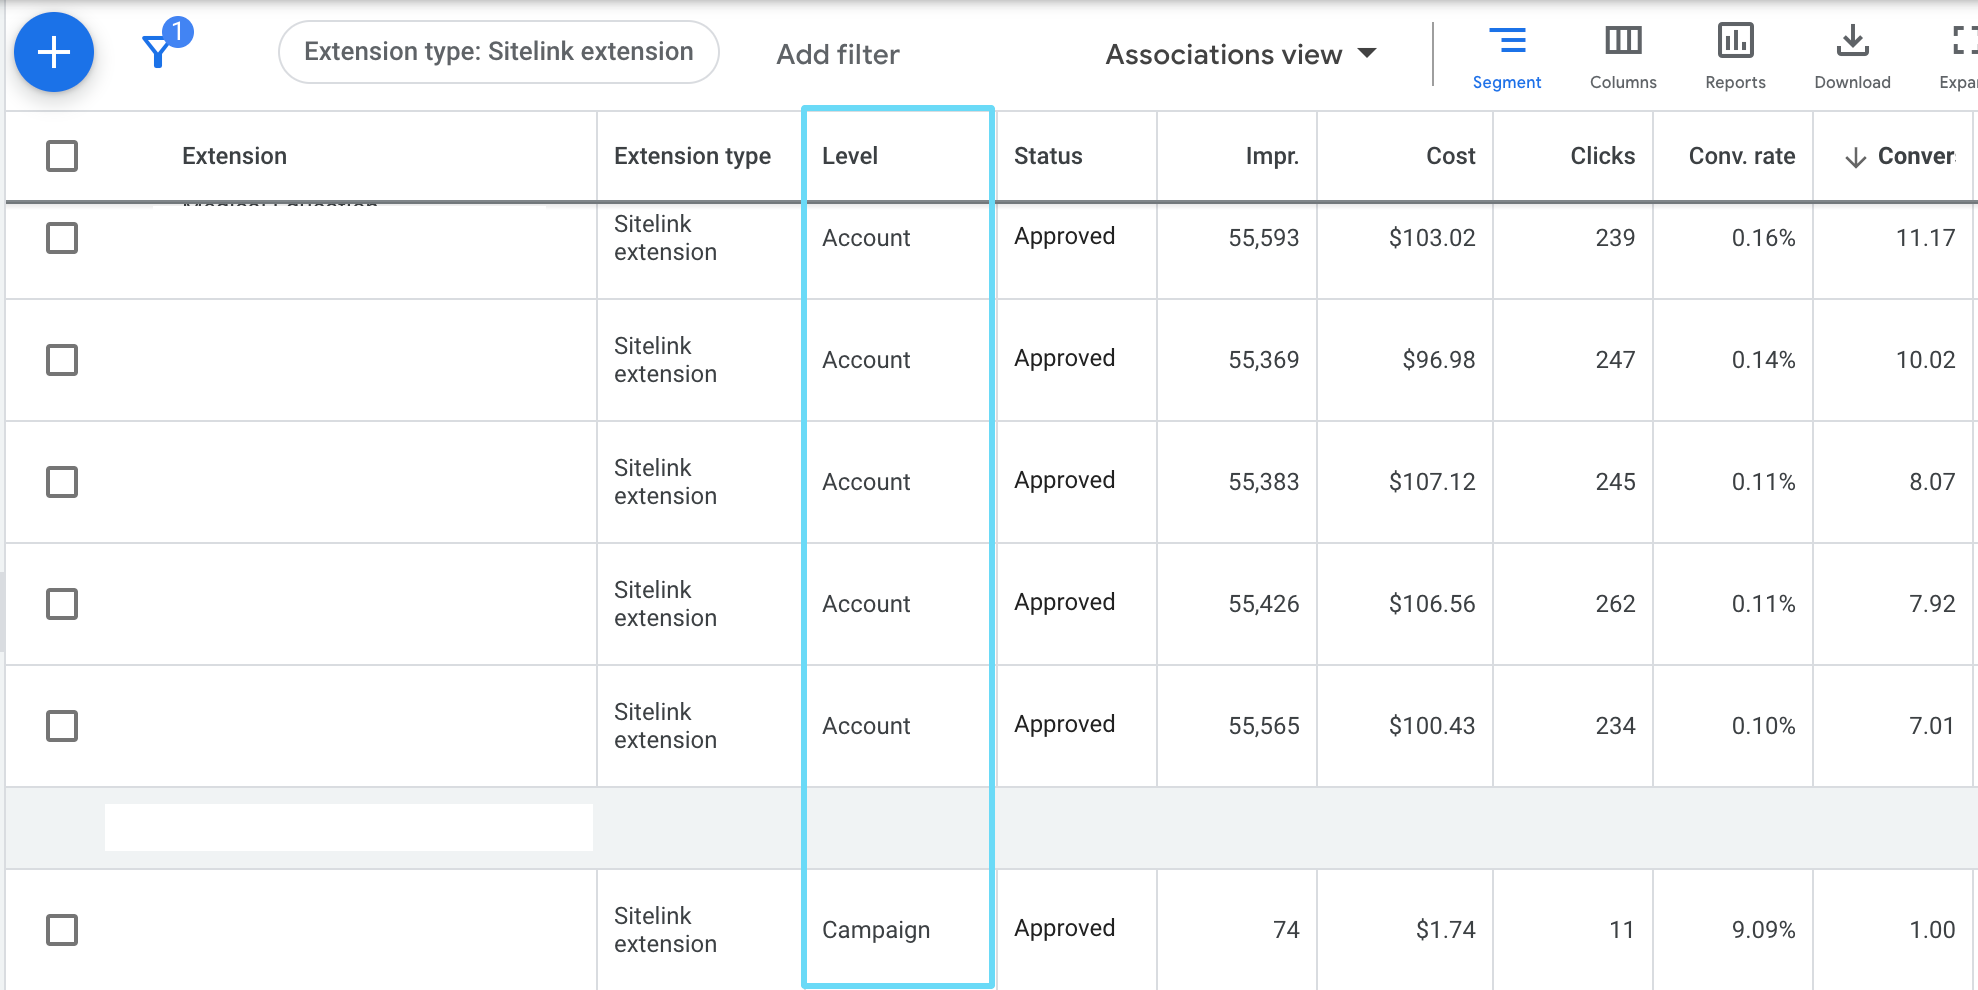
Extensions View means you’re viewing data by the extension itself regardless of its associations. You’ll only see one listing for each unique extension. This is true even if you have the same extension applied on the campaign level for multiple campaigns.
If you’re nodding but also scratching your head at this point because you’ve got no actual data to see in any of these fancy extensions tables, don’t worry. Now that you’re familiar with what the extensions tab looks like, and the many different ways you can look at the data here, let’s get into creating your ad extensions.
Manual versus automated extensions
Our various Google Ads developments over the years have brought us an interesting choice when setting up extensions: Do we enable automated (also known as dynamic) extensions?
For those who aren’t familiar with the difference between manual extensions and automated extensions, let’s look at some important details on both.
Manual extensions are extensions that you create and have full control over. That means you make any copy required, set up any Final URLs required, etc. Then, you choose what associations those extensions should have (in other words, what those extensions are attached to).
Automated extensions are extensions dynamically created by Google Ads. You have no control whatsoever over the contents or appearance of these extensions or their associations. Google uses its advanced AI to make these extensions for an auction if it believes the extension will increase the ad’s performance.
You can use both manual and automated extensions at the same time, so there’s no need to choose one or the other.
How to create manual extensions
Because there are so many types of extensions (which we’re going to review in a bit), let’s leave the specific extension setups to their respective sections. Here, we’ll go over the very basics of creating ad extensions, and it’s pretty straightforward.
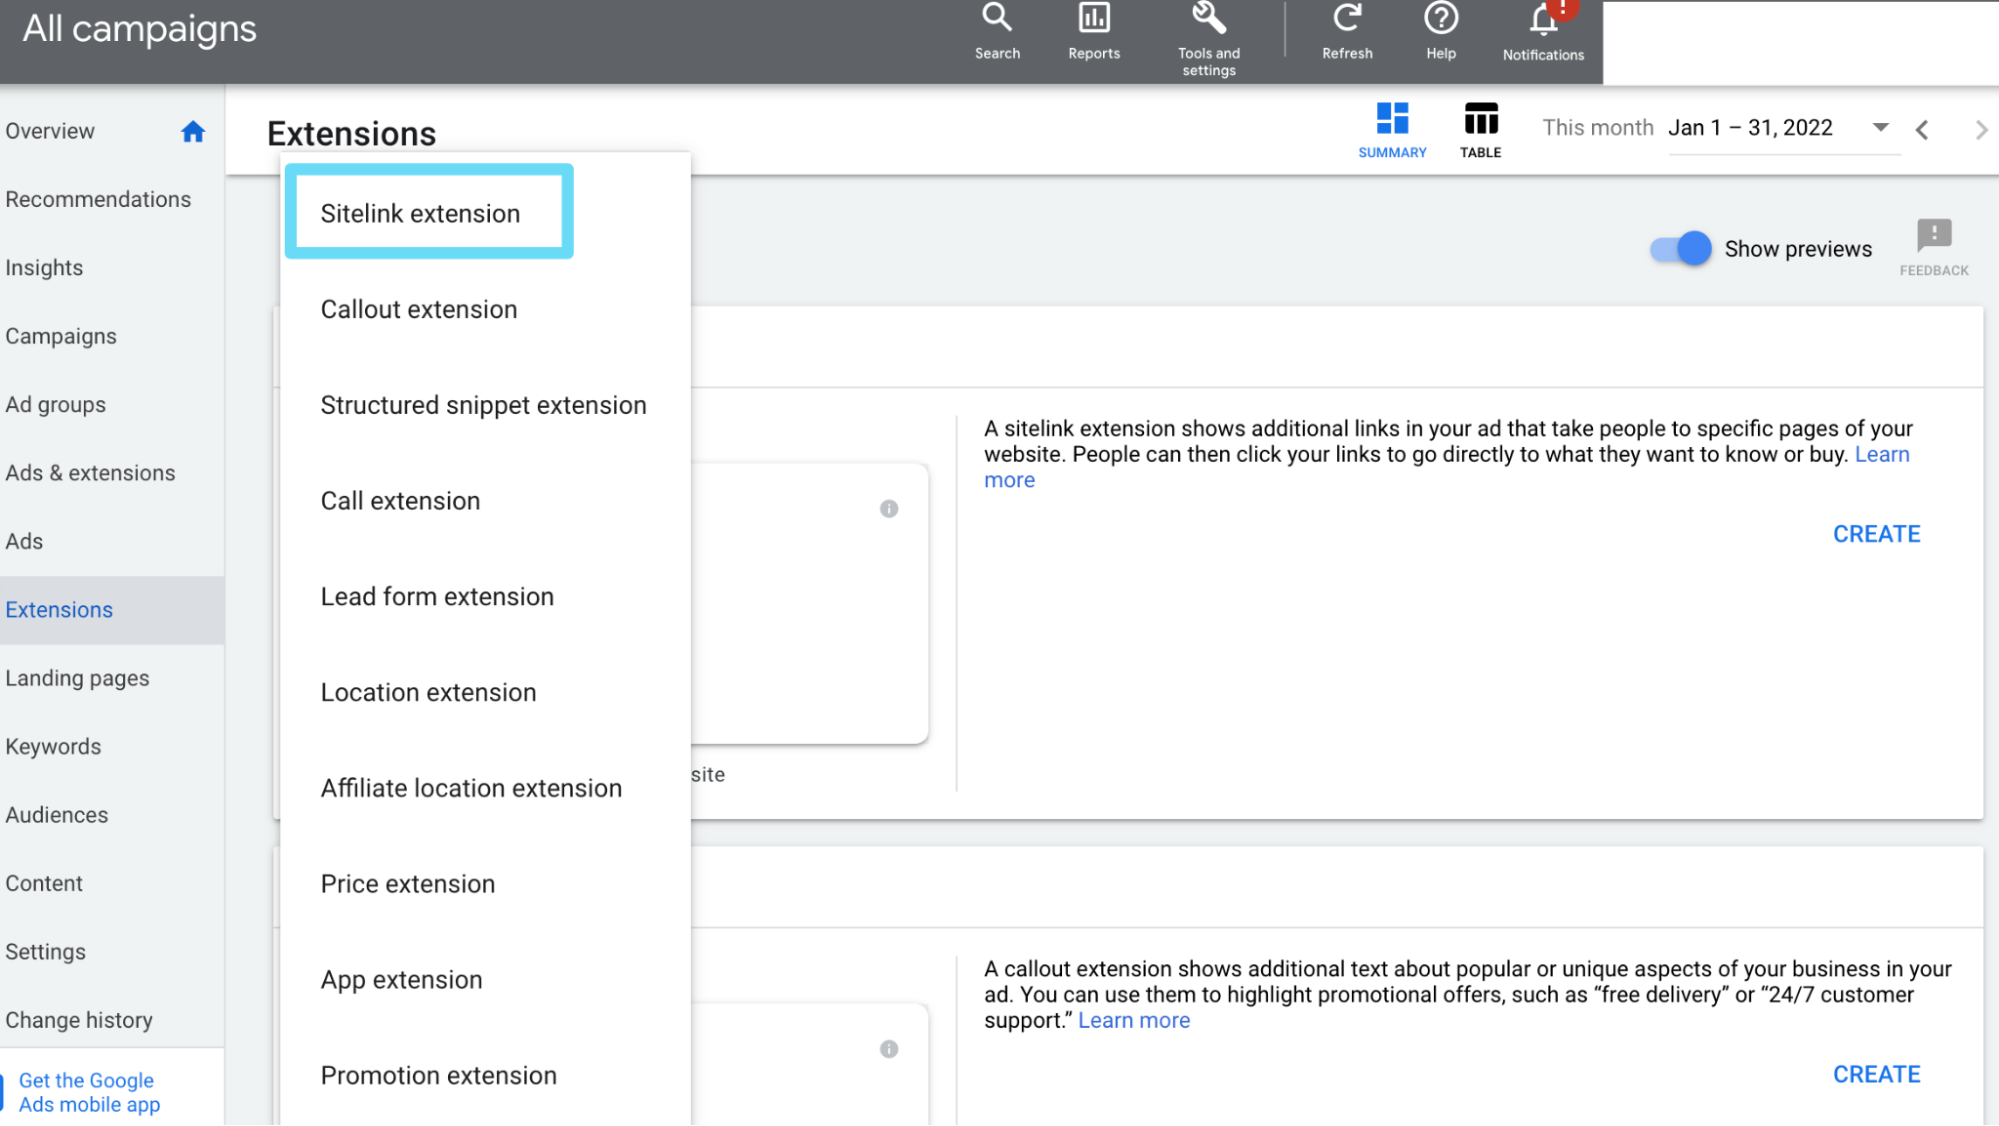
To make a manual extension, go to your Extensions tab, and click the blue “+” button.
Then, simply select the extension type you want to make from the list that appears.
Pro tip: If you don’t see image extensions in the list, it may be because you have no search ads currently live. The image extensions option will only show if you already have search ads running.
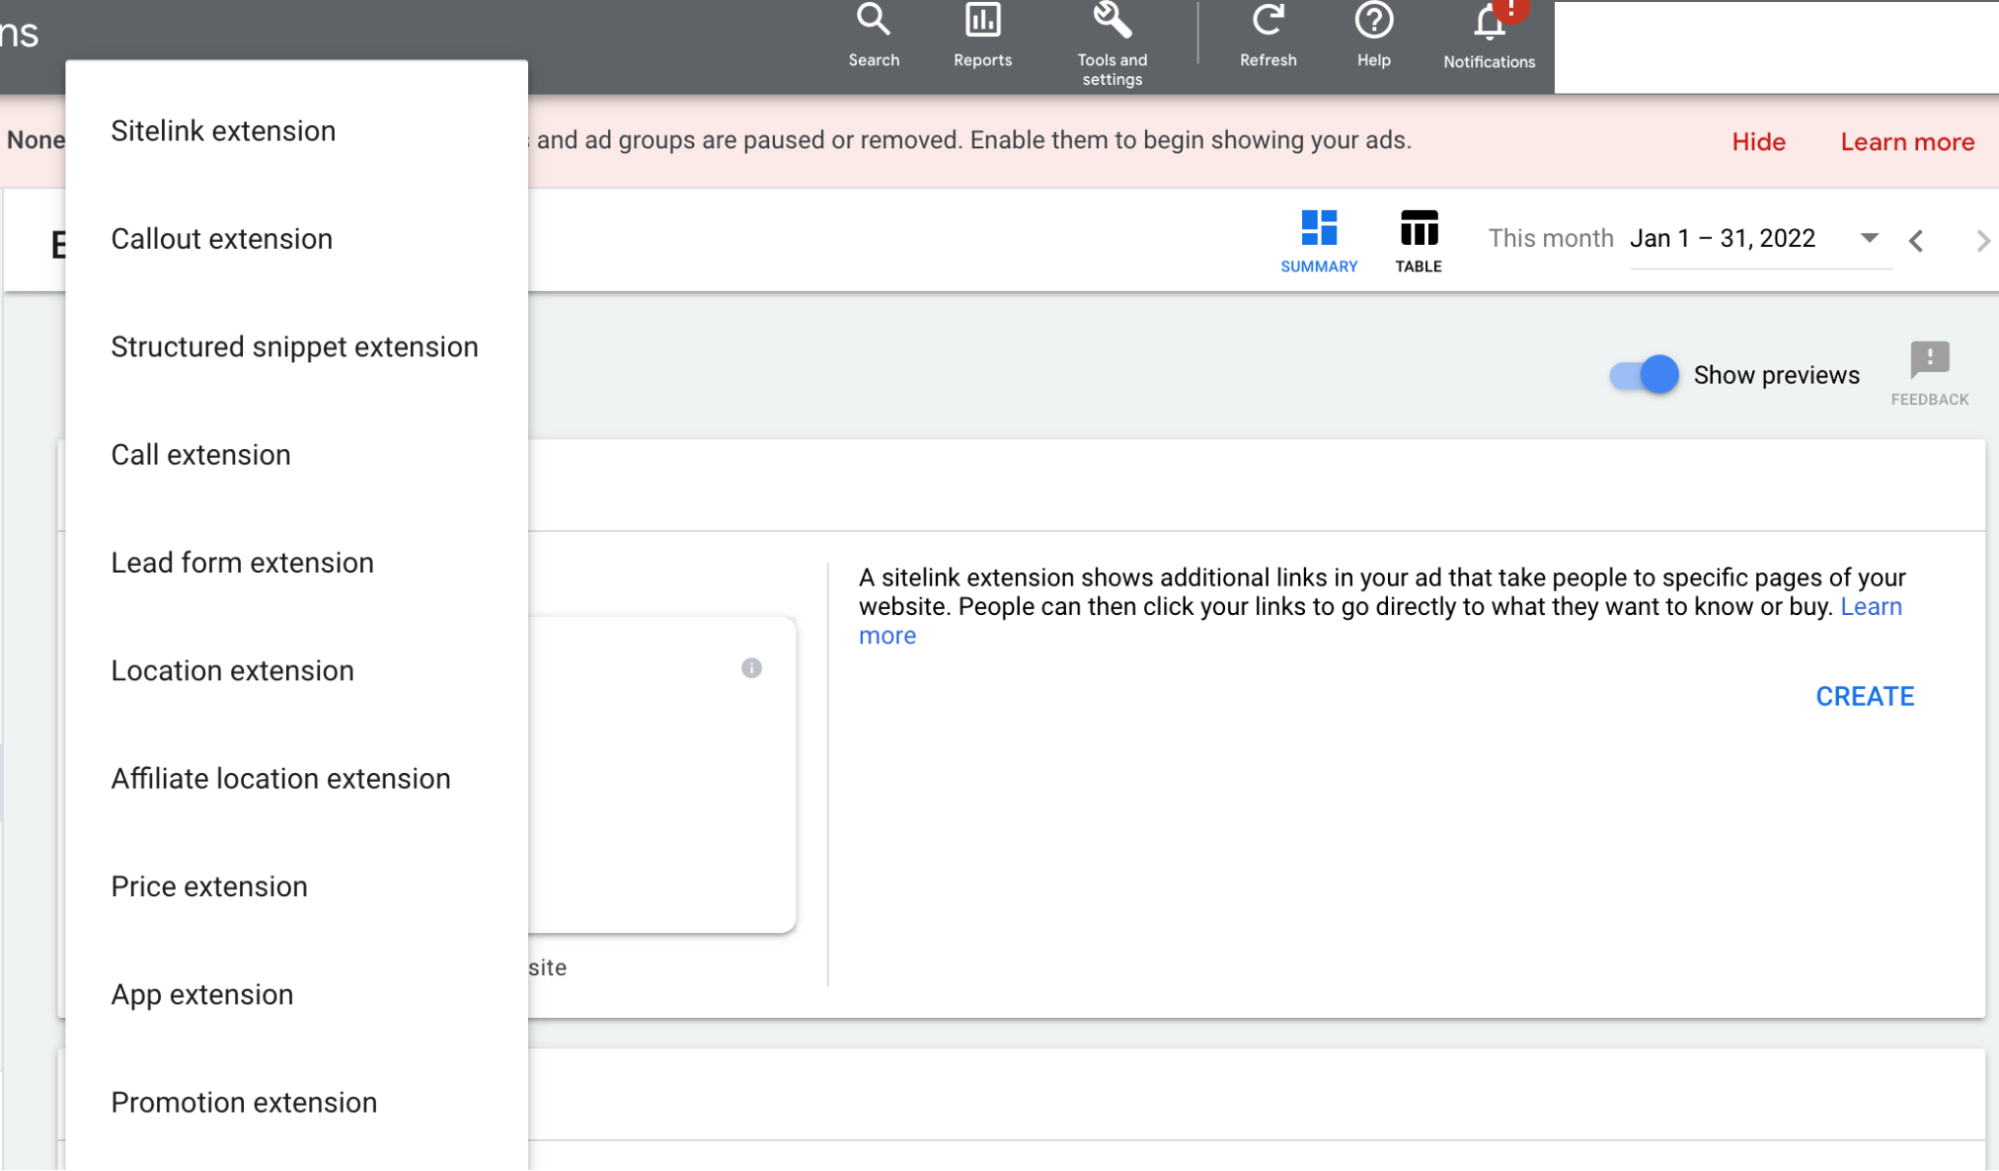
Select your desired extension type
And that’s about it for the basics of setting up manual extensions. Easy, right?
Follow along to the detailed list of ad extensions below to see more specifics on setup for each type of extension.
How to remove manual extensions
There will definitely be times down the line when the usefulness of an ad extension will run out–whether that’s because the information it had is no longer accurate or because, from testing, you’ve determined another extension performs better.
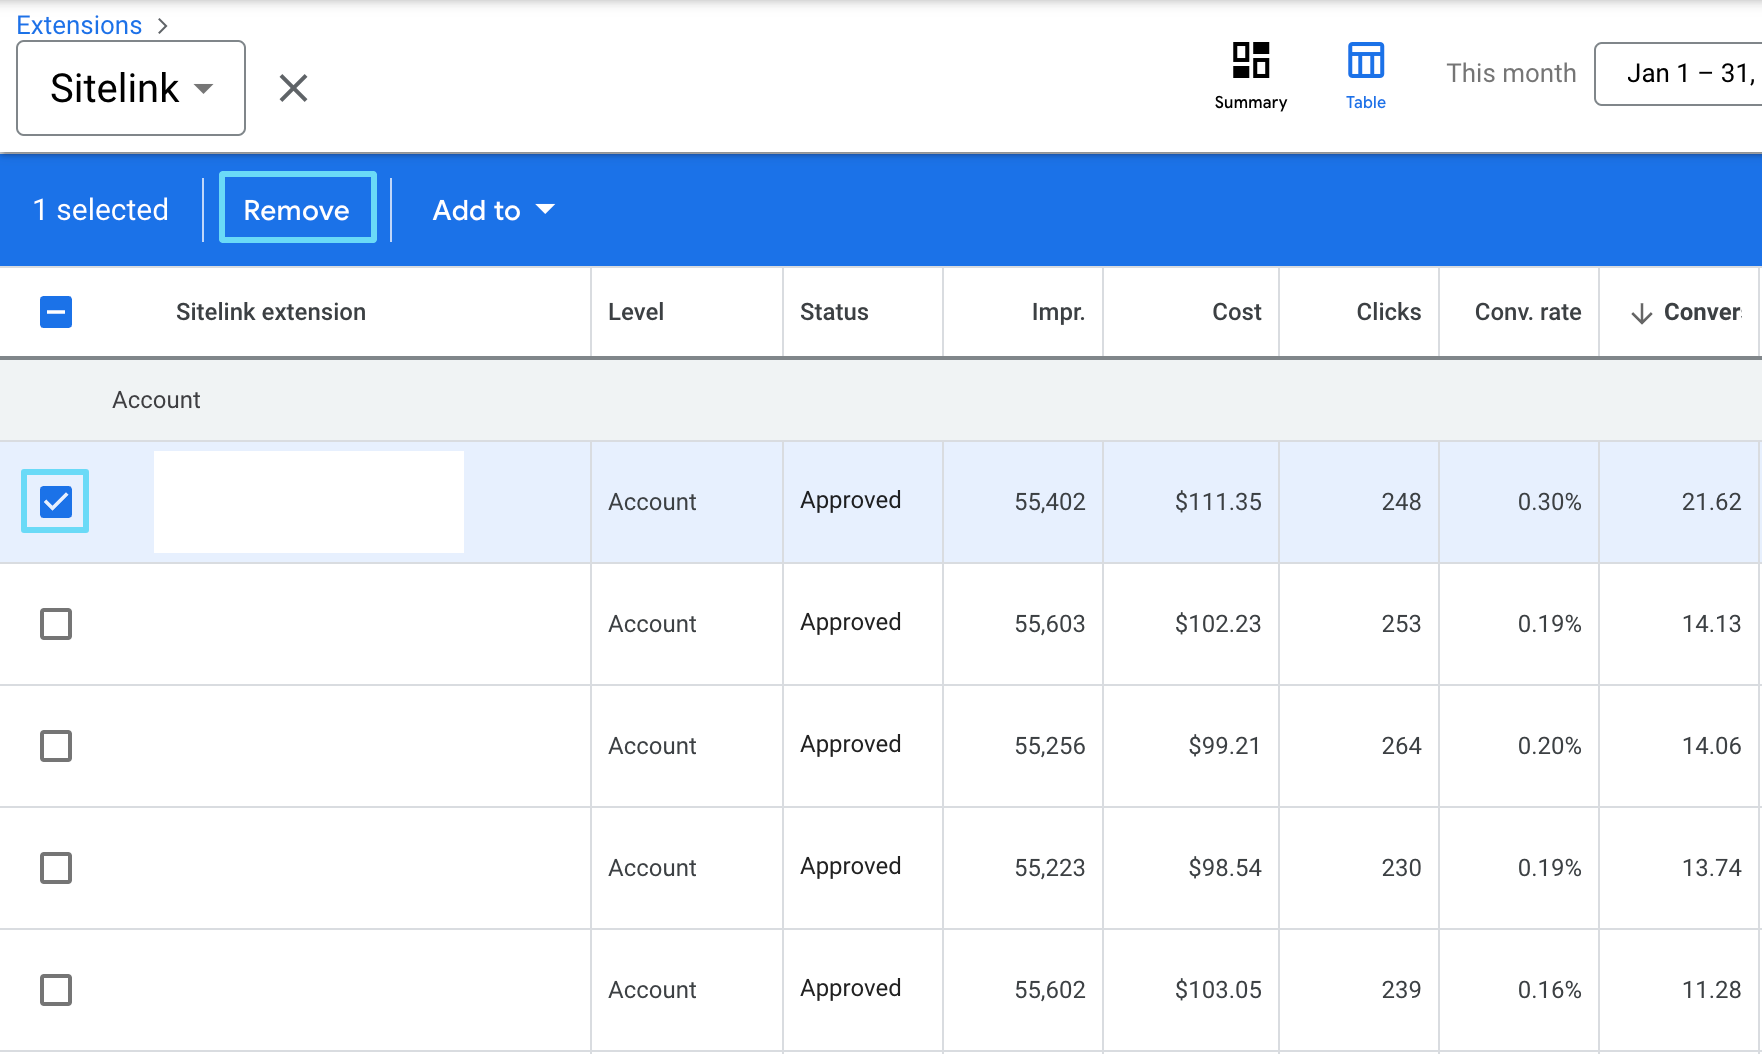
To remove an ad extension, go to your Extensions tab. From the summary, click on the type of extension you want to look at. Once you have all your extensions in front of you, simply select the extension you want to remove, and click remove.
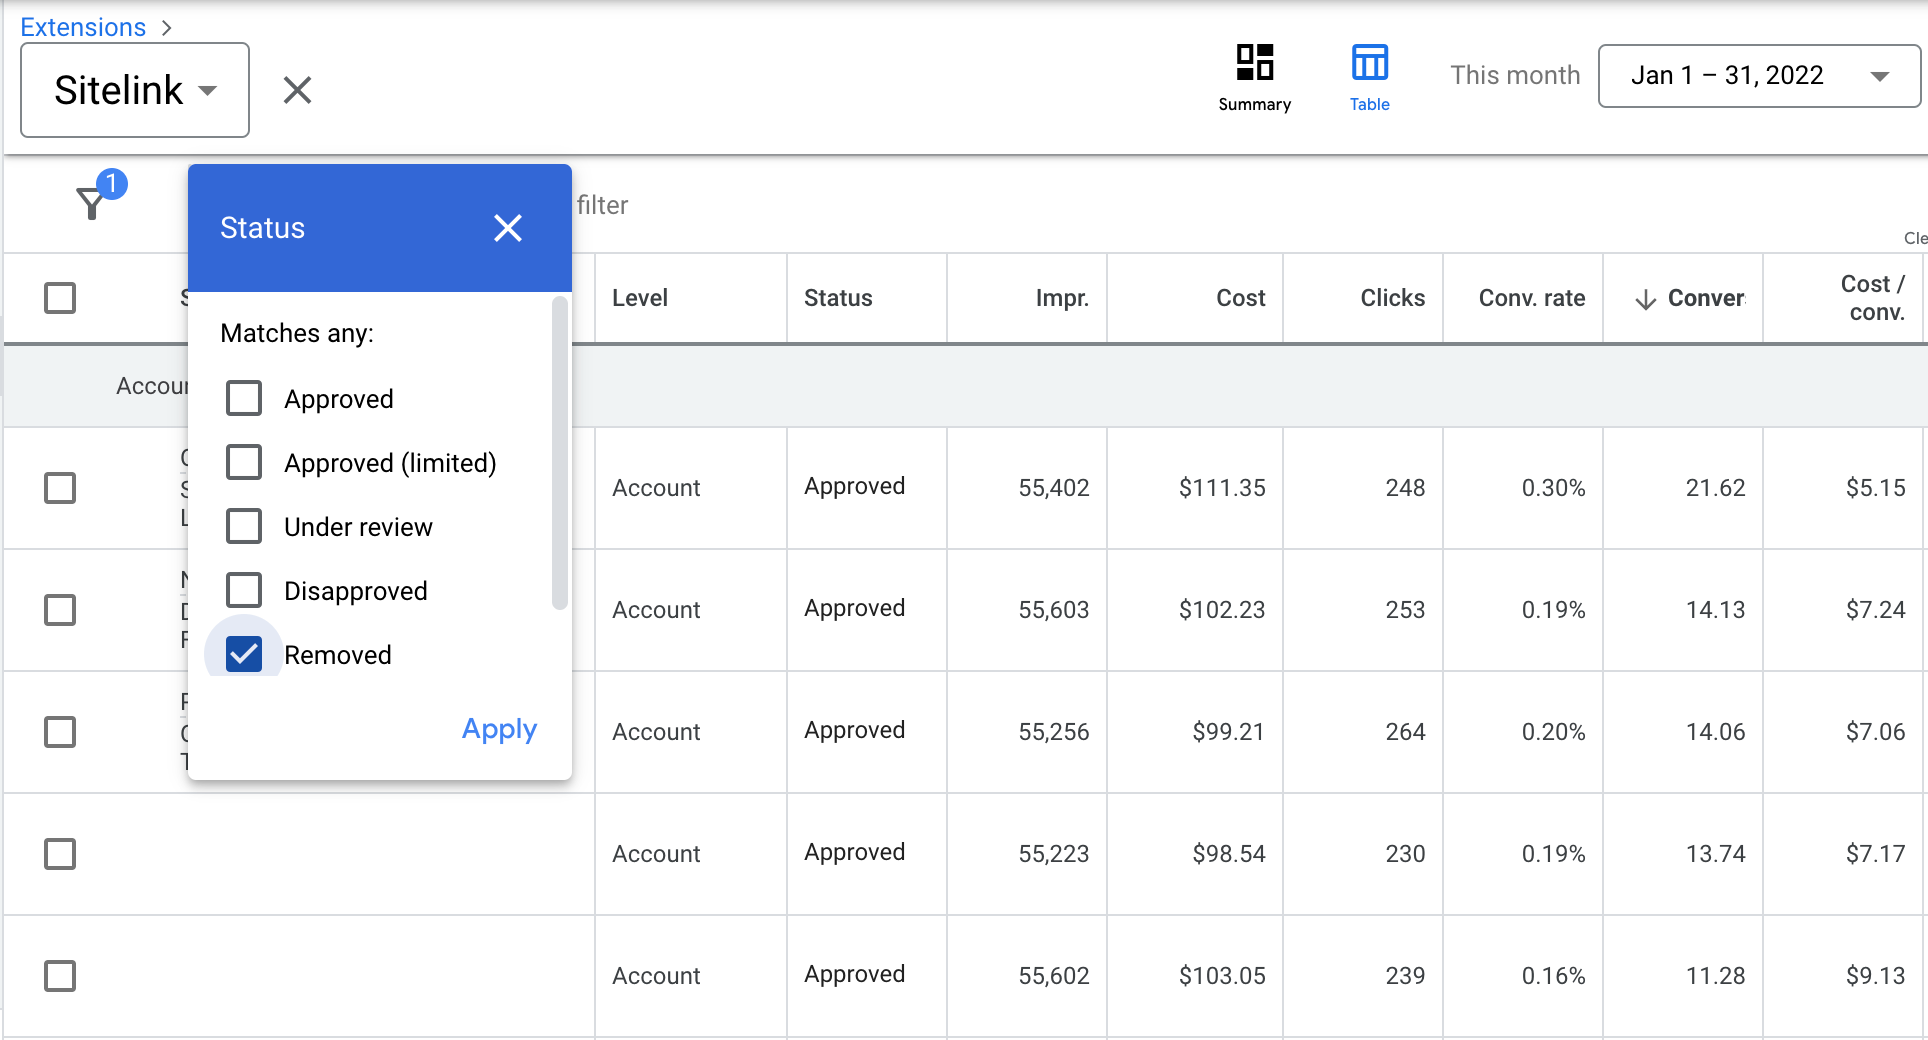
You can still view past data from removed extensions by using a Google Ads filter. Click on “Add filter” and select “Status,” then click “Removed.”
How to add existing manual extensions to new associations
If you come across a situation where you have an extension that you want to add new associations to, that’s an easy one, too.
Go to your Extensions tab, then from the summary page, click which type of extension you want to look at. From there, select the extension(s) you want to add associations to and click “Add To.”
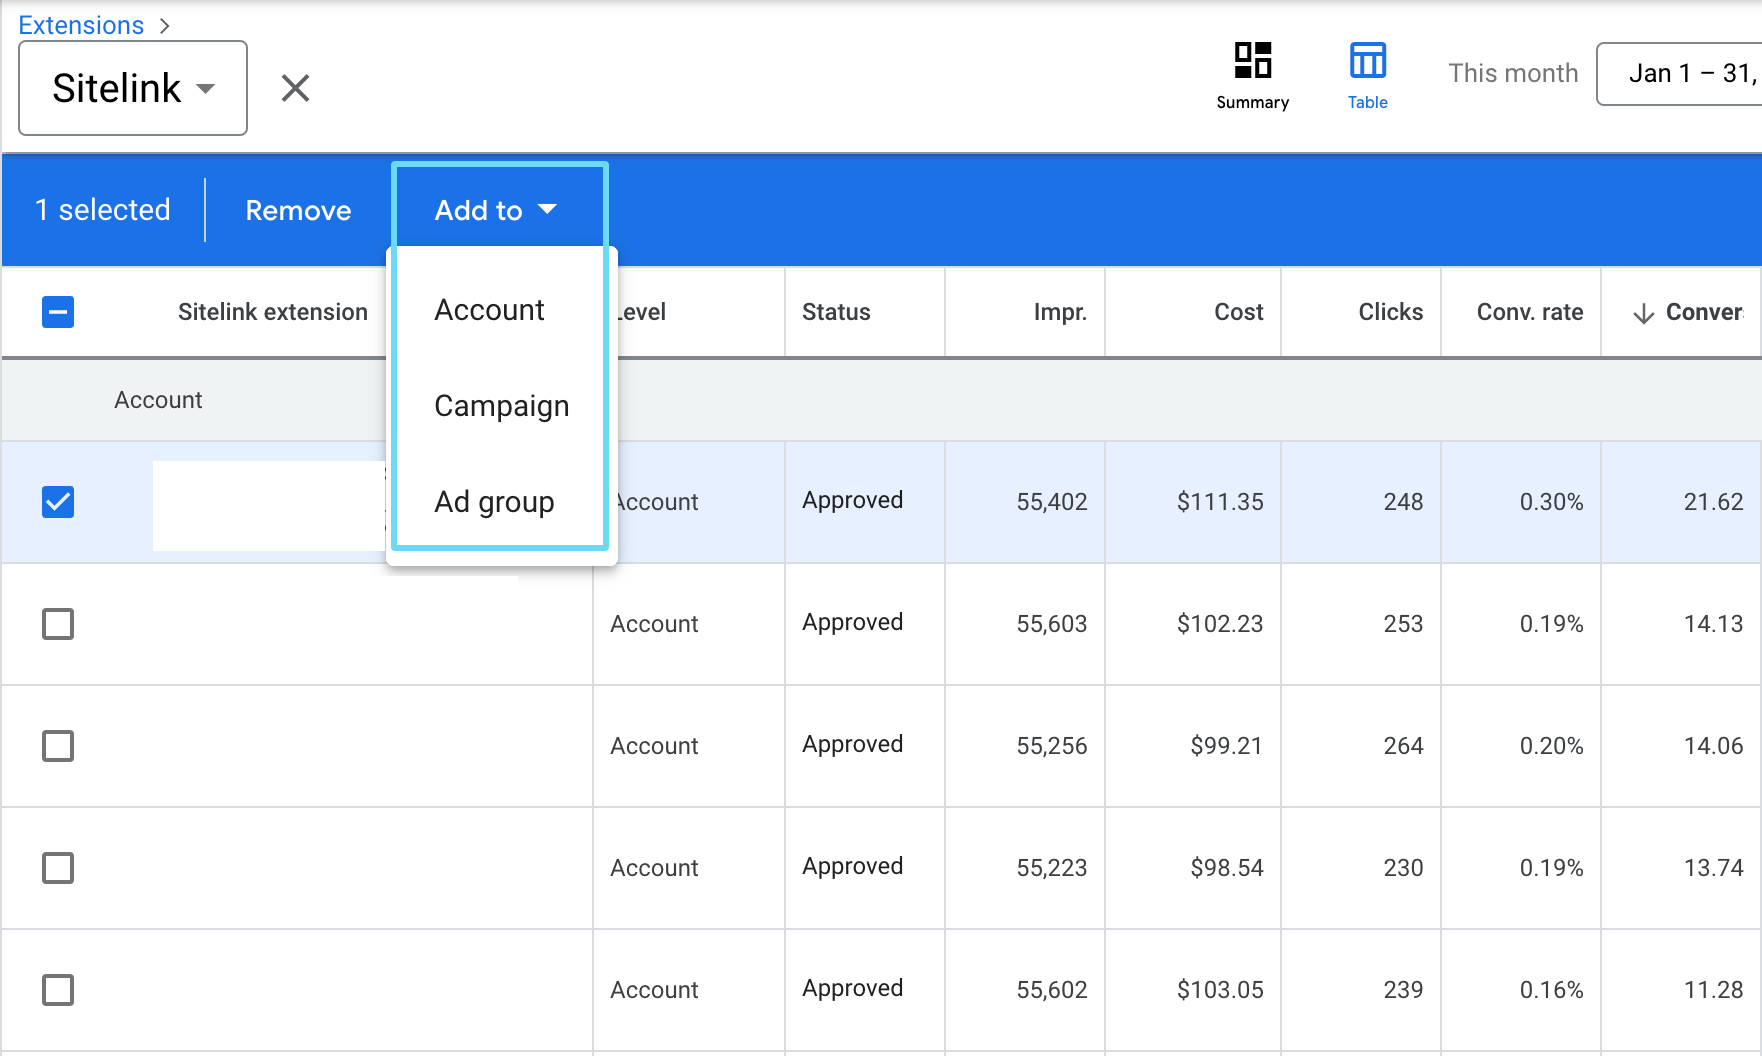
Decide whether you want to add your extension to the account, a campaign, or an ad group, and there you go.
How to turn automated extensions on and off
Notice we didn’t say “creating” automated extensions, because you can’t create them.
You can, however, decide which automated extensions you’d like to turn on or off.
As much as we love taking advantage of Google’s AI opportunities, not all automated extensions will work for every business.
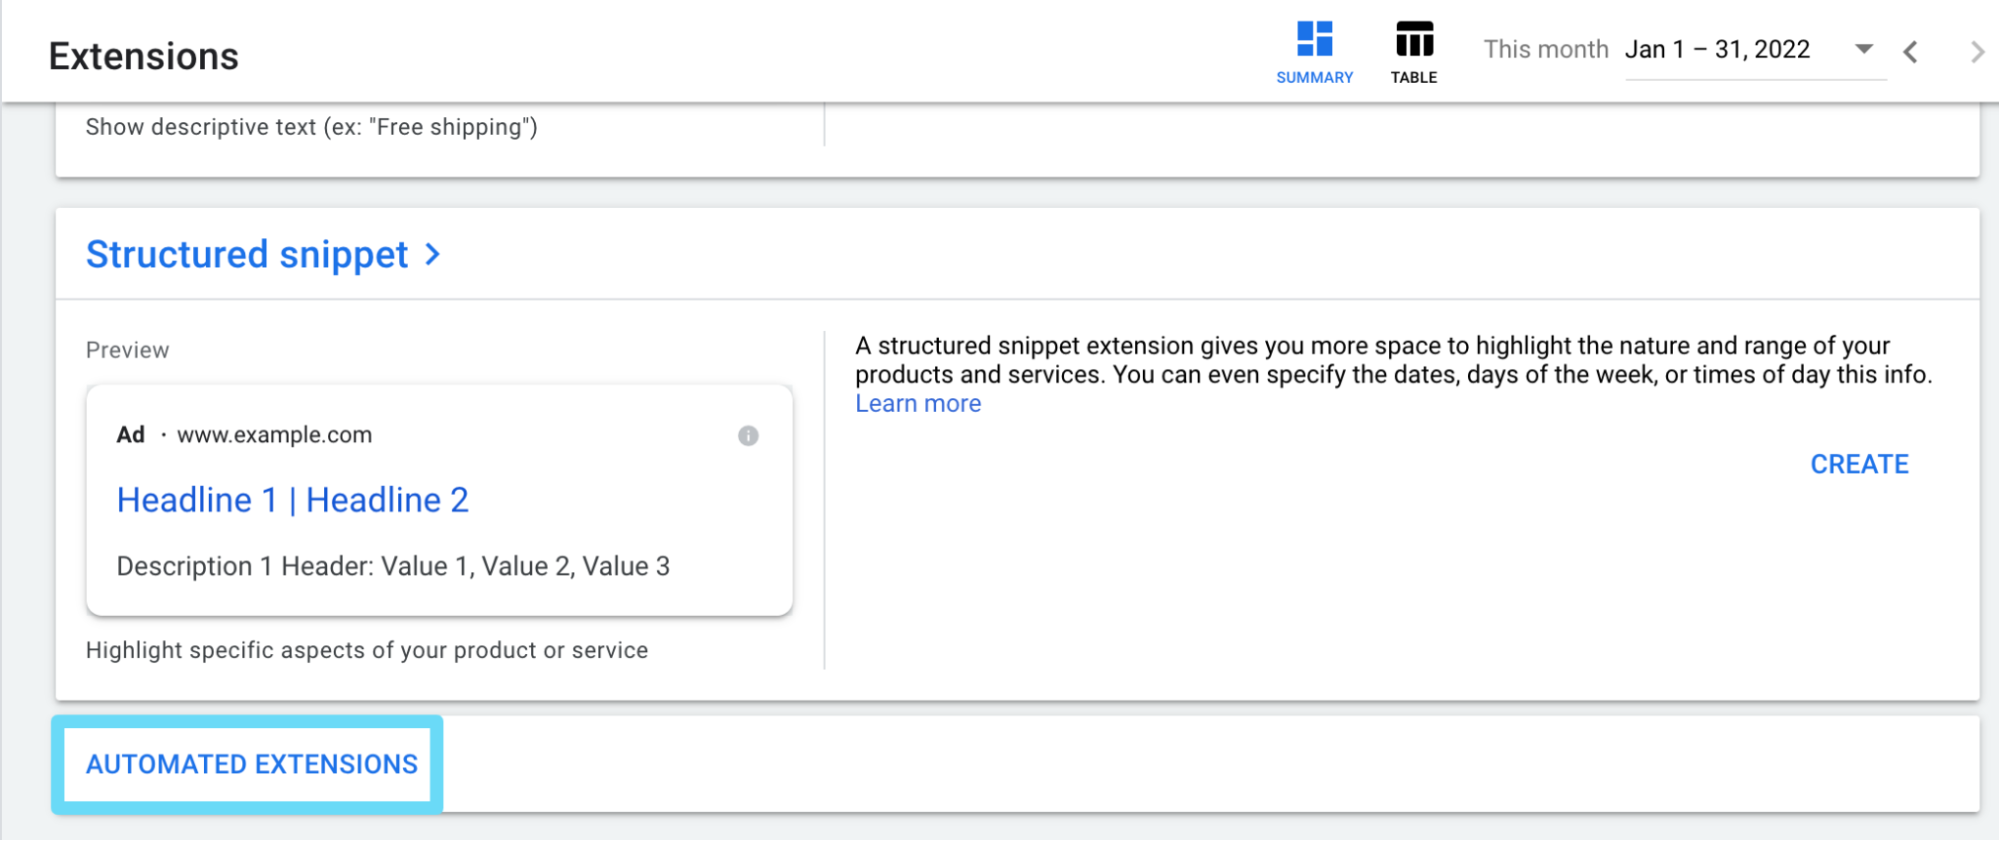
To turn automated extensions on or off, go to your Extensions tab. In the summary view, scroll to the bottom until you see “Automated Extensions” and click that.
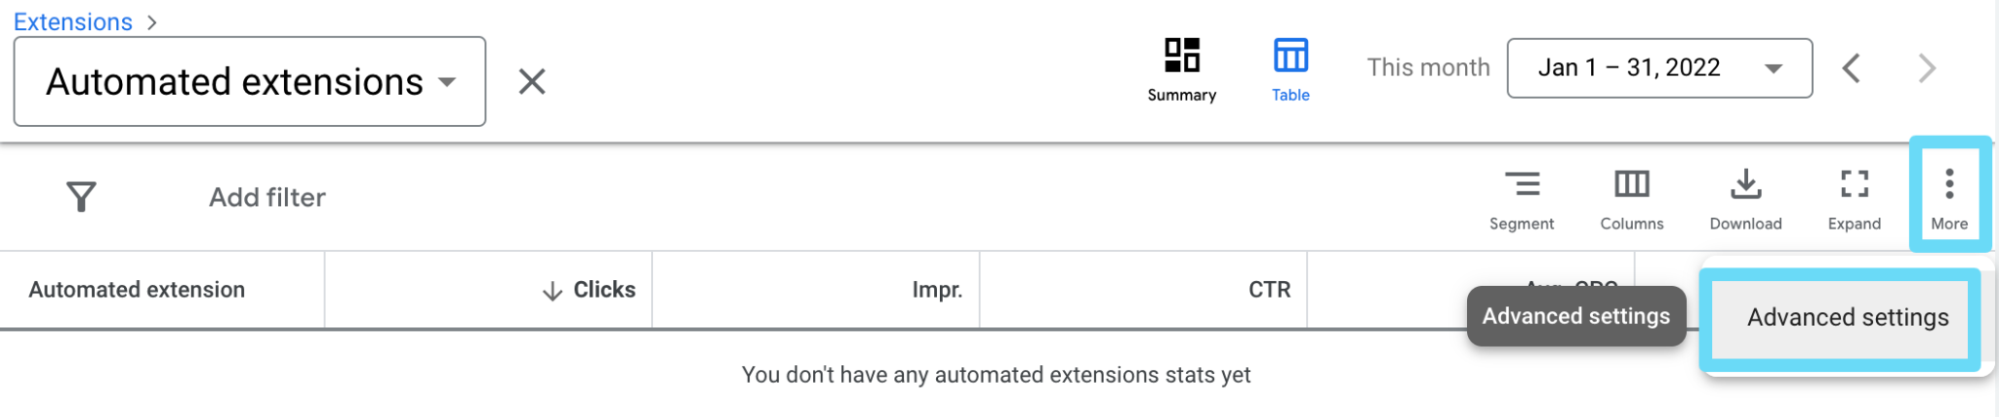
On the next screen, click the three-dot icon at the far right, and select “Advanced Settings.”
Have a look at the automated extension options available, and click the down arrow to the right of each choice to turn them on or off.
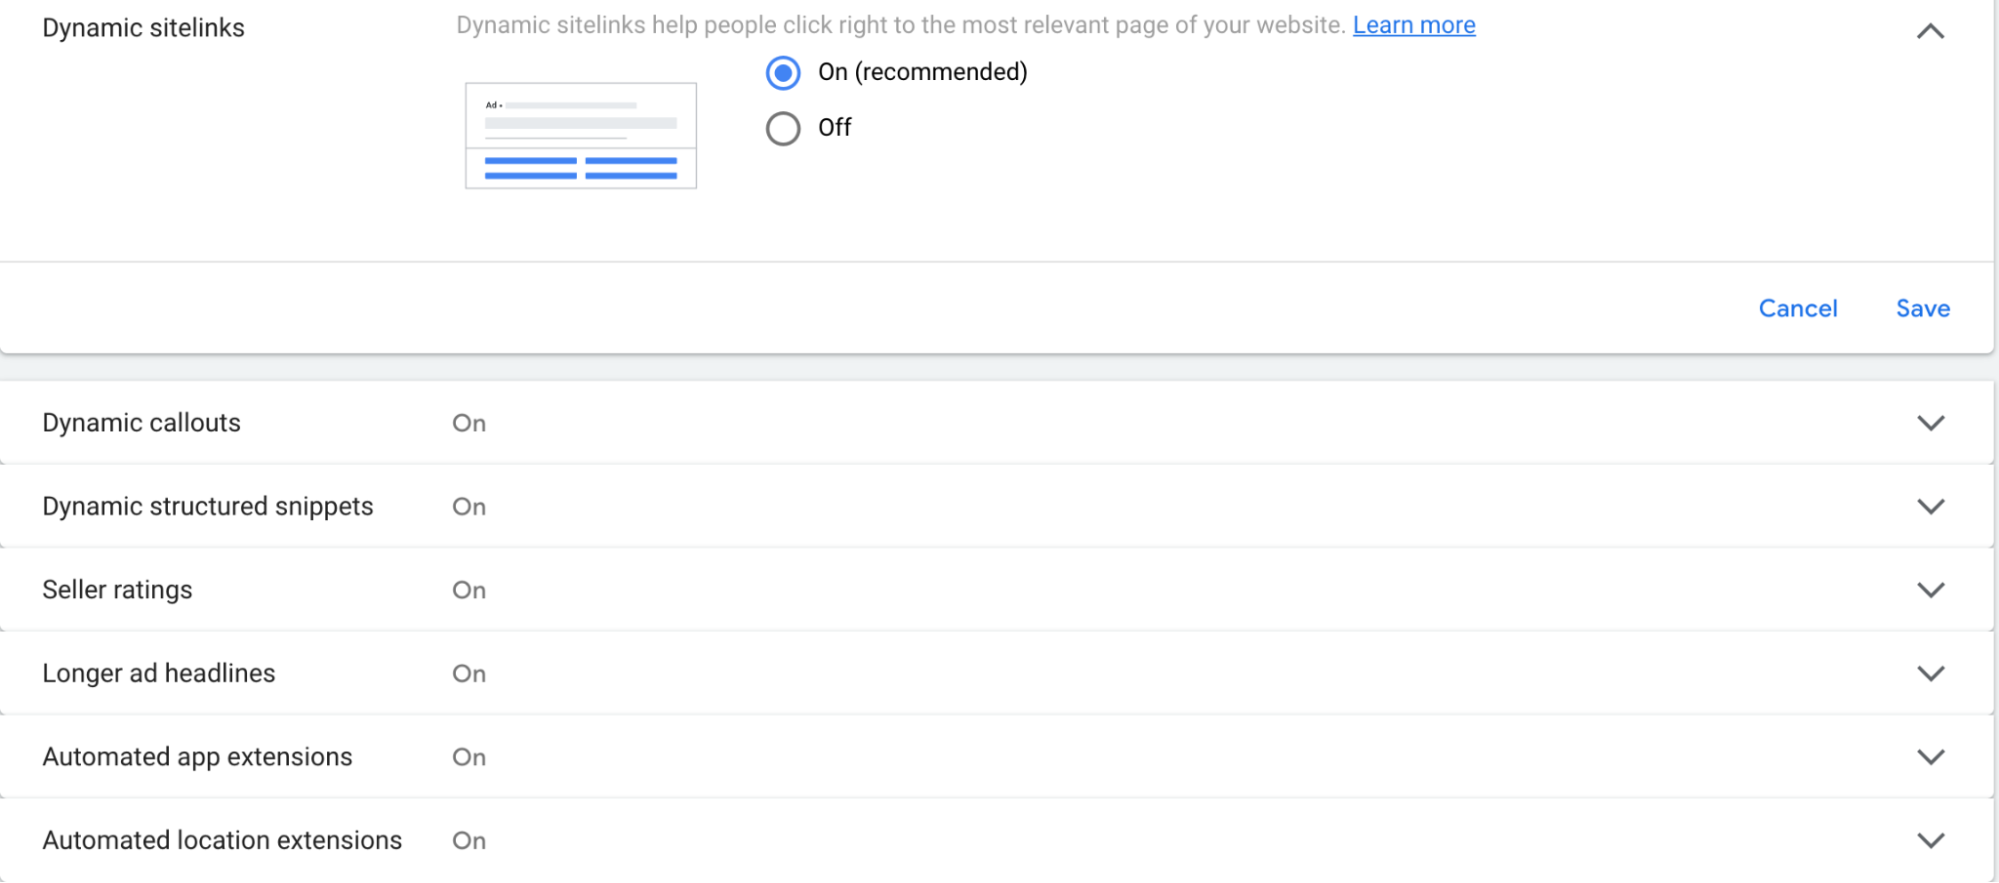
The “on” setting is recommended by Google for all of these, of course, but that doesn’t mean you need all of them. Google just really likes it when you let it decide the extension that works best for your ad.
For example, if you don’t have an app for your business, turn off automated app extensions. We put a lot of faith in Google knowing for certain if your business isn’t associated with an app, but err on the side of caution by turning it off anyway, just to make sure it never accidentally associates your business with an app you don’t own.
You probably don’t want Google creating an automated location extension for your business either if your business location isn’t open to the public.
And folks, I shudder a bit to say this, but if you know you probably don’t have good seller ratings for any reason, even if that reason isn’t your fault, don’t enable the seller ratings extensions. That’s the equivalent of shooting yourself in the foot.
How to see conversions directly attributed to your extensions
If you’re thinking that the performance summary overall is indicative of how many conversions your extensions directly drove, think again.
It can be difficult to see direct conversion return from any extensions aside from lead forms (but we’ll talk about those later).
Typically, direct conversion return is not what most extensions are for–they’re indirect tools to help improve conversion rates through other means, like improving CTR. Callout extensions for example, will probably never be credited with a conversion.
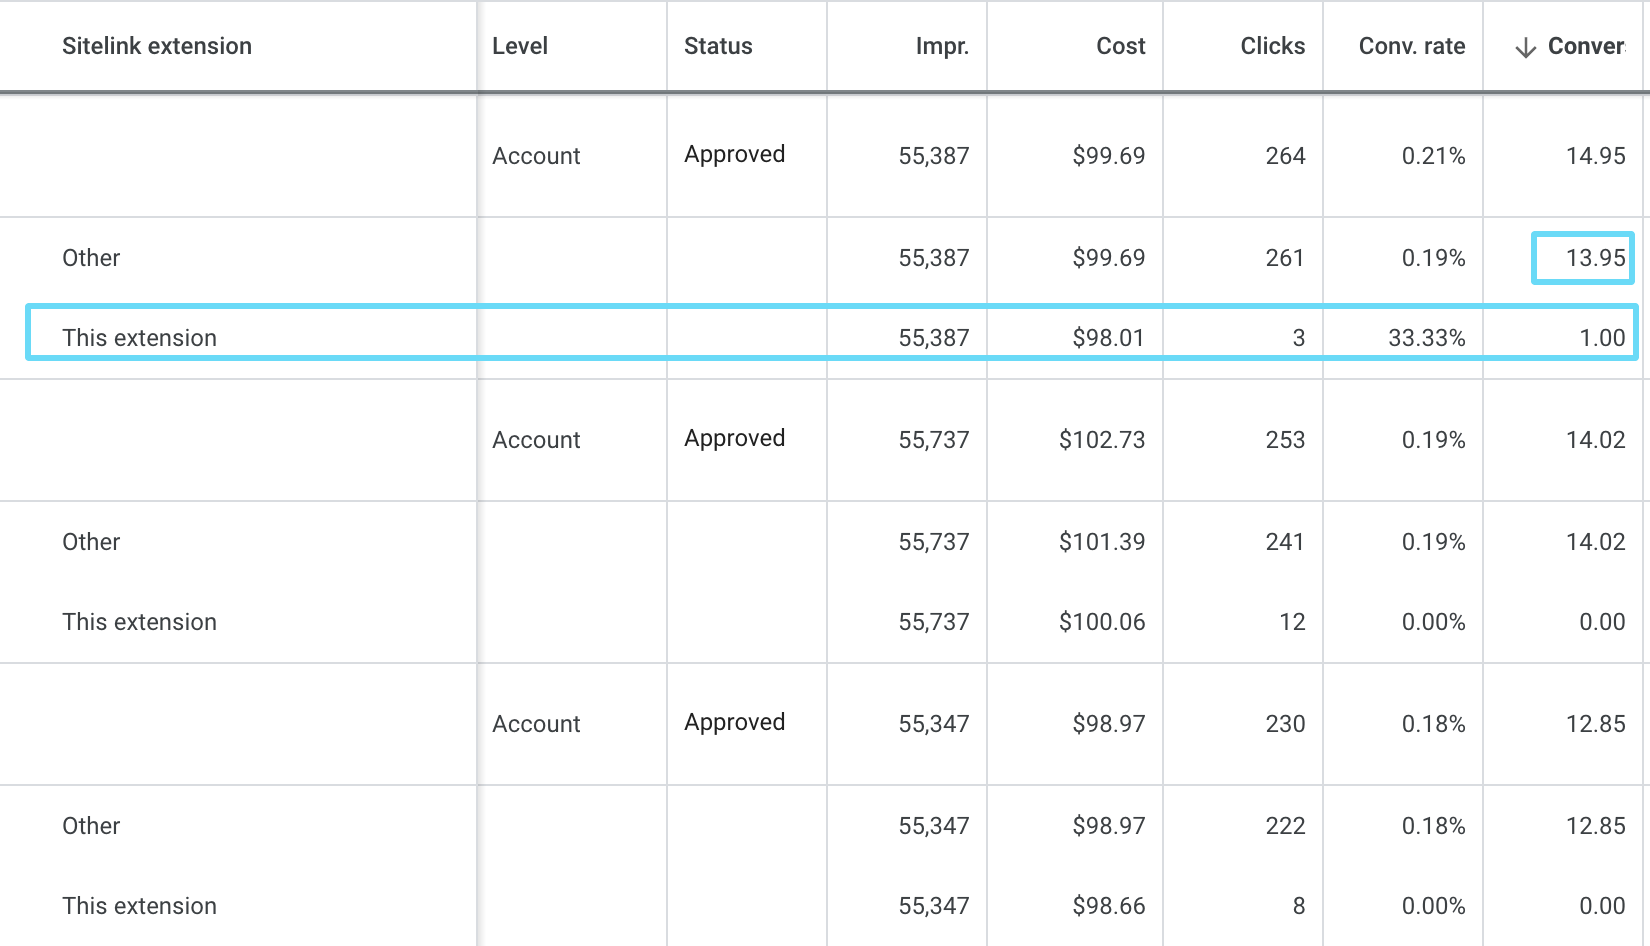
Sometimes clickable extensions do get credit for conversions, though. You can see direct conversions attributed to an extension by going to your “Extensions,” clicking on the extension you want to look at from the summary, and then segmenting the data by “This Extension vs Other.”
The 12 different types of ad extensions
By now, you’ve brushed up on your ad extension basics, and you’re getting fired up to start testing these puppies out.
Before you jump into anything sight unseen though, let’s dive into some details on each extension so you know what they are, their purpose, and how to use them.
1. Sitelink extensions
These are the elders of all ad extensions. They’re the most common, have been around for the longest time, and are highly useful across all industries and business types.
Sitelinks let you showcase additional links to different pages of your website within your ad. For example, your ad itself might direct to a landing page specifically pushing your main offer, but your sitelinks send searchers to alternative site locations that provide additional information or value.
Take a look at this example:
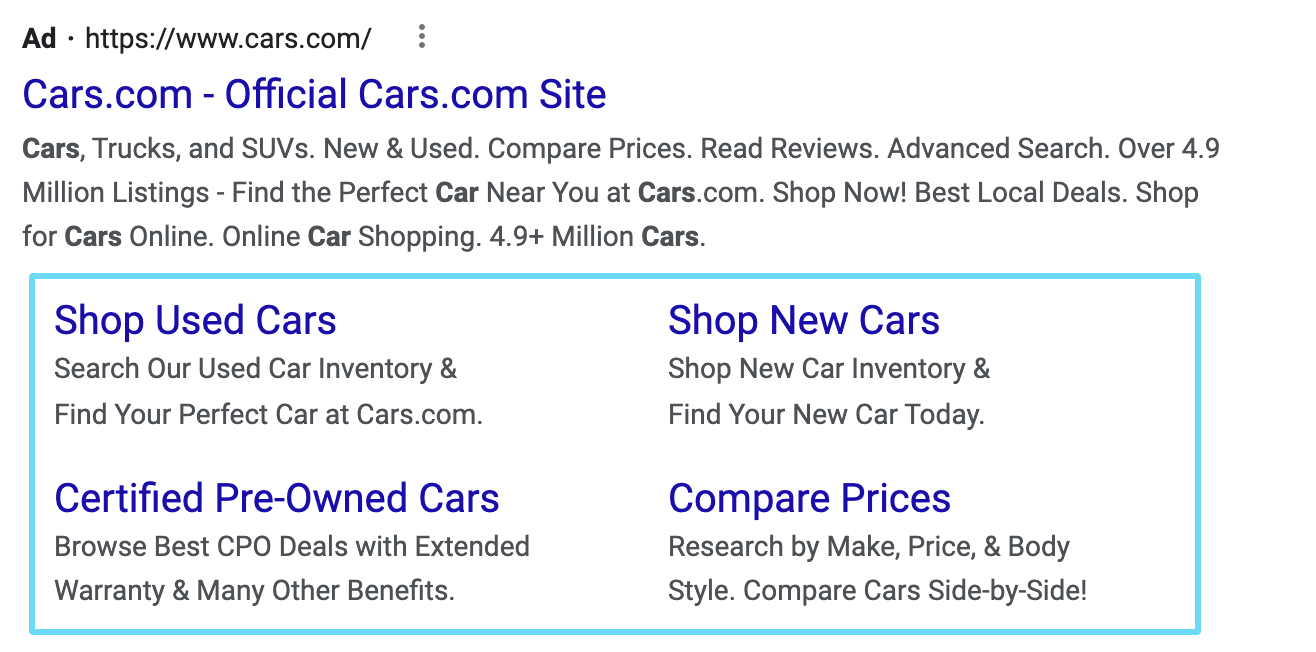
This ad showed for the query “cars for sale.” That search is pretty broad, so the ad served to me was equally so. If I clicked the ad, I’d go to the business’ homepage, and I’d have to navigate around myself looking for what I need.
Who has time for that these days?
You’ll notice that each of their shown sitelinks further helps to narrow down my options, and sends me to a more specific location on the site: Used, New, Certified Pre-Owned, and Compare Prices. Like many other searchers, I’m much more likely to click an ad with sitelinks like this as opposed to one without.
Additionally, adding sitelinks to your ad allows your ad to take up more “real estate” in search results, which also increases the chance of a click. The more real estate you take away from competitors, the more prominent your ad is.
Plus, if you take advantage of sitelinks (and other ad extensions) and your competition doesn’t, then your ad can take up twice as much space compared to theirs.
Descriptions can be added to your sitelinks, too, which creates added value and takes up even more ad space. Your one ad can turn into what looks like five ads.
Pro tip: If you want your ad’s extensions to fully show like the example above, make sure you have good ad rank. The ads in the first position are often the only ones that get this much real estate. In other positions, your sitelinks may show, but they’ll look like this:

A word of caution: Your ad’s main landing page probably has conversion tracking set up, but what about the pages you’re sending your sitelinks to? You don’t want to set up a sitelink that goes to your Contact Us page if you’re not tracking Contact Us form completions. Take the time to tidy up your tracking and make sure you don’t miss out on any forms, subscriptions, newsletter signups, etc. that your sitelinks help you get.
How to set up sitelink extensions
To set up a sitelink extension, start with the basics you learned earlier–go to your Extensions tab, click the blue “+” button, and select “Sitelink Extension.”
Next, fill out your sitelink’s details.
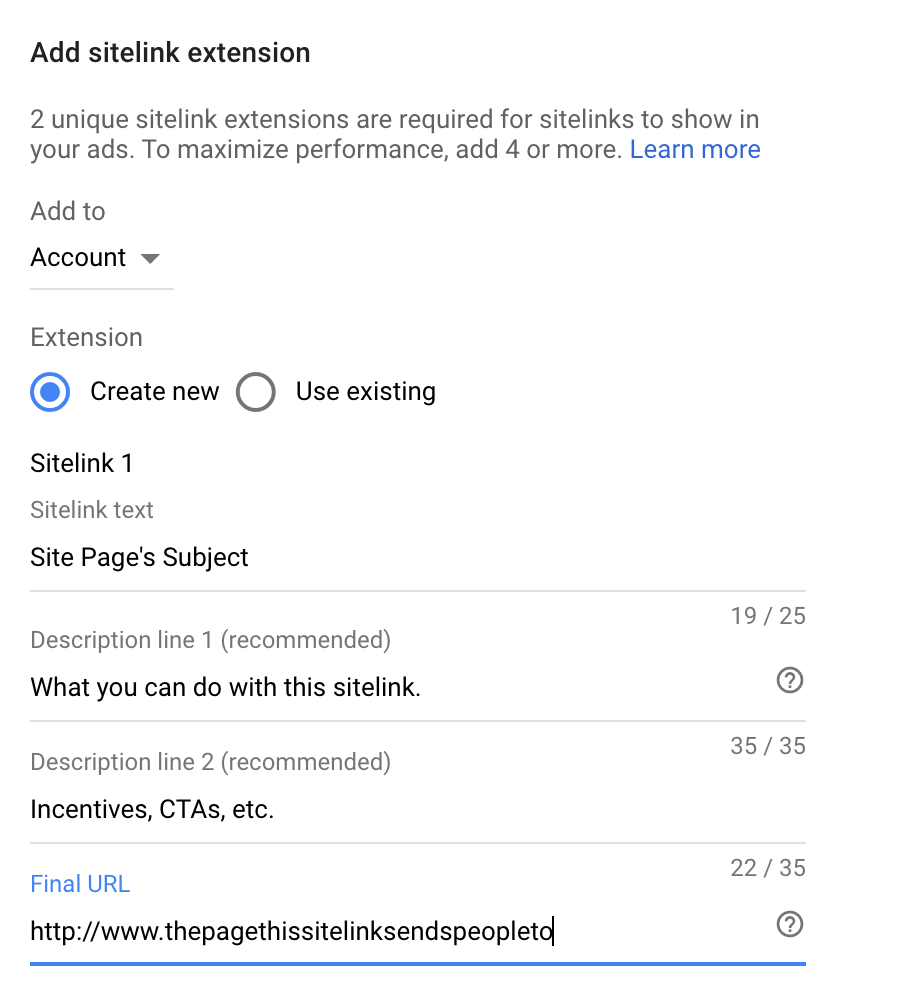
Sitelink setup has 6 main components:
- Add to: Choose the associations for this sitelink–whether it’s account level, or you want to add it to specific campaigns or ad groups
- Extension: If you’re creating a brand new extension, select new. If you want to use an existing one, select existing
- Sitelink text: This is the hyperlink part of the extension that searchers will click. It should clearly explain the subject or contents of the page you’re driving traffic to
- Description Line 1: The top line of your sitelink’s description. You can use your descriptions to say more about the page, push CTAs, or reveal any evergreen offers or value propositions
- Description Line 2: The bottom line of your sitelink’s description, which serves the same purpose as the description prior
- Final URL: This is the page on your website you want your sitelink to send clicks to
You also have the opportunity to create multiple sitelinks at a time in the sitelink creation window (this is what the “Sitelink 1,” “Sitelink 2” text means).
Last but not least, you can optionally click “Sitelink URL Options” to add tracking templates and suffixes to your sitelinks’ URLs. And if you don’t want your sitelinks to show all the time, clicking “Advanced Options” enables you to set a start and end date and/or schedule them to run only at certain times of day or days of the week.
2. Location extensions
Location extensions help you show your address alongside your ad to people who are nearby.
If you’re trying to drive foot traffic to your store, then this is another ad extension you can use to direct people to find what they’re looking for (your address), directly in your ad.

To take advantage of this ad extension, you need to have a verified Google Business Profile, and you’ll need to link that Business Profile to your location extension. Once upon a time, you could paste your address right into the location extension, but that’s no longer the case.
How to set up location extensions
To start, go through the same beginning process as before to create a new extension, but this time select “Location Extension.”
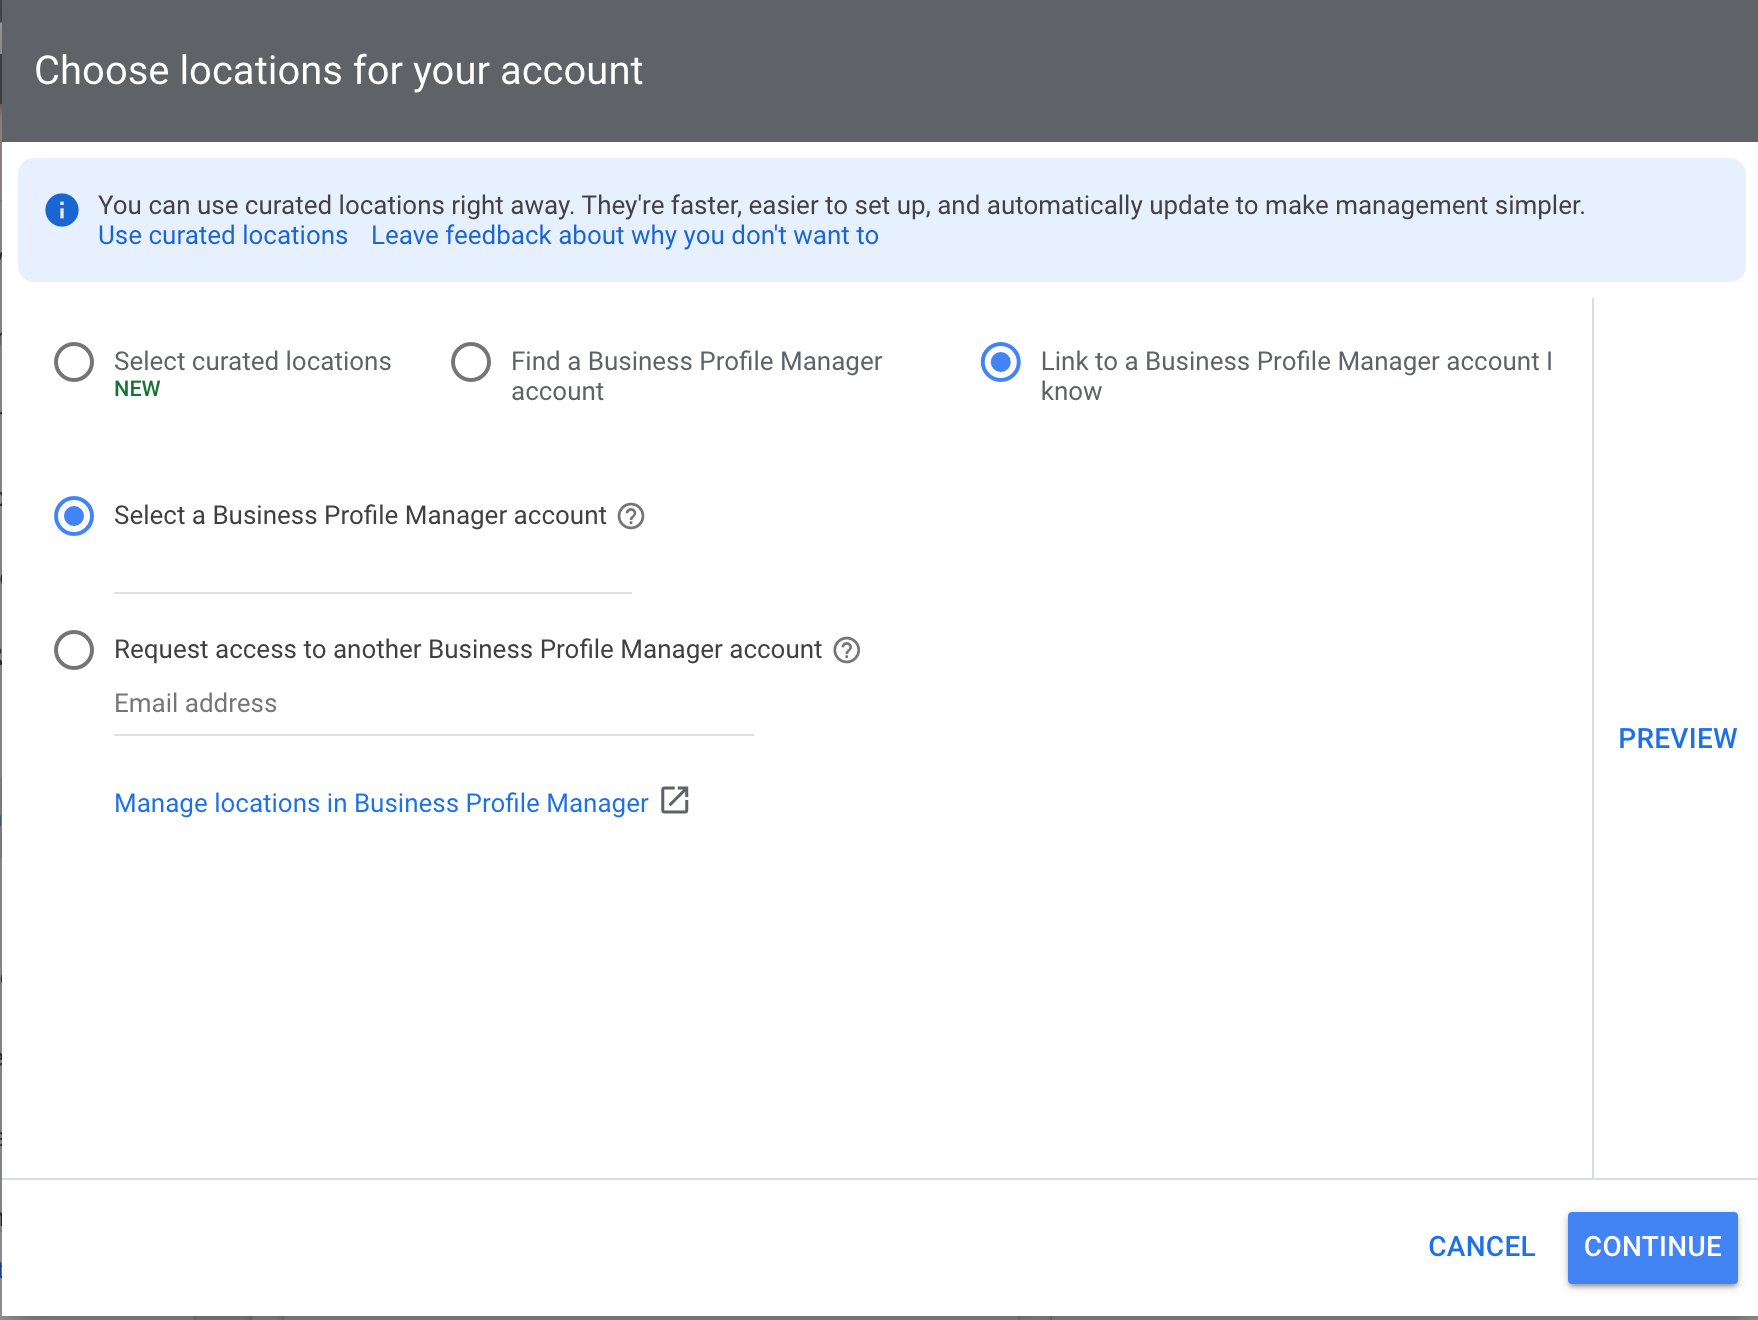
You have a few options here–let us explain.
- Select curated locations: If your business is one in a known chain, you can select that chain brand from Google’s database. Then, after you create your location extension, you can apply a location group to only show your store’s location.
- Find a Business Profile Manager account: If your Business Profile isn’t already linked to your Google Ads account, you can search for your domain to find it here. The Business Profile you select will receive a link request in the email it’s associated with, and you’d just need to approve it.
- Link to a Business Profile Manager account I know: If your Google Ads account is already linked to your Business Profile Manager account, you can select it here. Or, you can request access to a Business Profile Manager account here, too.
Pro tip: If you’re connecting your extension with a Business Profile Manager account that contains more than one store location, you’ll need to apply location filters to use only your desired location. This happens after you click “Continue.”
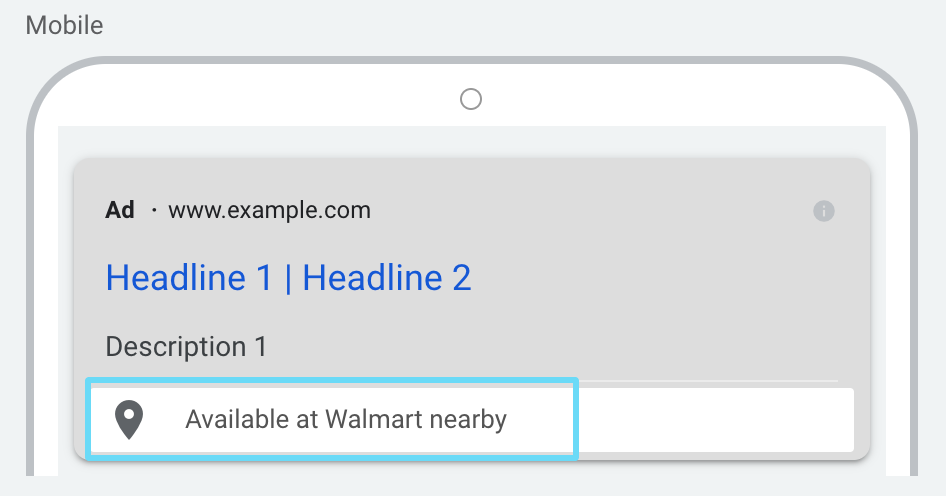
3. Affiliate location extensions
Another type of location extension, affiliate location extensions are mainly intended for those who sell their products through larger retail chains. They’re most helpful with showing searchers the nearest chain store location they can go to buy your goods.
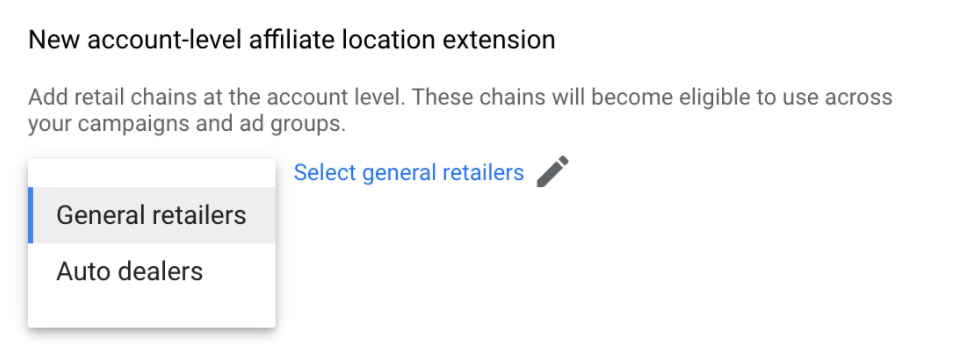
How to set up affiliate location extensions
There’s really not much to setting these up. All you need to do is select from Google’s database of general retailers or auto dealers. Then, when your extension shows, it will show the closest location of that general retailer or auto dealer near the searcher.
4. Call extensions
If your business depends on phone leads, I bet you’ve been itching to read up on these.
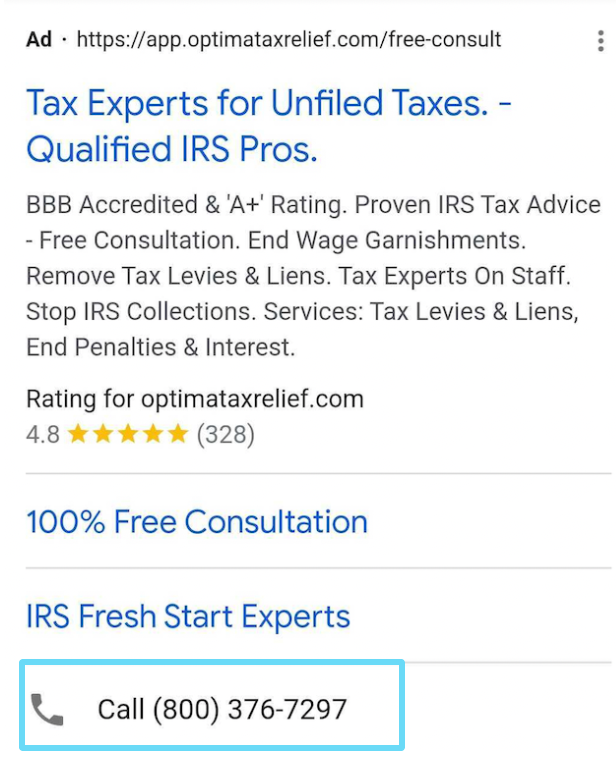
With call extensions, you can add a phone number to show up alongside your ads.
Unlike call ads, call extensions can show up on both mobile and desktop. On mobile, clicking the extension can open that phone number directly on that person’s mobile device, ready to call. On desktop, the extension appears but isn’t clickable, so a searcher would need to manually call the phone number they see.

Pro tip: You’ll need to enable call tracking within Google Ads if you want to see which keyword and ad was responsible for a call (a call conversion). Or, you can use a tracking number that you purchased from an advanced call analytics platform, like Callrail.
IMPORTANT NOTE: Keep geographic granularity in mind here.
If you’re targeting bigger areas, then consider breaking down your campaigns to smaller geo areas so you can use local area code phone numbers in your ads. This could help increase conversions a good deal because customers tend to be more likely to call a local number than a toll-free number.
How to set up call extensions
When you create an extension this time, select “Call Extension.”
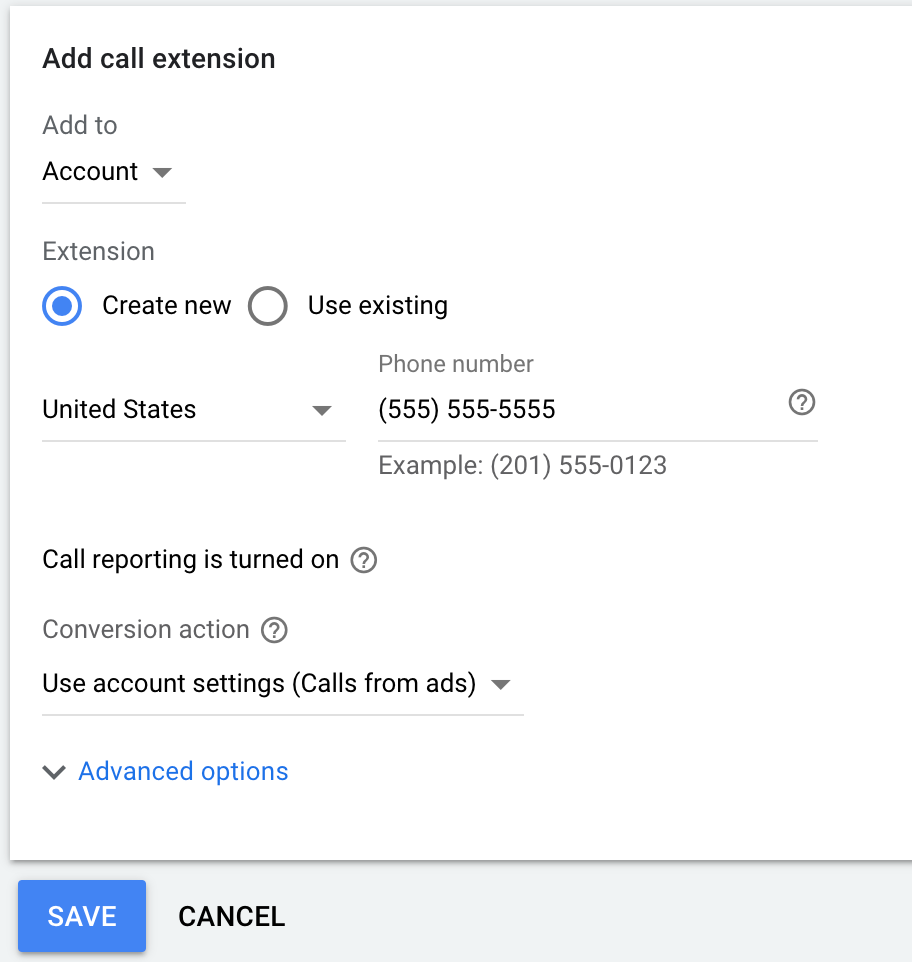
What you need to set up here is pretty easy:
- Decide what level you’re applying the extension at
- Create new, or use existing
- Select your country and input your business’ phone number (If you’re using call reporting, use your business number. If you’re using advanced call analytics, use the tracking number you bought)
- If call reporting is turned on, select the conversion these calls are counted as (“Calls From Ads” is the default and is most typically used)
- Use advanced settings to implement an ad schedule. (If you’re not available to answer the phone 24/7, it’s best to schedule the extension to only show during business hours)
And voilà–now your ads are showing your phone number.
5. App extensions
If you’d like to showcase your iOS or Android app alongside your ad text, then app extensions will be perfect for you. They’re especially important if many purchases actually happen through your app, or if you feel that the app heavily assists in driving site purchases down the line.
As the name implies, app extensions allow mobile searches to download your app and hopefully use it in the future as well.
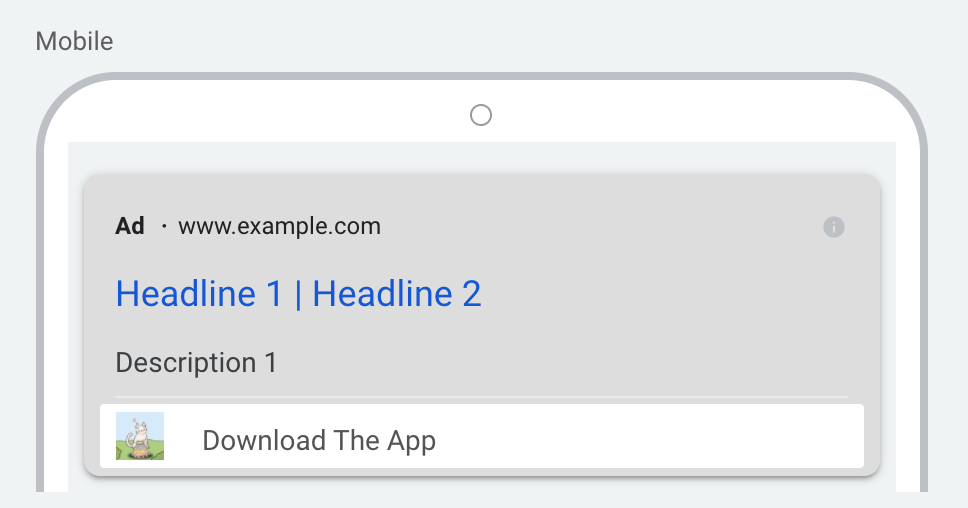
Since not many companies have dedicated apps, you might find that the goal of having app extensions is not always to get more app downloads. Instead, having an app extension sometimes just serves to boost your credibility, which can lead to more clicks on the ad itself, and potentially more site conversions.
Pro tip: If your app is available for both iOS and Android, you should make one app extension for each device. Google Ads will automatically know which extension to show based on the mobile device the searcher is using.
How to set up app extensions
When creating a new extension, select “App Extension.”
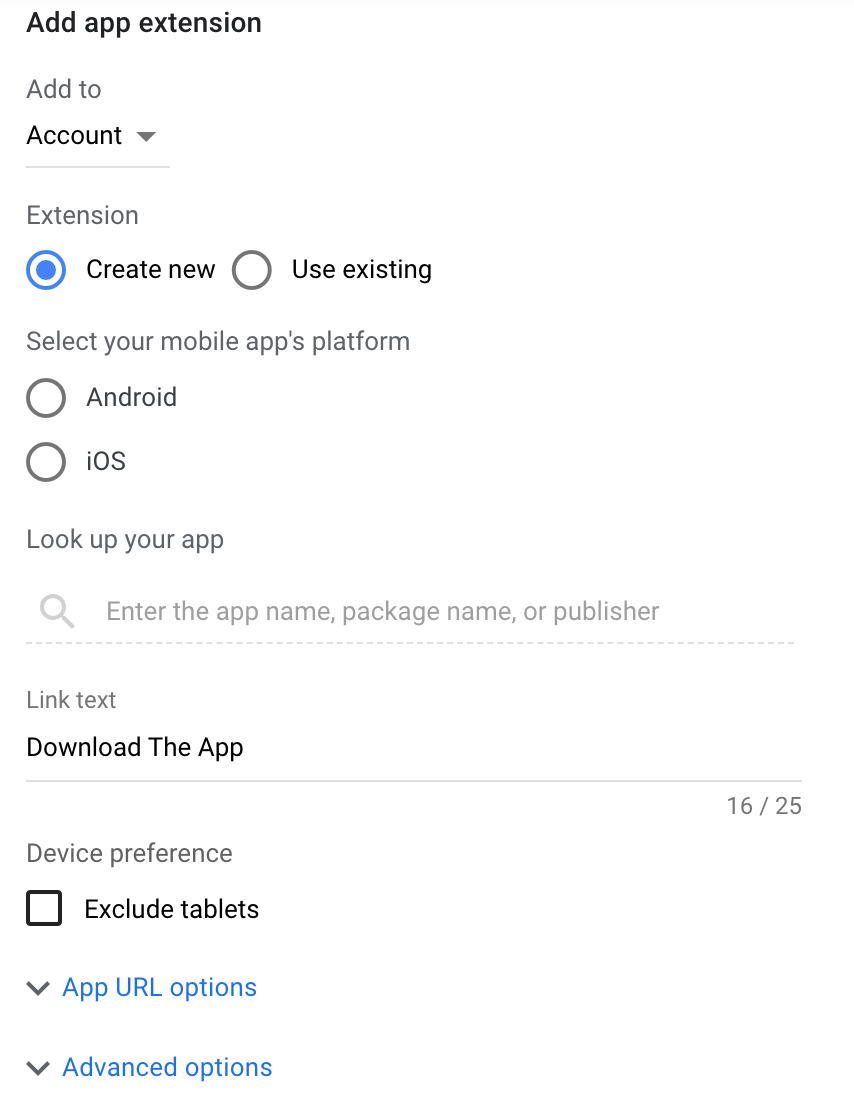
Here’s what you’ll need to set up:
- Select the level you’re applying the extension to
- Create new or use existing
- Select the mobile platform your app runs on (Again, if it runs on both, create 2 extensions)
- Type in your app’s name to find it, then select it
- Enter the text that will show on the extension (You don’t have a lot of characters here, so keep it simple and action-focused)
- Opt to exclude tablets if needed
- Enter URL options for tracking if needed
- Go into advanced options to schedule when the app shows if needed
Once that’s done, your ads will start showing your app alongside them.
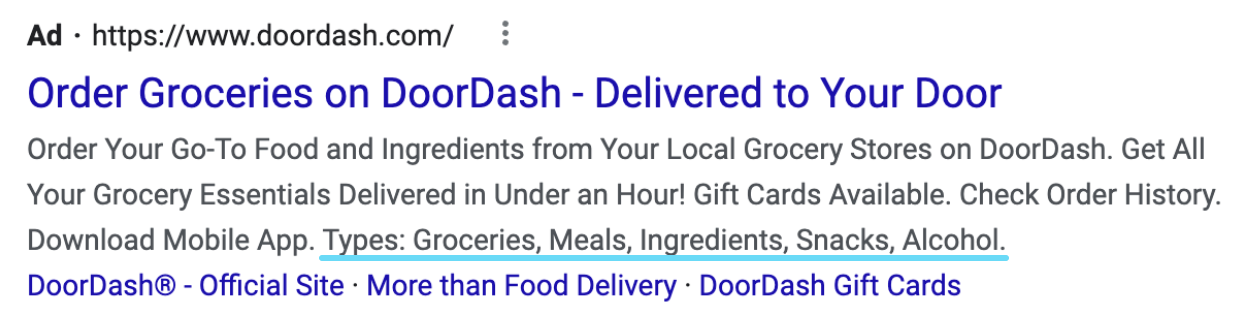
6. Callout extensions
Being one of simpler extensions you can set up, callouts give you an additional non-clickable line of ad text to highlight benefits and features (or whatever you want).
For example, let’s check out this Doordash ad:
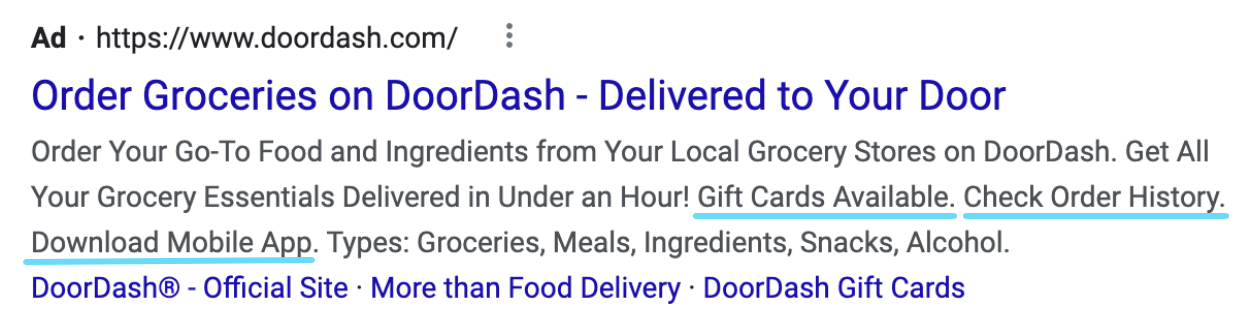
As you can see, they’re using their callouts to highlight extra perks and features they have available, and they show as short statements separated by periods.
Really the main benefit with callouts is the ability to add more to your ad than your description lines have room for, which can make your ad more credible, and increase CTR.
Pro tip: Try not to be redundant. Highlight extras or features in your extension that your ad’s body copy doesn’t already cover–we don’t want to repeat ourselves.
How to set up callout extensions
This time, select “Callout Extension” when you go in to create an extension.
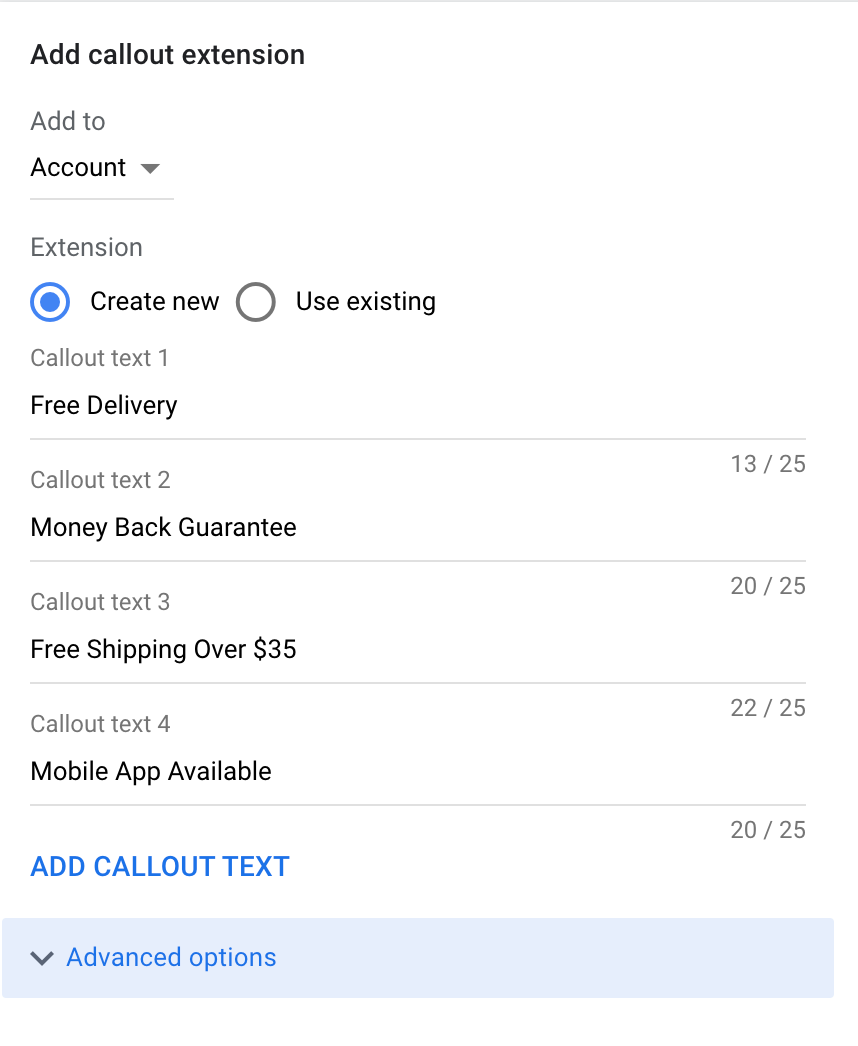
Like with the other extensions, select the level you’re applying it to, then whether you’re creating new or not. After that:
- Write your callout extensions. You can add up to 10, but ads will only show as many as 6 at a time (and even still, that’s pretty rare). We recommend starting with 4-6
- Schedule your extension if needed
Once that’s done, your callouts will be hard at work beefing up your ads.
7. Structured snippet extensions
To a newcomer, it might be difficult at first to differentiate structured snippets from callouts. But it’s actually pretty easy to spot them once you know what you’re looking for.
All structured snippets will begin with a category and a colon. Like this:
Structured snippets allow you to take advantage of yet another line of ad space by showcasing information from a number of different categories.
The “Types” and “Styles” categories do apply to most businesses, but still, make sure what you’re listing actually makes sense to be paired with the category you’ve chosen.
In a lot of first-time accounts, I often see advertisers make the mistake of filling out structured snippets with the kind of information you should be putting in a callout, and the two don’t serve the same purpose. Or worse, I see callouts showing the exact same information the structured snippets are.
Redundancy doesn’t serve us well, people. Callouts and structured snippets can and often do show together, so don’t put the same stuff in both.
Structured snippets are best used to detail out services, use cases, or varieties of the product you sell. Trust me, they look wonky when you try to say that the “Types” of your product are “Free Shipping.”
How to set up structured snippets
Select “Structured Snippet” when creating an ad extension this time around, and you’ll end up with this settings window:
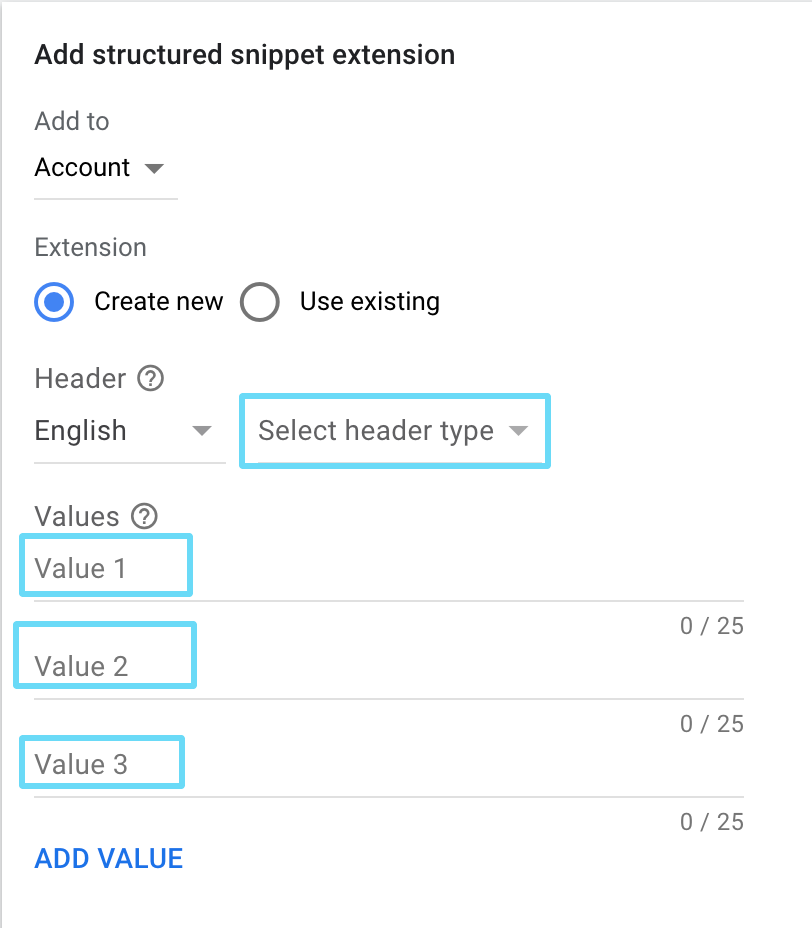
There’s not much to set up here, so once you’ve selected an option from those top two settings, the next steps are to:
- Select your header language and type. The header type is the category that will show before the colon in your snippet. It denotes what you’re listing.
- Enter your structured snippet values. The minimum is 3, the maximum is 10 (per header). Remember that ad space is limited, so if your extensions show, you’ll typically only see 2 or 3 values visible in the ad.
Now you’re cooking with gas. Your ads are about to look beastly in that first position spot.
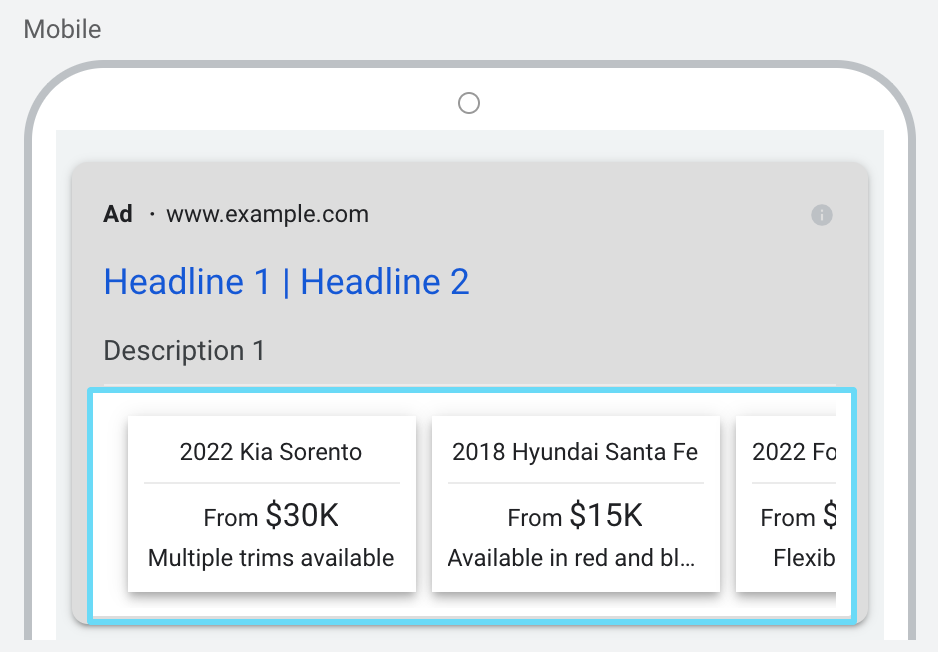
8. Price extensions
Price extensions are for all advertisers who want to showcase the pricing along with popular services or products. At a glance, this extension helps provide an answer to the question most people have upfront: What the heck does it cost?
Seeing price really improves the credibility and favorability of your ad. That is…if your pricing is competitive.
You can add price extensions at the account, campaign, and ad group level. This will help you drive down to the ad group level and get even more granular with the help of single keyword ad groups.
Pro tip: Each type of price extension has its own requirements, so if you want your extensions to be approved, best get familiar with them.
How to set up price extensions
Once you select “Price Extensions” as the type of extension you’re creating, you’ll see this:

Price extensions have a bit of a more detailed setup, but it’s easy nonetheless. After making your choices on the top two settings, you’ll then:
- Select the extension’s language.
- Select the type of extension you want to use. Make sure it’s relevant to your product; e.g. if you’re showing pricing on different brands you carry, select Brands.
- Select the price currency.
- Select the price qualifier. This is used if the price you show is not absolute. You can pick “From,” “Up to,” “Average,” or “No qualifier” if the price is what it is.
All of these settings will apply to every price extension in your set.
Now, when setting up the price extensions themselves, you’ll need:
- The header: The product you’re giving a price on.
- The price
- The price unit: Stay with no unit if your price is the one time buying price period, or select a unit like per month, per week, per hour, etc.
- The description: Write a little something that adds value to this listing. You’re short on characters, so make it count. It can’t be another price or discount offering.
- Final URL: The final URL should take users directly to the product you’ve priced in the extension. Make sure the price you represent in the extension and the one on your landing page match.
You need a minimum of 3 different price extensions in the set, so keep going until you have at least 3. (Or more, you overachiever.)
Don’t forget about URL options and ad scheduling at the end, if you need them.
That’s it–now your ads are really looking flashy.
9. Promotion extensions
Have a great discount happening on your product? Then you should be trying to push that offer however you can. With promotion extensions, you can add a clickable link to the bottom of your ad that features your current offer.
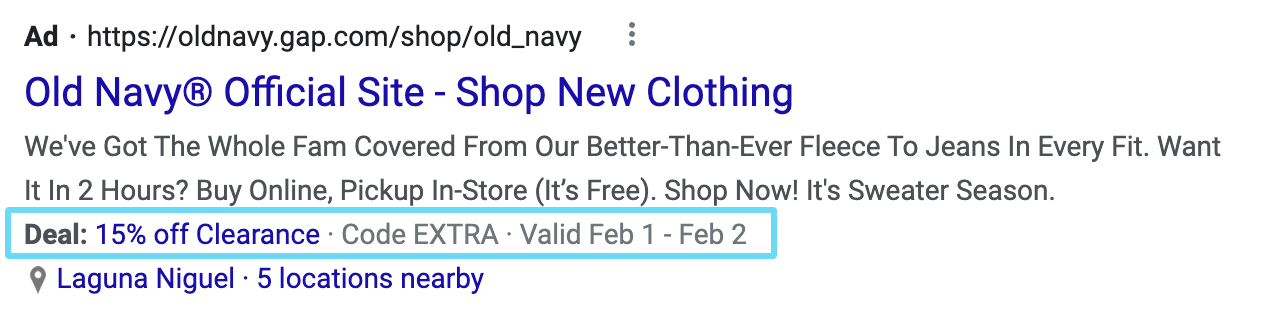
Promotion extensions are somewhat similar to price extensions. However, instead of promoting a price, they promote a discount. It can be a monetary or percentage off discount.
It’s another way to give your potential customers what they’re probably already looking for (a deal) upfront in your ad, which further increases your chances of a click.
How to set up promotion extensions
Go ahead and select “Promotion Extensions” when creating your extension, and decide what you want on those first two settings. Then, move on to building out the extension itself.
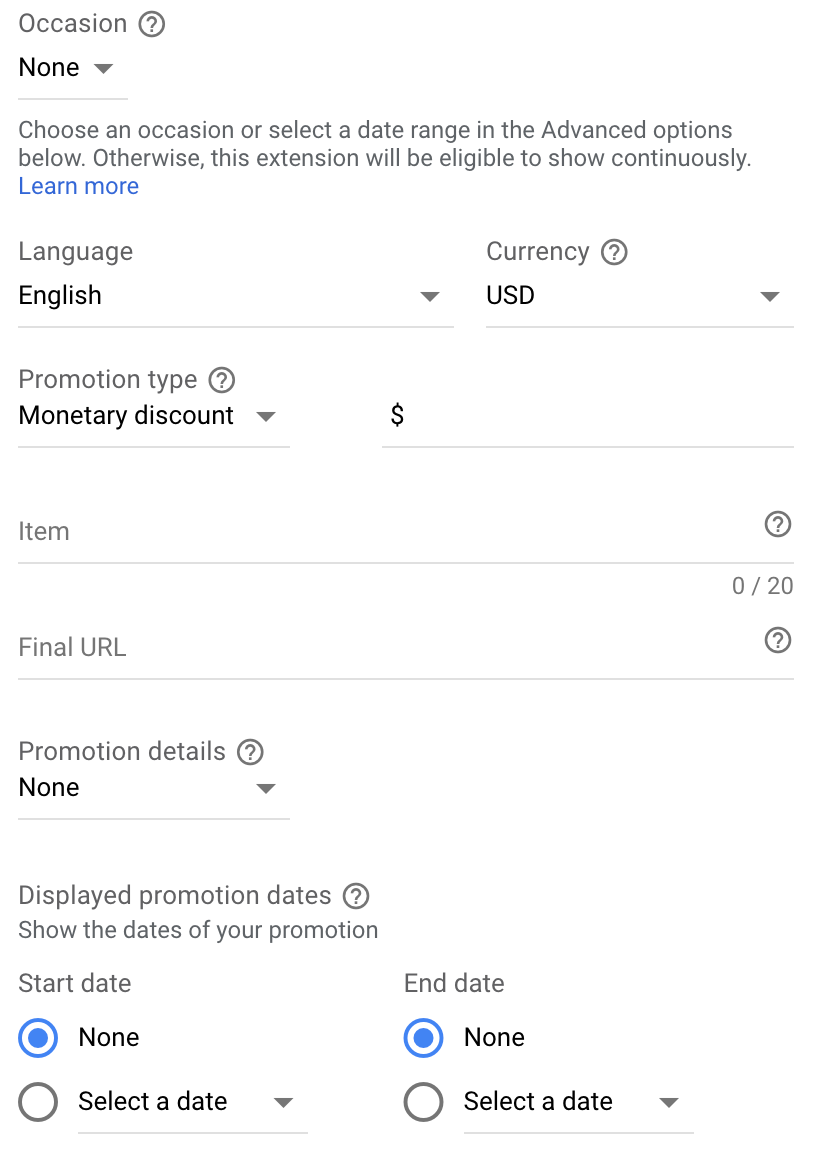
You’ll be filling out:
- The occasion (optional)
- The language
- The currency
- The promotion type: This is whether your discount is a percentage, or monetary value.
- The dollar or percentage amount of the discount
- The item: This is what you’re offering the discount on.
- The final URL: Direct your customers to the item the offer is for.
- The promotion details: This is where you can specify if you have a promo code or if the discount is only for orders over a certain amount.
- Displayed promotion dates: When does your offer start and end?
Like with other extensions, you can set URL options if needed, and schedule the times the ad shows if needed (although if your online promotion drives transactions completed by the customer, you may as well show it 24/7).
Spiffy–now you’re giving your eCommerce customers a time-sensitive reason to buy.
10. Image extensions
Everyone’s fighting the great fight to get their ads noticed first, before their competitors. That’s no secret. Do you know what catches attention better than any expertly drafted line of ad text?
Pictures. Take a brief trip back to your memories of grade school and think about how many words you were able to remember with the aid of images.
As a testament to their usefulness, check out what image extensions did for Estée Lauder in this Google case study:
“To inspire potential customers to learn more about these offerings, the brand turned to image extensions in August 2020. By adding relevant visuals that included product shots and lifestyle images to unbranded Search campaigns, Estée Lauder drove a 91% increase in click-through rate while seeing a 14% improvement in return on ad spend.”
Searchers are highly influenced by images, and even when your ad doesn’t take up much real estate, image extensions can still show, because they’re positioned to the right of your ad. This can even make your ad more appealing than a bigger, higher positioned ad without an image.

Pro tip: Image extensions are small in search ads, so don’t use images with text on them.
How to set up image extensions
For all their benefits, image extensions are the easiest to set up, especially now that Google has added a free stock images search to your image use options. You don’t even have to have your own images made to get started.
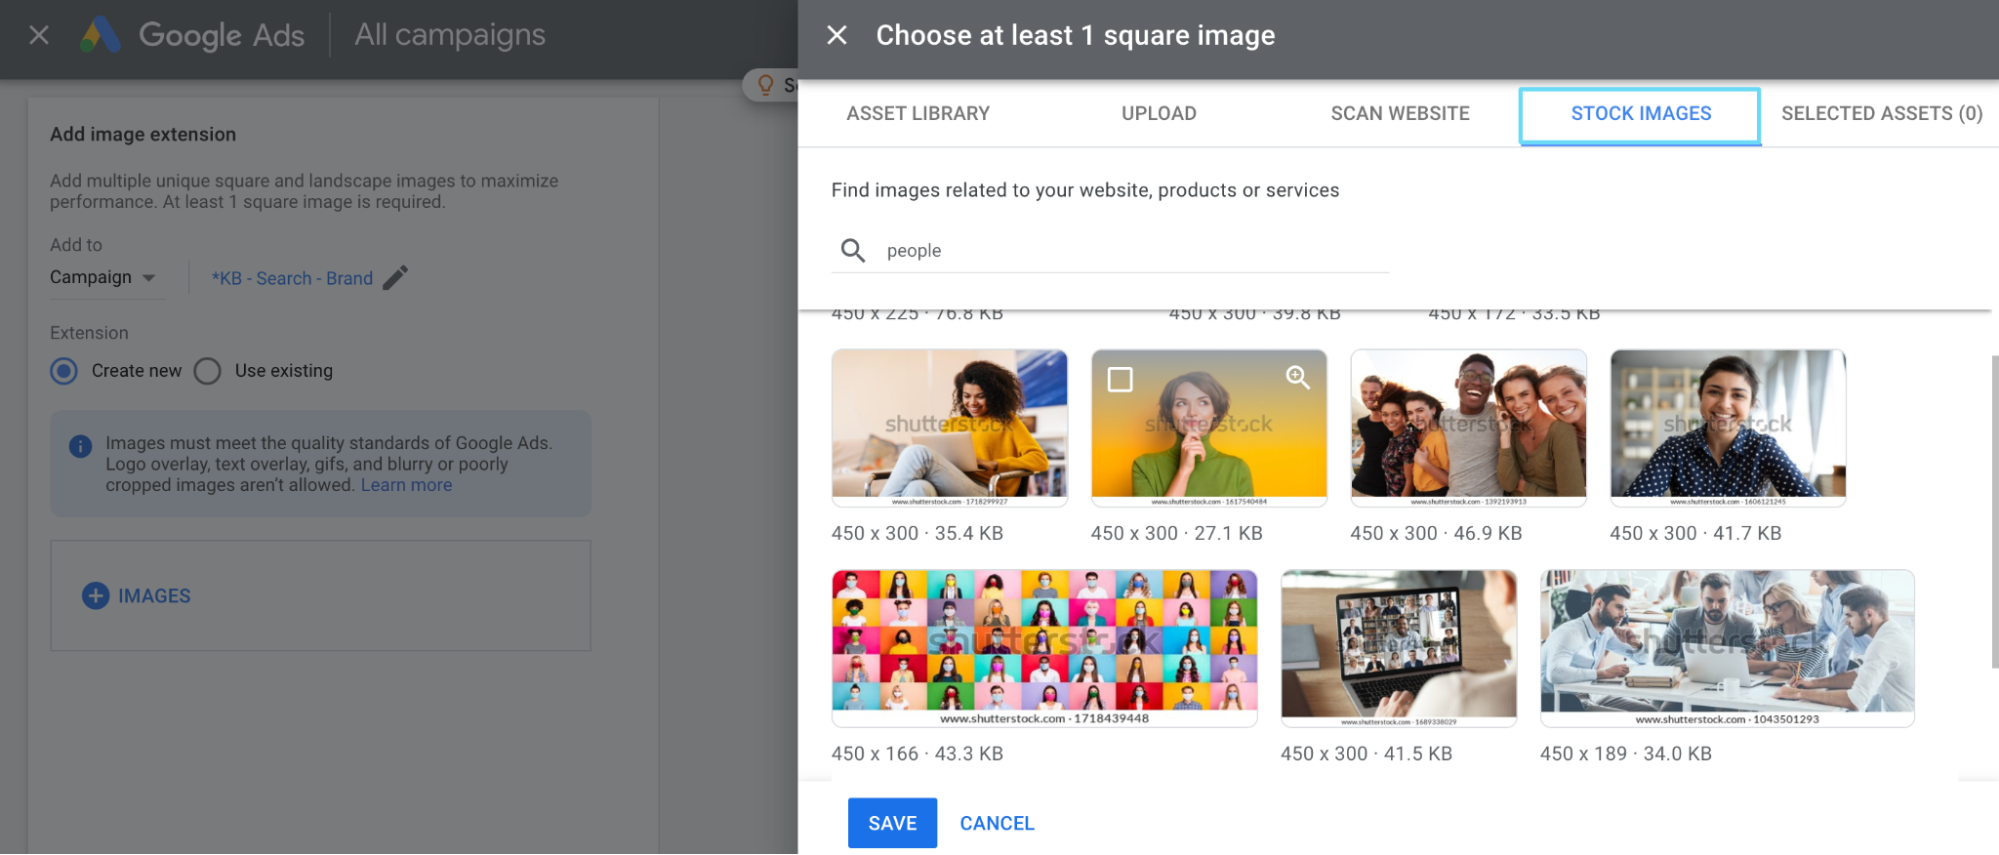
Selecting at least 1 square image is all you really have to do. Note that if you’re selecting stock images, the watermarks you see on them won’t be on the image when it shows in your extension.
One final thing to note is that the highest level an image extension can be applied to is the campaign.
11. Lead form extensions
If lead forms have a lot of value to your business, and you wish you could get the form in front of people sooner, test out lead extensions.
Lead extensions put a fillable form directly in your ad, allowing customers to fill out their information without even clicking the ad.

They do, however, come with some caveats–one being that they take longer to set up, and not everyone is eligible to use them.
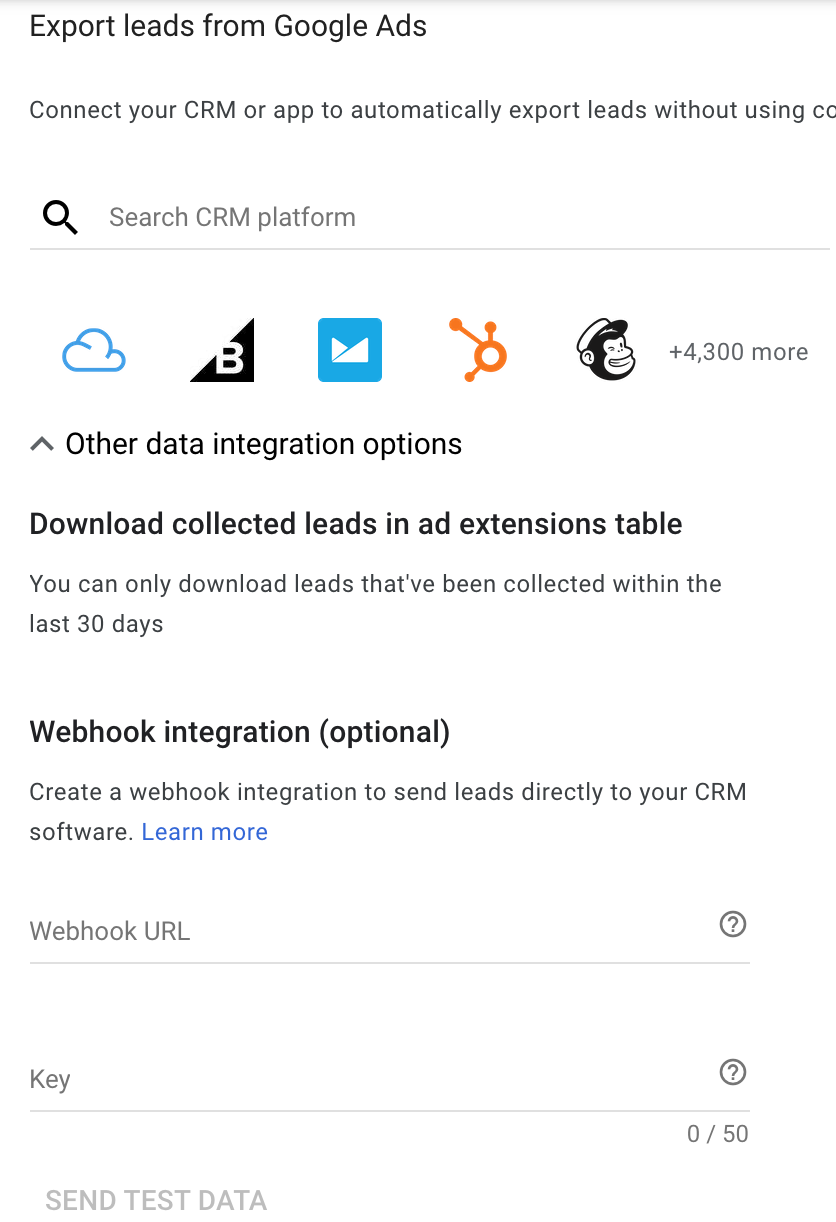
Another caveat: If you want your leads to be imported directly to your customer relationship management (CRM) tool when they’re submitted (as opposed to having to download them manually off of Google Ads), you’ll either need to set up a webhook integration, connect your CRM directly during the extension’s setup, or bring the leads over to your CRM using an integration platform like Zapier.
And, last but not least, it’s typical that leads received from lead form extensions may not be the best quality.
You’re putting your form in front of everyone without requiring a visit to your website, which inherently means you’ll get some bogus leads from people messing around, or even from bots. That can be a big waste of money, so keep an eye out.
How to create lead form extensions
First things first, once you’ve opened lead form extension creation, you’ll need to decide on your choices for those same first two settings, and then you’ll need to accept the terms of service.
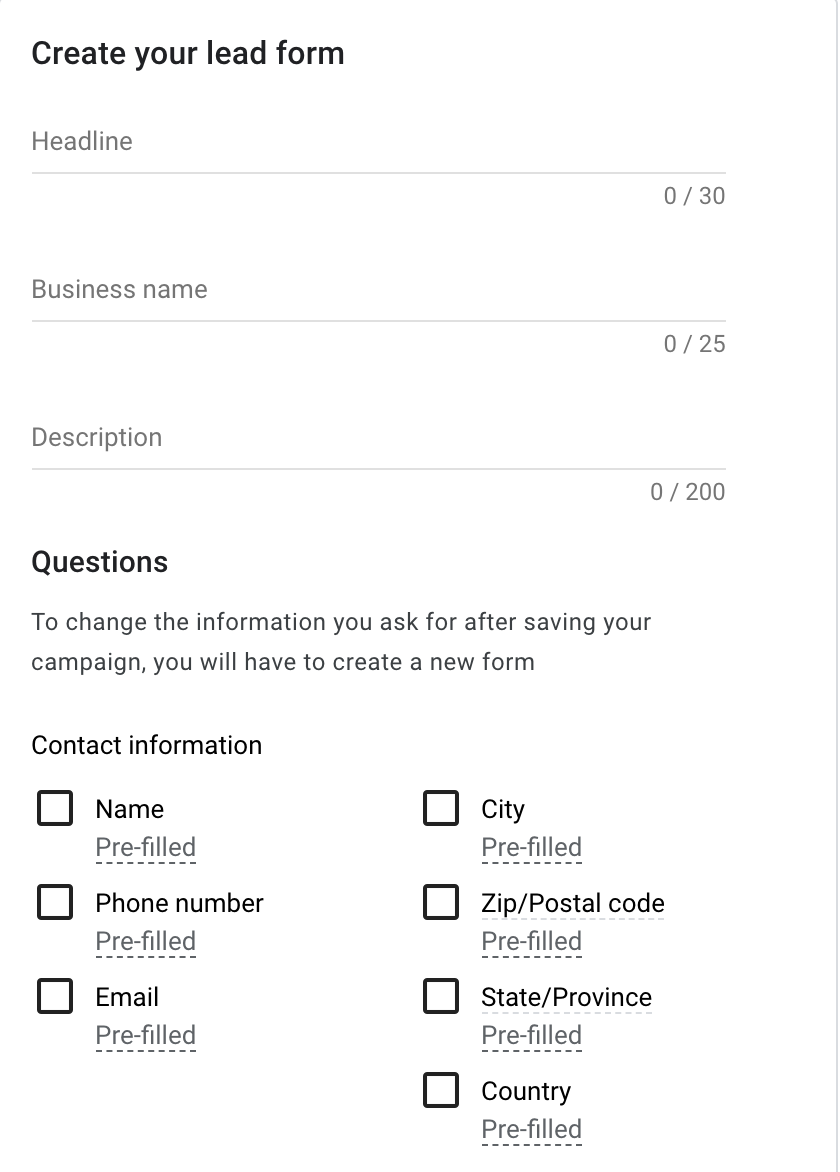
Then, you’ll first create the lead form itself, by setting up:
- The headline, your business name, and the description you want to show on the form
- The contact and work information: This is the information you want to collect from a lead. In some circumstances, Google may pre-fill these fields with customer info when it’s available.
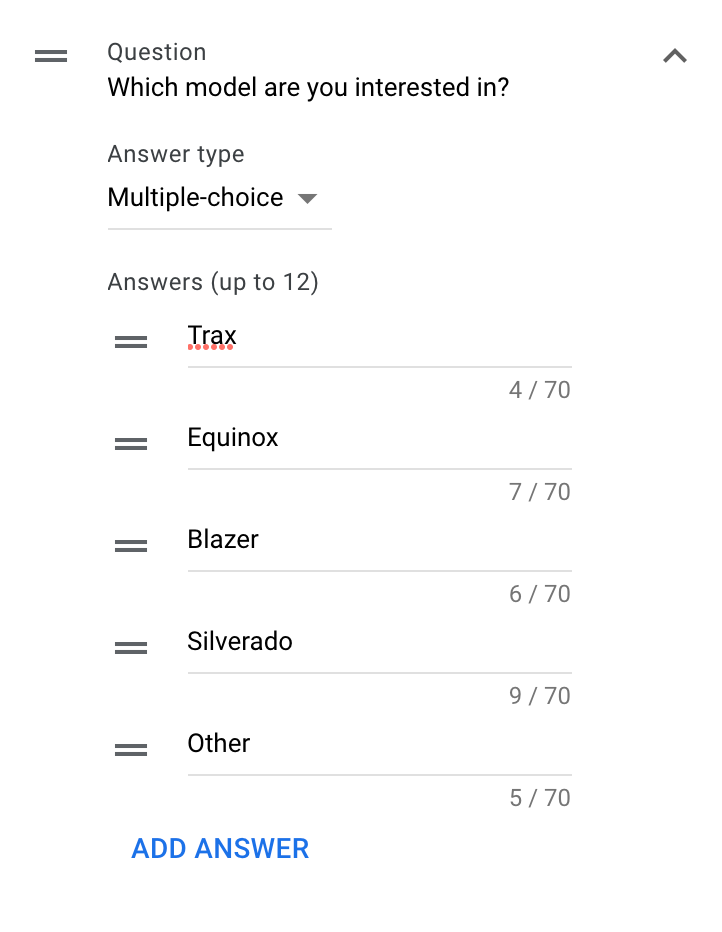
- The qualifying questions: This is other qualifying info you want to know from a lead. Google has a set list of options you can choose from, and you can choose whether the question’s answer is short response or multiple choice.
- The background image for the lead form
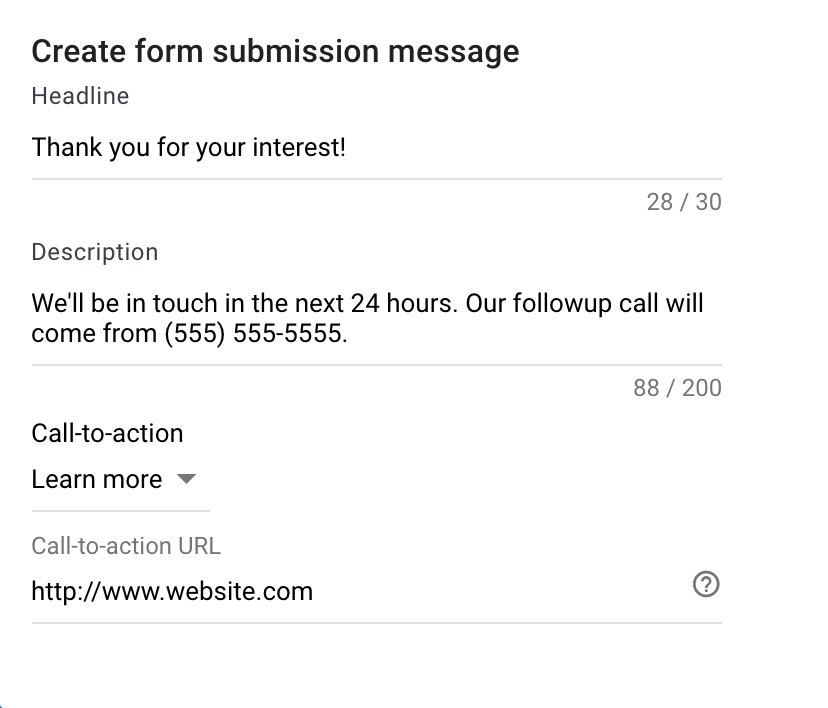
Next, you’ll create the thank you message that appears after a form is submitted.
Now, you’ll create the call to action that shows when your lead form button is compressed, before someone clicks to expand it.

And finally, you’ll set up how you want to export the leads you receive.
That just about sums it up–now you’re ready to start pulling in lead info from your ad extensions.
If you’re interested to know how you can make your ad only open the lead form extension when clicked (and not directly to your website), check this out.
12. Automated Extensions (AKA Dynamic Extensions)
We’ve already briefly covered how you can see which automated extensions are turned on and off in your account, and how to change that. So as a brief recap, the automated extension options available are:
- Dynamic sitelinks
- Dynamic callouts
- Dynamic structured snippets
- Seller ratings
- Longer ad headlines (this is when Google pushes a piece of your descriptions to your headlines)
- Automated app extensions
- Automated location extensions
Again, Google has complete control over these, so there’s nothing for you to do here except decide if you want them on or off.
Because these extensions are dynamic, you also won’t be able to see the extensions Google dynamically generated at any given time. So it’s a good idea to do a periodic check with the Ad Preview Tool to see if you can catch Google showing an extension in a way you’re not happy with. (Don’t get carried away doing this for hours.)
Curious how your automated extensions are performing?
Look at the automated extensions report to see.
5 essential ad extension tips smart advertisers follow
When it comes to making wise choices with ad extensions, we’ve been around the block more than a couple of times.
If you made it this far, then congrats–you now get access to a handful of important tips for success with ad extensions.
Use extensions that actually benefit your business
Each extension has a purpose, so when you’re thinking about which ones to use, think quality, not quantity.
In general, we recommend that everyone starts with at least the “main three:” Sitelinks, Callouts, and Structured Snippets (if there’s a Structured Snippet category useful to you).
Avoid extensions that don’t do anything for you, or won’t contribute to your primary goal.
For example, if you have a business location but it’s not open to customers, and all your transactions are online, don’t use location extensions. If you have a business phone number customers can call, but your ultimate goal is to have people submit a lead on your website, don’t use call extensions. You get the idea.
Sounds like a no-brainer, I know. But you would be surprised how many ads I’ve seen showing location extensions when the business’ office isn’t open to the public.
If your CPCs rise, don’t get rid of the extension
Sometimes cost-per-click (CPC) comes down when you implement ad extensions because they make your ad more relevant. However…sometimes your CPCs will rise because they’re helping make your ad more competitive, which means you’re getting higher positions, which could mean higher costs.
If you notice a rise in CPCs after you bring ad extensions in, don’t jump ship and abandon the extensions.
Look for other ways you can work toward reducing your CPC. Or, if your performance otherwise is ten times better after making extensions, maybe it’s time to consider increasing your budget to keep up with those CPCs.
Improve your ad rank if you want your extensions to show
Whether or not your ad extensions show depends highly on your page position. So if you’re struggling down at the bottom of the search results page pretty consistently, your extensions likely won’t show, or will show minimally.
If that’s the case, you won’t be seeing the positive return from adding ad extensions, because they won’t show enough for it to matter.
Increase your ad rank by raising your bids and working on your quality score.
Schedule your call extensions
To put it plainly, if you’re not planning to pick up a phone call after 5pm, don’t show your call extensions then, either. You’ll create a lot of waste by directing extension clicks to your voicemail, where people will either drop off, or become a cold lead. (You’ll have to call them back to get a hold of that lead, and you’ll probably just wind up playing phone tag.)
Split test your extensions
If you’re familiar with ad testing, then you know how even just a small change in ad copy can affect you in a really positive way.
Extensions are no different.
Constantly A/B split test your ad extensions against new, improved versions to see if you can keep exceeding your past performance peaks.
This will help you figure out what captures your customers’ attention the most, and maybe you can even start using those learnings on your ad copy or landing pages…
Over to you…
Most companies are taking advantage of some of the available Google Ads ad extensions, but are you taking advantage of all the ones that stand to benefit your business?
By now, you’ve gotten up close and personal with ad extensions, from the basics to the specifics. You know how to make them work for you, and that will get you a long way.
All that’s left is to jump in and start making them. From there, the benefits will keep stacking up.
If you’re ready for the next step in supercharging your CTR after getting your ad extensions up and running, check out 17 Speedy Ways To Increase CTR (Click-Through Rate) With Google Ads.


